PostgreSQL is an open-source database. Developers can create their database servers for any purpose. PostgreSQL provides an image for Docker, making it possible to build a database server in a controlled environment. For practice, the developer can control the server using only the Docker’ Easy Create’ and ‘Delete’ commands. The developer can learn various features and understand PostgreSQL before implementing a PostgreSQL database server for real-life projects.
Pros
Feature-rich
support for complex queries, indexing, JSON data types, full-text search, and more.
Open Source
PostgreSQL is freely available and can be modified and extended according to specific needs.
Scalability
PostgreSQL supports both vertical and horizontal scalability. Vertical scalability can be achieved by adding more resources to the existing server.
Community Support
PostgreSQL has a large and active developer community.
Cons
Resource Consumption
PostgreSQL may consume significant system resources, especially in large datasets or high-concurrency scenarios.
High Availability Setup
Implementing high availability and failover solutions in PostgreSQL.
Learning Curve
PostgreSQL, like any sophisticated database system, requires time for developers to use.
Software development
PostgreSQL
Database Management System (DBMS)
pgAdmin
Database Management Tool
Docker
Containerization Platform
Start creating a PostgreSQL database server.
Download and install Docker. The developer can download Docker from https://www.docker.com/ and follow the installation instructions. Docker supports various operating systems, such as Linux, Windows, and macOS, which run on Apple and Intel chips.
PostgreSQL Docker Hub
The developer can view images of the PostgreSQL version on Docker Hub.
1. Directory Structure Windows
C:\
└── workspace\
    └── postgres\
        ├── docker-compose.yml
2. Create a workspace for Docker-Compose. YML files.
#docker-compose.yml
version: '3.9'

services:
  db:
    image: postgres
    restart: always
    ports:
      - "5432:5432"
    environment:
      POSTGRES_USER: admin
      POSTGRES_PASSWORD: password
      POSTGRES_DB: demo
    volumes:
      - ./data:/var/lib/postgresql/data
    networks:
      postgres-network:
        ipv4_address: 172.20.0.2
  pgadmin:
    image: dpage/pgadmin4
    restart: always
    ports:
      - "5050:80"
    environment:
      PGADMIN_DEFAULT_EMAIL: [email protected]
      PGADMIN_DEFAULT_PASSWORD: password
    volumes:
      - ./pgadmin_data:/var/lib/pgadmin
    networks:
      postgres-network:
        ipv4_address: 172.20.0.3
networks:
  postgres-network:
    driver: bridge
    ipam:
      config:
        - subnet: 172.20.0.0/16
The docker-compose.yml file has two services, DB and pgAdmin, for managing the database. Recommend using a GUI tool, as it is easier than managing via the command line. Define networks using the same network for pgAdmin access and the database server, utilizing the intranet Docker environment.
Start the PostgreSQL database server and pgAdmin.
docker compose up
1. Docker pulls “postgres” and “dpage/pgadmin4” images defined in a docker-compose.yml file.
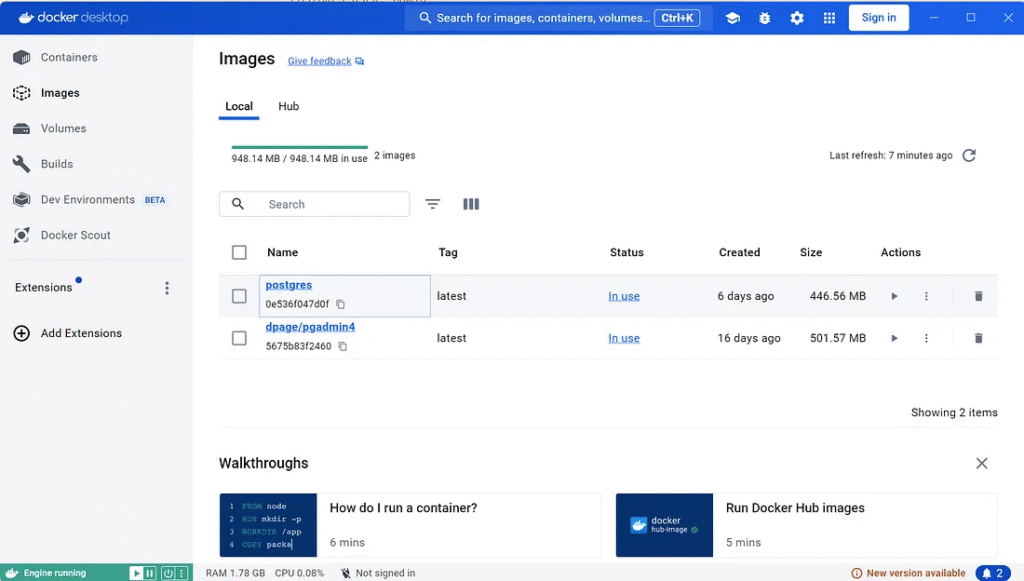
2. The PostgreSQL database server and pgAdmin status are running in the Docker containers tab.
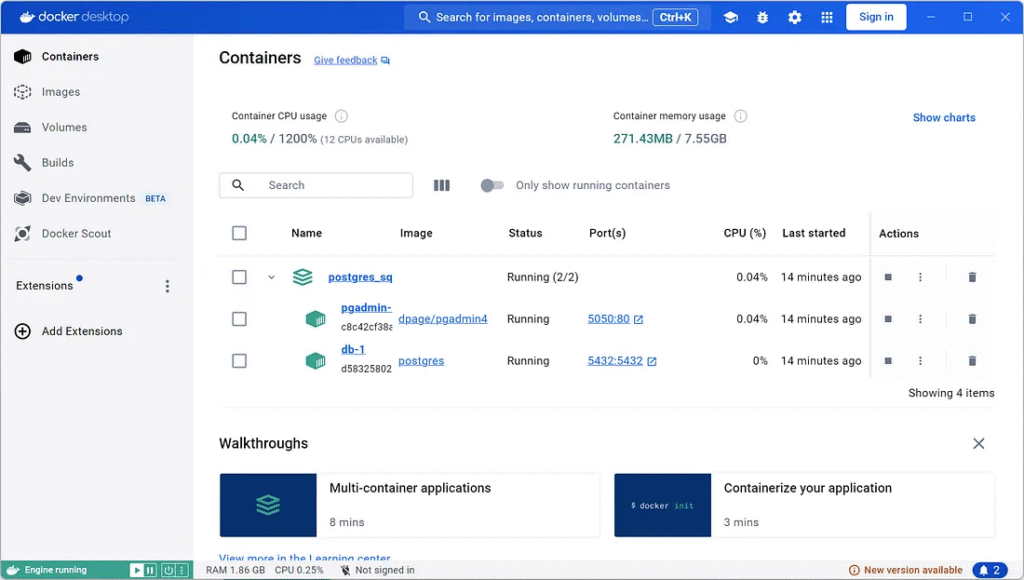
3. Check the Docker network.
docker network ls
NETWORK ID     NAME                        DRIVER    SCOPE
60ef17c700c7   bridge                      bridge    local
90e23212ded7   host                        host      local
61218b2c7675   none                        null      local
239141d8af76   postgres_default            bridge    local
ab85ba0ebc67   postgres_postgres-network   bridge    local
4. Check the Docker network for postgres_postgres-network.
docker network inspect postgres_postgres-network
[
    {
        "Name": "postgres_postgres-network",
        "Id": "ab85ba0ebc67fddbbe2aa962e4df703f4c3d325a85ad08c13267031276a1ddae",
        "Created": "2024-05-15T08:05:16.858935922Z",
        "Scope": "local",
        "Driver": "bridge",
        "EnableIPv6": false,
        "IPAM": {
            "Driver": "default",
            "Options": null,
            "Config": [
                {
                    "Subnet": "172.20.0.0/16"
                }
            ]
        },
        "Internal": false,
        "Attachable": false,
        "Ingress": false,
        "ConfigFrom": {
            "Network": ""
        },
        "ConfigOnly": false,
        "Containers": {
            "d6dec7f61c1625a575a262c624c4fb106989b7f34683c307d2c08cd50177c799": {
                "Name": "postgres-pgadmin-1",
                "EndpointID": "84a347cc41e6684b778b425eb93f07dc504d67ceeddde2b554b3cadba622eabe",
                "MacAddress": "02:42:ac:14:00:03",
                "IPv4Address": "172.20.0.3/16",
                "IPv6Address": ""
            },
            "e1695bd86dc966232fb6246ab586b8f40ef0b427483c38b89a33675a9ebd486a": {
                "Name": "postgres-db-1",
                "EndpointID": "657a97ca39eab4b585abec9d42321e598b1913aad0ae663cf428848fed020294",
                "MacAddress": "02:42:ac:14:00:02",
                "IPv4Address": "172.20.0.2/16",
                "IPv6Address": ""
            }
        },
        "Options": {},
        "Labels": {
            "com.docker.compose.network": "postgres-network",
            "com.docker.compose.project": "postgres",
            "com.docker.compose.version": "2.26.1"
        }
    }
]
5. The inspection shows the IP address and information of the PostgreSQL database server and pgAdmin.
Testing connects pgAdmin to the PostgreSQL database server.
1. Access pgAdmin using Chrome, Microsoft Edge, or Safari with the following URL: http://localhost:5050.
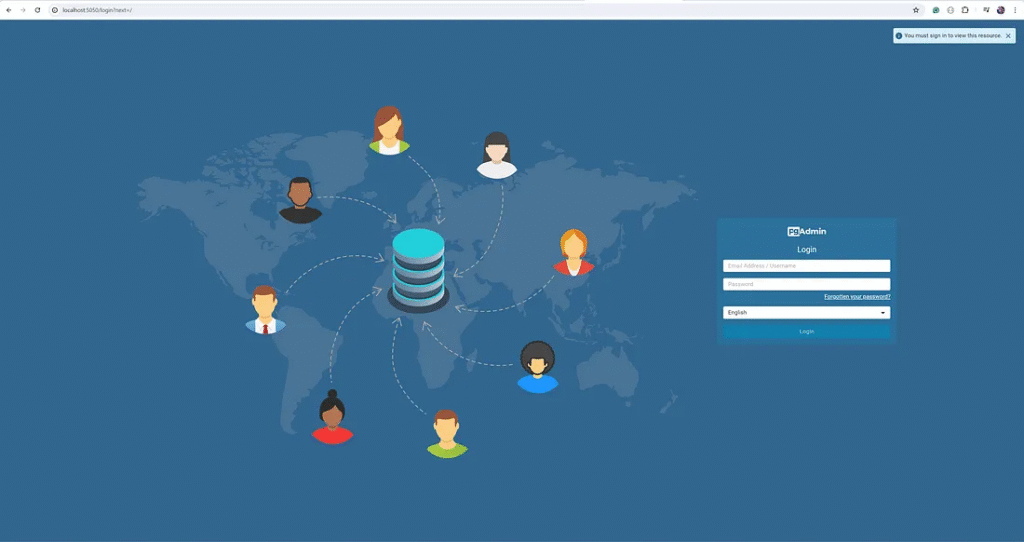
2. The developer can log in to pgAdmin using the username and password defined in the docker-compose.yml file.
Add a new server for the PostgreSQL database server.
1. In the general tab, input Name
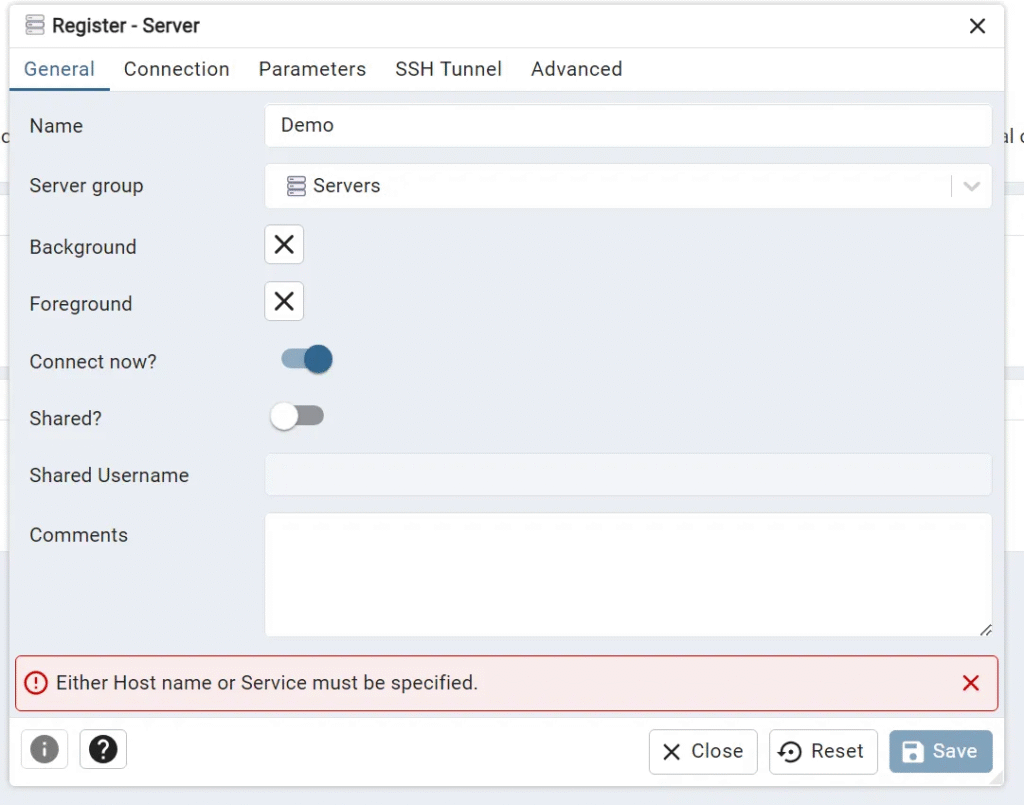
2. In the connection tab, the input value follows the value in the
docker-compose.yml file. Click the save button.
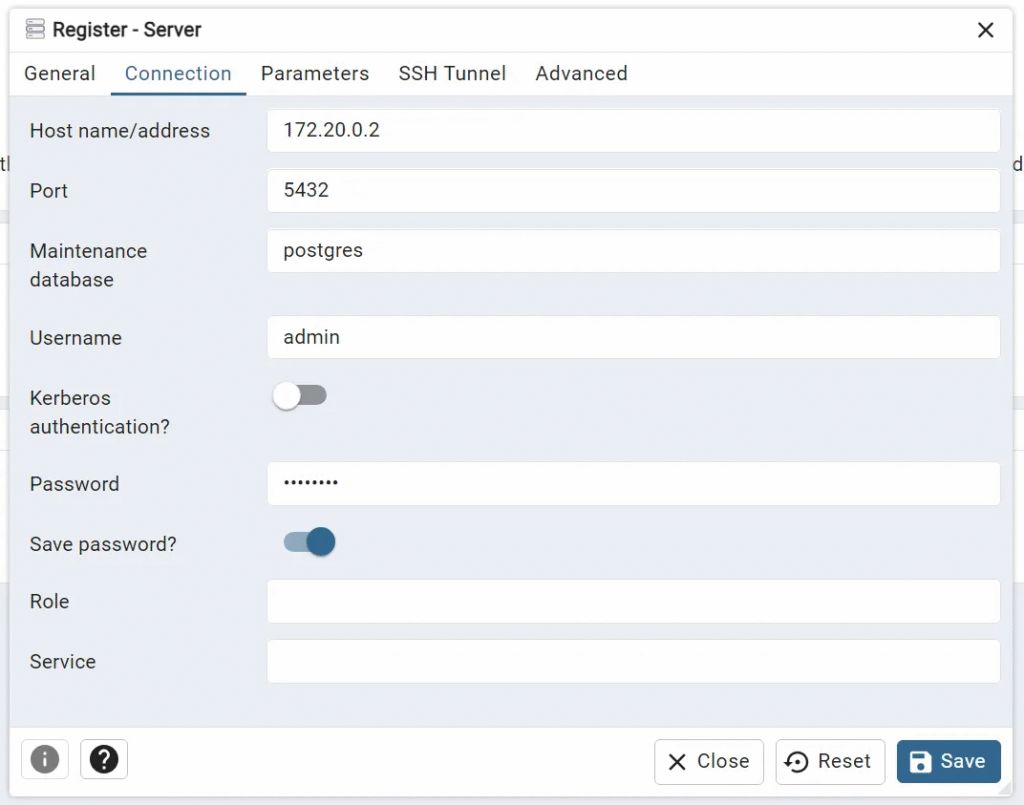

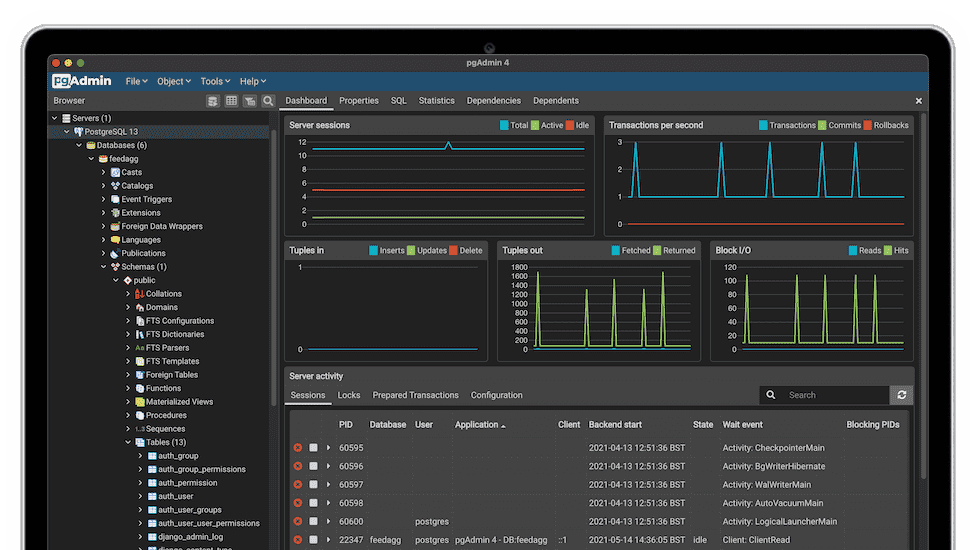
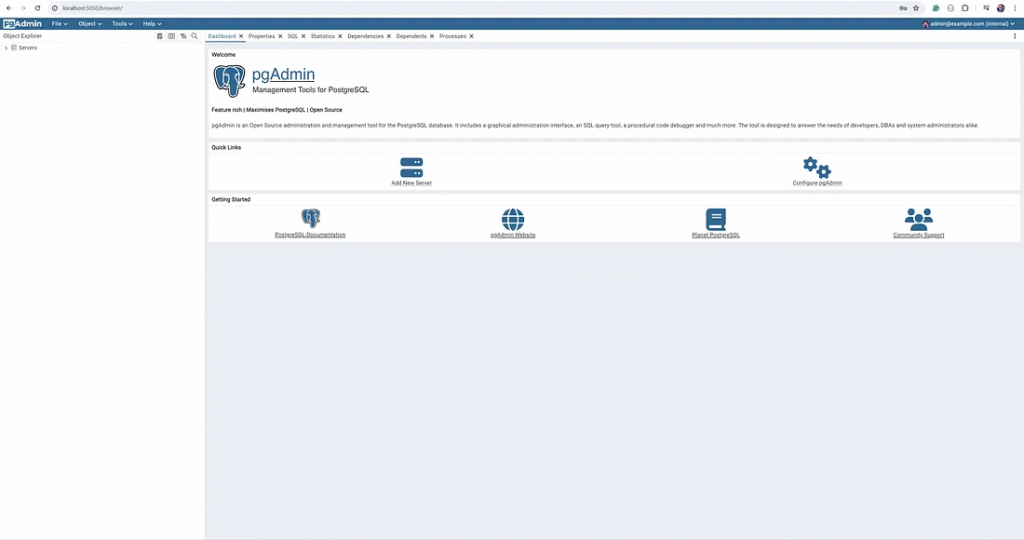
3. pgAdmin displays a general dashboard for monitoring the database and provides information about the database in the Object Explorer. It can also connect to the PostgreSQL database server, which is ready to manage the PostgreSQL database.
Testing the PostgreSQL database using pgAdmin
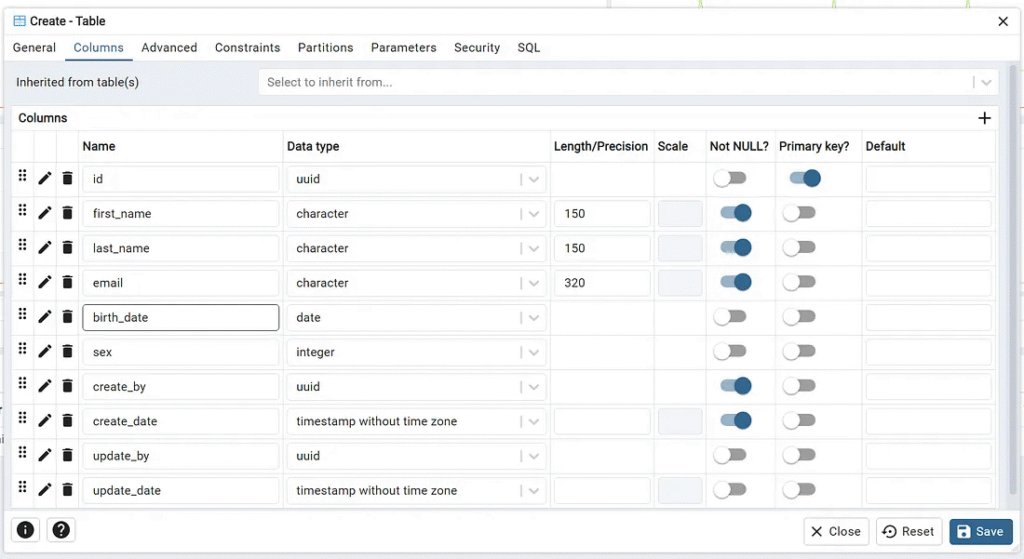
1. Create a table user_profiles using pgAdmin

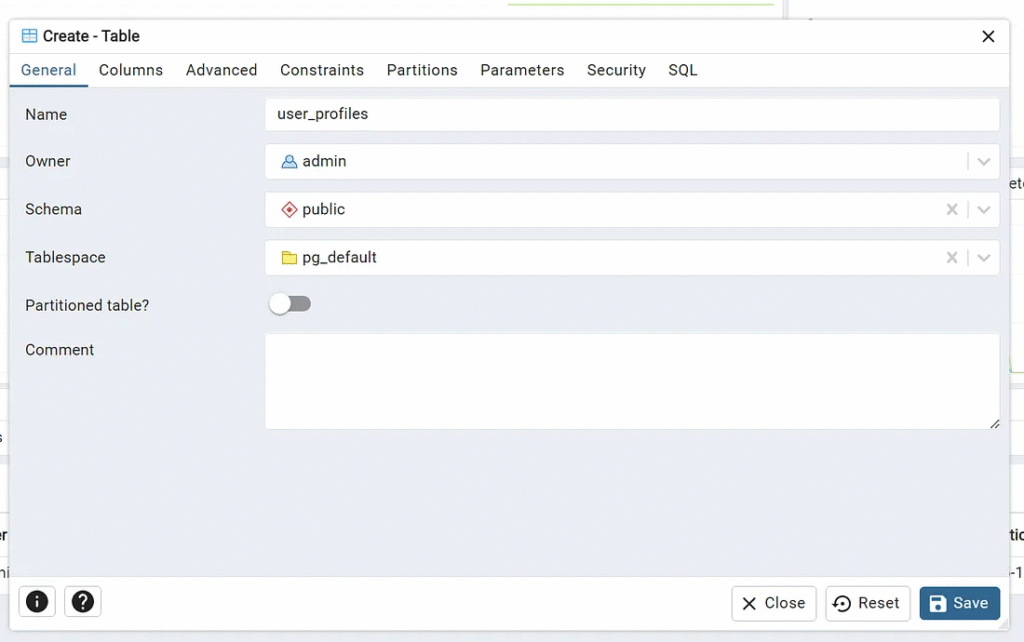
2. Create columns in the columns tab. Click the save button to execute the command to create a table. The developer can view or save SQL statements in the SQL tab.
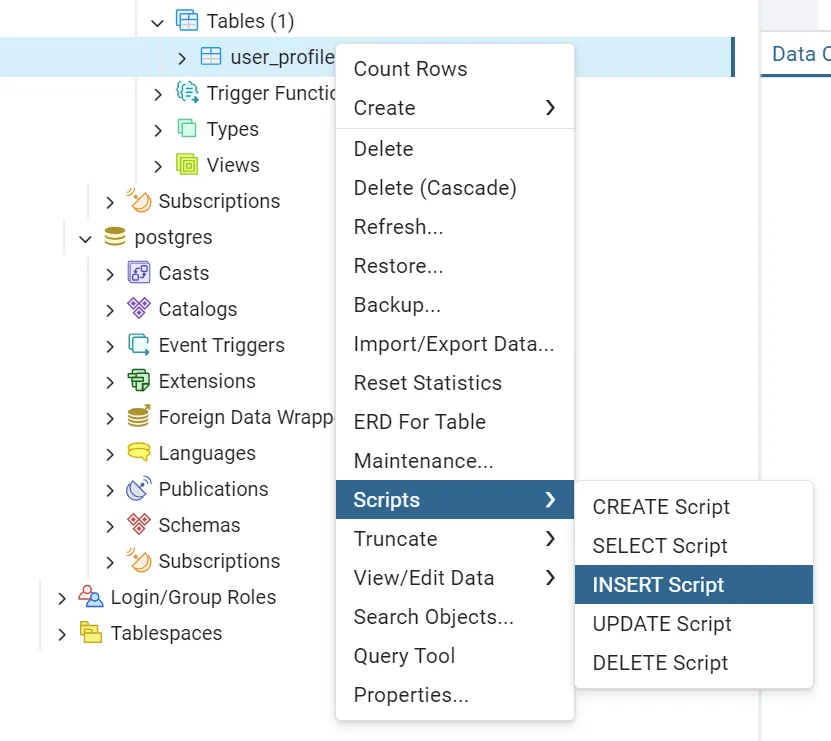
3. Insert data into the user_profiles table. pgAdmin provides a feature to generate an INSERT Script by right-clicking on the table and choosing Scripts -> INSERT Script.
INSERT INTO public.user_profiles(
 id, first_name, last_name, email, birth_date, sex, create_by, create_date, update_by, update_date)
 VALUES (gen_random_uuid (), 'John', 'Doh', '[email protected]', to_date('1989-01-06','YYYY-MM-DD'), 1, gen_random_uuid (), NOW(), null, null);
commit;
4. PostgreSQL database provides functions gen_random_uuid, NOW, and to_date. The developer should learn more functions that help the developer use the PostgreSQL database effectively.

Check the inserted row by the query tool.
SELECT * FROM public.user_profiles
ORDER BY id ASC

The data output shows the data in the user_profiles table correctly.
Conclusion
The PostgreSQL database server and pgAdmin can work appropriately inside Docker. pgAdmin can connect to the PostgreSQL database server via the network with the IP address correctly defined by the developer. The PostgreSQL database server can create a table and insert a row into it using pgAdmin.
Finally
This is a fundamental practice for learning to use Docker, the PostgreSQL database server, and pgAdmin. These tools offer many features; the developer should know them well to better understand basic software architecture.
This article was originally published on Medium.