
In today’s interconnected digital landscape, where applications increasingly rely on intricate distributed systems, a crucial architectural priority is fortifying APIs and service endpoints against potential threats such as denial-of-service attacks, cascading failures, or resource overutilization. Rate limiting is an indispensable technique to regulate the pace at which an API or service is consumed, ensuring optimal performance and resilience.
The Pivotal Role of API Gateways
Within distributed systems, centralizing the configuration and management of API consumption rates is a reasonable approach. By acting as a gatekeeper, an API Gateway can enforce predefined rate limits, allowing only requests within the permissible threshold to proceed to the API while promptly rejecting excess traffic with an HTTP “Too Many Requests” error. This strategic control mechanism safeguards the system from being overwhelmed by an influx of requests, thereby averting potential bottlenecks and performance degradation.

Spring Cloud Gateway: A Lightweight Yet Powerful Solution
Spring Cloud Gateway (SCG) is a lightweight and efficient component that seamlessly integrates rate-limiting capabilities into your application architecture. Its simplicity belies its potency, enabling developers to manage API consumption rates through concise configuration settings without extensive coding.
To incorporate SCG into your project, include the org.springframework.cloud:spring-cloud-starter-gateway Spring Boot Cloud dependency, and you’re ready to leverage its robust rate-limiting features through appropriate configuration settings.
Routing Requests with Precision
SCG executes incoming requests from the frontend to the backend services based on meticulously defined route configurations. These route definitions specify the conditions under which requests should be forwarded to specific backend endpoints, typically based on criteria such as request paths and headers.
For instance, the following YAML configuration snippet illustrates how to route requests targeting the “/backend” path to a backend service running on http://localhost:8081
spring:
  cloud:
    gateway:
      routes:
        - id: route1
          uri: http://localhost:8081
          predicates:
            - Path=/backend
Introducing the RequestRateLimiter Filter
Among the numerous gateway filters SCG offers, the RequestRateLimiter filter is a potent tool for enforcing rate limiting. This filter determines whether an incoming request should be permitted or has exceeded its allotted limit based on a configurable key resolution strategy.
By default, SCG resolves the key using the user’s Principal name, necessitating a secured gateway. However, developers can customize the critical resolution process by implementing the KeyResolver interface and plugging in their strategy for deriving the key from the ServerWebExchange object.
public interface KeyResolver {
    Mono<String> resolve(ServerWebExchange exchange);
}
To accommodate scenarios where the KeyResolver fails to resolve a key, SCG provides configuration options to deny such requests or allow them through, and specify a custom HTTP status code for empty vital responses.
# Allow requests with unresolved keys
spring.cloud.gateway.filter.request-rate-limiter.deny-empty-key=false

# Specify a custom status code for empty key responses
spring.cloud.gateway.filter.request-rate-limiter.empty-key-status-code=403
Leveraging Redis for Distributed Rate Limiting
Maintaining a rate-limiting state across multiple instances in a distributed system becomes paramount. SCG’s provided Redis implementation, based on the Token Bucket algorithm, offers a robust solution for managing rate limits in a distributed environment.
To utilize this implementation, developers must include the spring-boot-starter-data-redis Spring Boot starter dependency in their gateway application.
The Token Bucket algorithm maintains a “bucket” of tokens, replenished at a defined rate and consumed by incoming requests. This approach accommodates sporadic traffic bursts while adhering to the overall rate limit.

For example, consider the following configuration:
spring:
  cloud:
    gateway:
      routes:
        - id: route1
          uri: http://localhost:8081
          predicates:
            - Path=/backend
          filters:
            - name: RequestRateLimiter
              args:
                redis-rate-limiter.replenishRate: 500 # Replenish 500 tokens per second
                redis-rate-limiter.burstCapacity: 1000 # Maximum burst capacity of 1000 requests
                redis-rate-limiter.requestedTokens: 1 # Each request consumes 1 token
In this configuration, the rate limiter allows up to 500 requests per second, with a burst capacity 1000. If a sudden surge in traffic occurs, the system can accommodate up to 1000 requests before denying further requests for the next second, smoothing out traffic spikes while adhering to the defined rate limit.
Customizing Rate Limiting Strategies
Spring Cloud Gateway provides flexibility in implementing custom rate-limiting strategies by allowing developers to define their own RateLimiter implementation and configure it using a Spring Expression Language (SpEL) expression.
For instance, consider the following custom RateLimiter and KeyResolver beans:
@Bean
public KeyResolver customKeyResolver() {
    return exchange -> ... // Returns a Mono<String> representing the resolved key
}

@Bean
public RateLimiter customRateLimiter() {
    return ... // Custom RateLimiter implementation
}
These custom beans can then be configured for a specific route using SpEL expressions:
spring:
  cloud:
    gateway:
      routes:
        - id: route1
          uri: http://localhost:8081
          predicates:
            - Path=/backend
          filters:
            - name: RequestRateLimiter
              args:
                rate-limiter: "#{@customRateLimiter}" # Custom RateLimiter bean
                key-resolver: "#{@customKeyResolver}" # Custom KeyResolver bean
This approach enables developers to tailor rate-limiting strategies to their specific requirements, ensuring optimal performance and resource utilization for their APIs and services.
Rate Limiting Based on Client IP Addresses
An everyday use case for rate limiting is to enforce limits based on the client’s IP address, thereby preventing individual clients from overwhelming the system with excessive requests. SCG provides a straightforward mechanism to achieve this by implementing a custom KeyResolver that resolves the client’s IP address from the incoming ServerWebExchange.
@Component
public class ClientIpAddressResolver implements KeyResolver {
    @Override
    public Mono<String> resolve(ServerWebExchange exchange) {
        return Optional.ofNullable(exchange.getRequest().getRemoteAddress())
                .map(InetSocketAddress::getAddress)
                .map(InetAddress::getHostAddress)
                .map(Mono::just)
                .orElse(Mono.empty());
    }
}
This implementation extracts the client’s IP address from the RemoteAddress incoming request and returns it as the key for rate-limiting purposes.
When deploying behind a proxy or load balancer, the client’s originating IP address may be obscured. In such scenarios, SCG provides the XForwardedRemoteAddressResolver utility to handle forwarded IP addresses correctly.
@Primary
@Component
public class ProxyClientIpAddressResolver implements KeyResolver {
    @Override
    public Mono<String> resolve(ServerWebExchange exchange) {
        XForwardedRemoteAddressResolver resolver = XForwardedRemoteAddressResolver.maxTrustedIndex(1);
        InetSocketAddress inetSocketAddress = resolver.resolve(exchange);
        return Mono.just(inetSocketAddress.getAddress().getHostAddress());
    }
}
By annotating this implementation with @Primary, it takes precedence over other KeyResolver implementations, ensuring that the rate limiter correctly identifies clients even when deployed behind a proxy or load balancer.
Step-by-Step Guide: Redis Rate Limiting in Spring Boot API Gateway
Install and run Redis in a Docker container
Step 1: Pull the Redis Docker Image
Open a terminal and pull the latest Redis image from Docker Hub:
docker pull redis:latest
This will download the latest Redis image. The developer can specify a different version if needed (e.g., redis:6.2).
Step 2: Run Redis in a Docker Container
Start a Redis container with the following command:
docker run -d - name redis-container -p 6379:6379 redis:latest
Explanation
-d: Runs the container in detached mode (in the background).-name redis-container: Assign a name to the container, making it easier to reference later.-p 6379:6379: Maps port 6379 of the container to port 6379 on your localhost so the developer can connect to Redis on localhost:6379.redis:latest: Specifies the Redis image.
Step 3: Verify Redis is Running
To check if Redis is running, use:
docker ps
The developer should see the Redis container listed in the running containers.
Step 4: Connect to Redis
Now, the developer can connect to Redis using a Redis CLI or client on localhost:6379. The developer can also enter the container and use the Redis CLI directly:
docker exec -it redis-container redis-cli
Step 5: Stop and Remove the Container (Optional)
If the developer wants to stop and remove the container, the developer can use:
docker stop redis-container
docker rm redis-container
This will stop the container and remove it from your Docker environment.
Set up Spring Cloud API Gateway
The developer can use spring initializrthat for an easy setup to help create a Spring Boot project quickly.
Step 1: Add Maven dependency
  <!-- https://mvnrepository.com/artifact/org.springframework.cloud/spring-cloud-starter-gateway -->
  <dependency>
   <groupId>org.springframework.cloud</groupId>
   <artifactId>spring-cloud-starter-gateway</artifactId>
   <version>4.1.5</version>
  </dependency>
  <dependency>
   <groupId>org.springframework.boot</groupId>
   <artifactId>spring-boot-starter-data-redis-reactive</artifactId>
  </dependency>
Step 2: Config application.yml
spring:
  application:
    name: gateway-service
  redis:
    host: localhost
    port: 6379
  cloud:
    gateway:
      filter:
        request-rate-limiter:
          deny-empty-key: true
          empty-key-status-code: 403
      routes:
        - id: rate_limited_route
          uri: http://localhost:8080
          predicates:
            - Path=/greeting/**
          filters:
            - name: RequestRateLimiter
              args:
                redis-rate-limiter.replenishRate: 1  # number of requests per second
                redis-rate-limiter.burstCapacity: 5  # maximum number of requests in a single second
                key-resolver: "#{@userKeyResolver}"
server:
   port: 9090
management:
  endpoints:
    web:
      exposure:
        include: "*"
The developer can configure redis-rate-limiter.replenishRate and redis-rate-limiter.burstCapacity
Step 3: Create a configuration RateLimiterConfig
The developer uses IP as a custom token key for rate limiting.
import lombok.extern.slf4j.Slf4j;
import org.springframework.cloud.gateway.filter.ratelimit.KeyResolver;
import org.springframework.context.annotation.Bean;
import org.springframework.context.annotation.Configuration;
import reactor.core.publisher.Mono;

import java.util.Optional;

@Configuration
@Slf4j
public class RateLimiterConfig {

    @Bean
    KeyResolver userKeyResolver() {
        return exchange -> {
            String ip = Optional.ofNullable(exchange.getRequest().getRemoteAddress())
                    .map(address -> address.getAddress().getHostAddress())
                    .orElse("anonymous");

            if (ip.equals("0:0:0:0:0:0:0:1")) {
                ip = "127.0.0.1";
            }
            return Mono.just("ip_" + ip);
        };
    }
}
Set up Spring Webservice
Step 1: Add Maven dependency
<dependency>
   <groupId>org.springframework.boot</groupId>
   <artifactId>spring-boot-starter-actuator</artifactId>
</dependency>
<dependency>
   <groupId>org.springframework.boot</groupId>
   <artifactId>spring-boot-starter-web</artifactId>
</dependency>
<dependency>
   <groupId>org.springframework.boot</groupId>
   <artifactId>spring-boot-devtools</artifactId>
   <scope>runtime</scope>
   <optional>true</optional>
</dependency>
<dependency>
   <groupId>org.projectlombok</groupId>
   <artifactId>lombok</artifactId>
   <optional>true</optional>
</dependency>
Step 2: Config application.properties
spring.application.name=greeting-api
server.port = 8080
Step 3: Create RestController
import lombok.extern.slf4j.Slf4j;
import org.springframework.http.ResponseEntity;
import org.springframework.web.bind.annotation.GetMapping;
import org.springframework.web.bind.annotation.RestController;

@RestController
@Slf4j
public class GreetingController {

    @GetMapping(path = "/greeting")
    public ResponseEntity<String> greeting(){
        return ResponseEntity.ok().body("Hello World!");
    }

}
Testing: Redis Rate Limiting in Spring Boot API Gateway
For testing, the developer can use Postman to test Redis Rate Limiting.
Test greeting application
Create a Request for a test Greeting API, URL localhost:8080/greeting
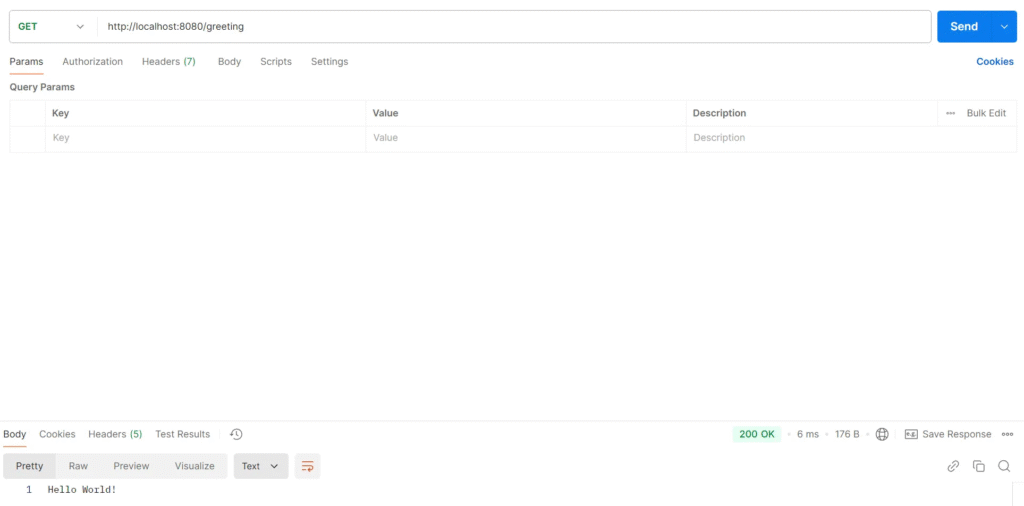
Test Result
The Greeting API responded correctly to the client.
Test API Gateway
Create a Request for a test API Gateway, URL localhost:9090/greeting
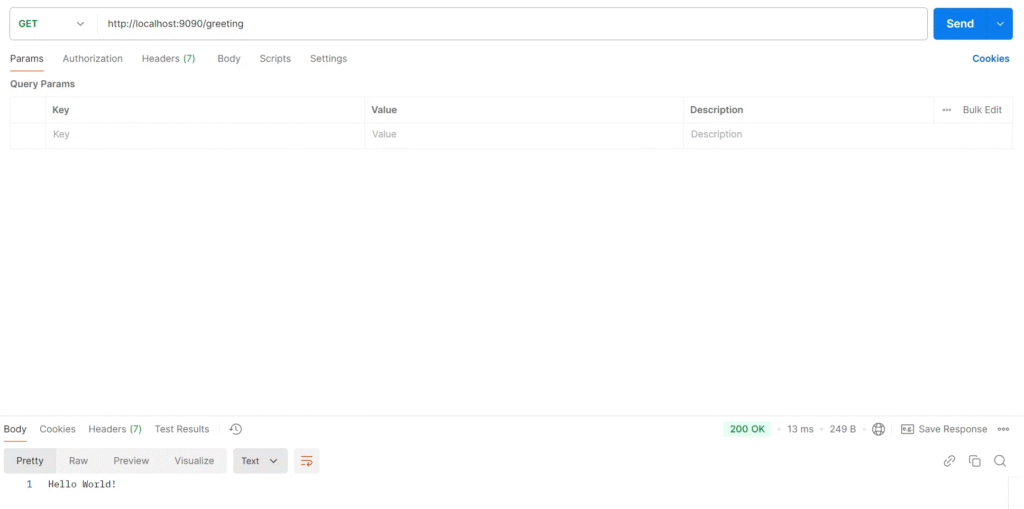
Check the response headers to see information about rate limiting.
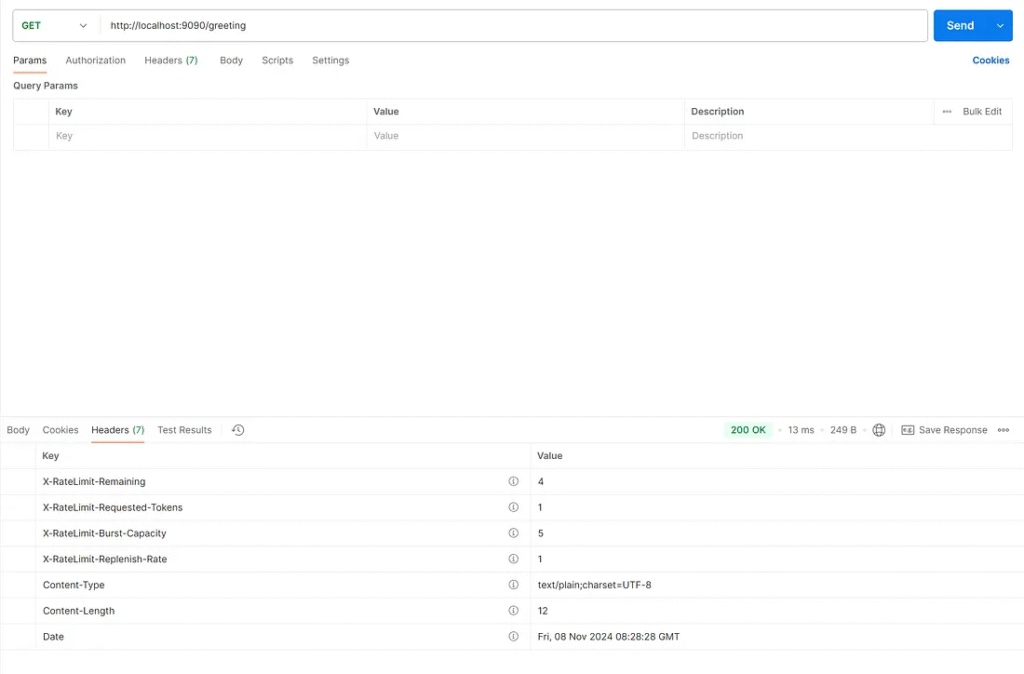
Test Result
The API Gateway responded correctly to the client, indicating that it can route requests to the Greeting API using the specified URI. localhost:8080
Test Redis Rate Limiting
1. Create a run collection.
Postman provides this feature, which helps developers send requests simultaneously to the API Gateway. The developer should check Persist responses for a session to view the response headers and body. Iterations: 10 requests simultaneously.
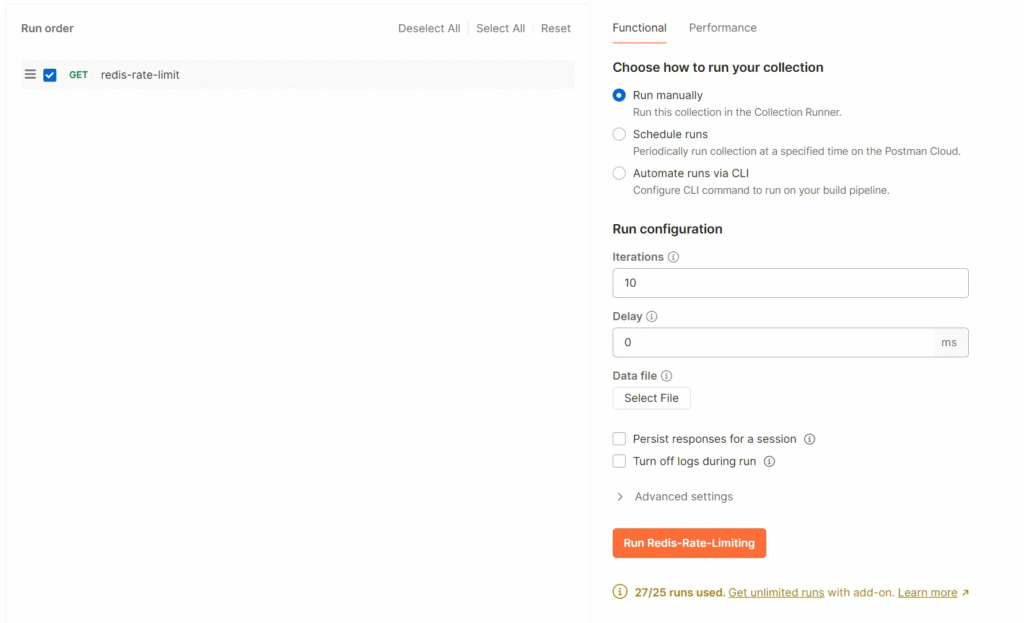
2. Execute the collection
by clicking Run Redis-Rate-Limiting the button.
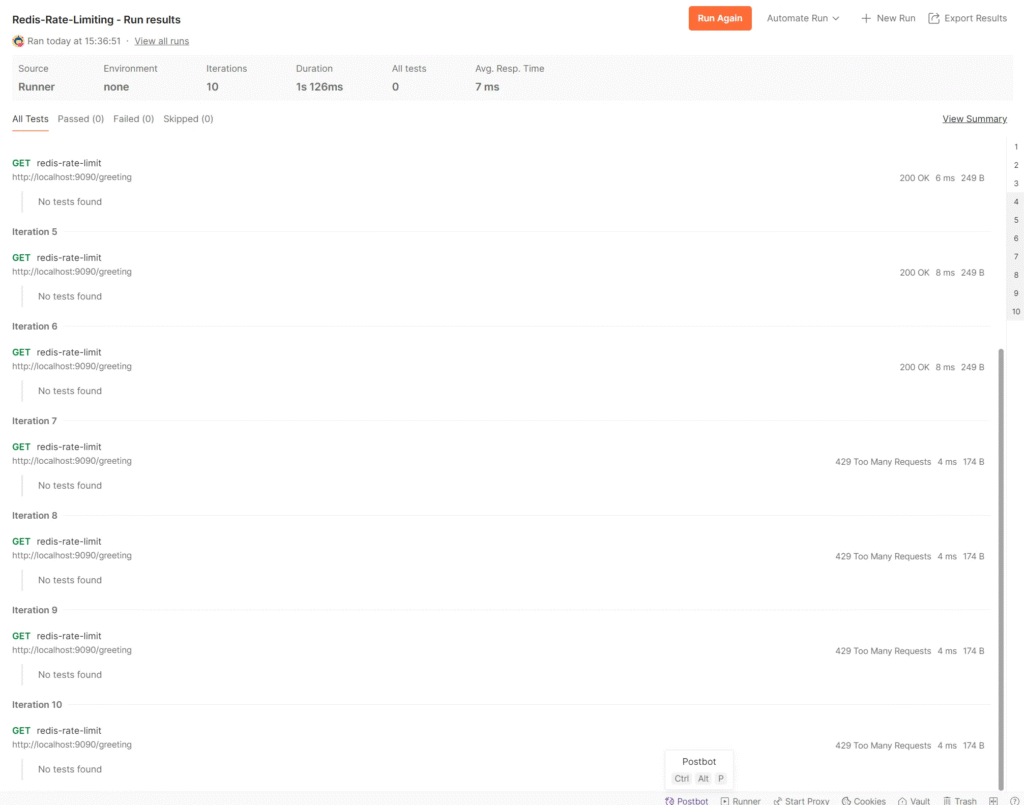
3. View the Redis-Rate-Limiting
Run results are detailed in each request.
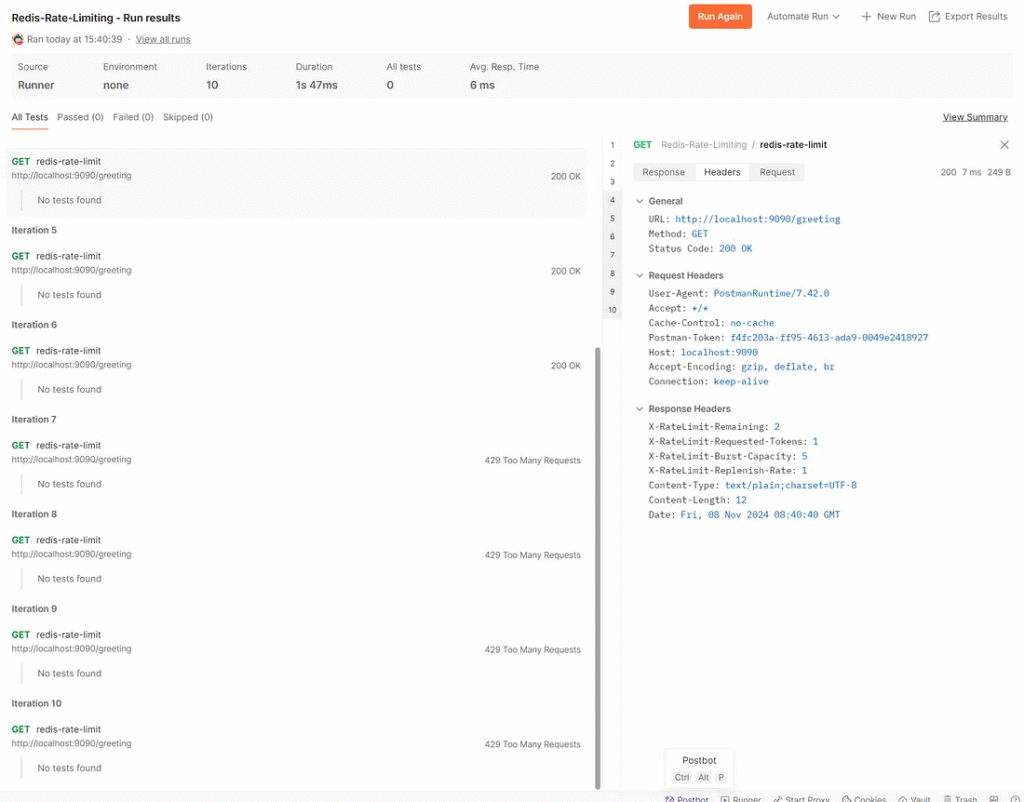
If the developer views headers X-RateLimit-Remaining:-1 That means the token is not stored on the Redis server. The developer should verify that the Redis server is started on the correct port, as the Gateway server doesn’t check the Redis server status when starting the API.
4. Check the error response HTTP status code 429
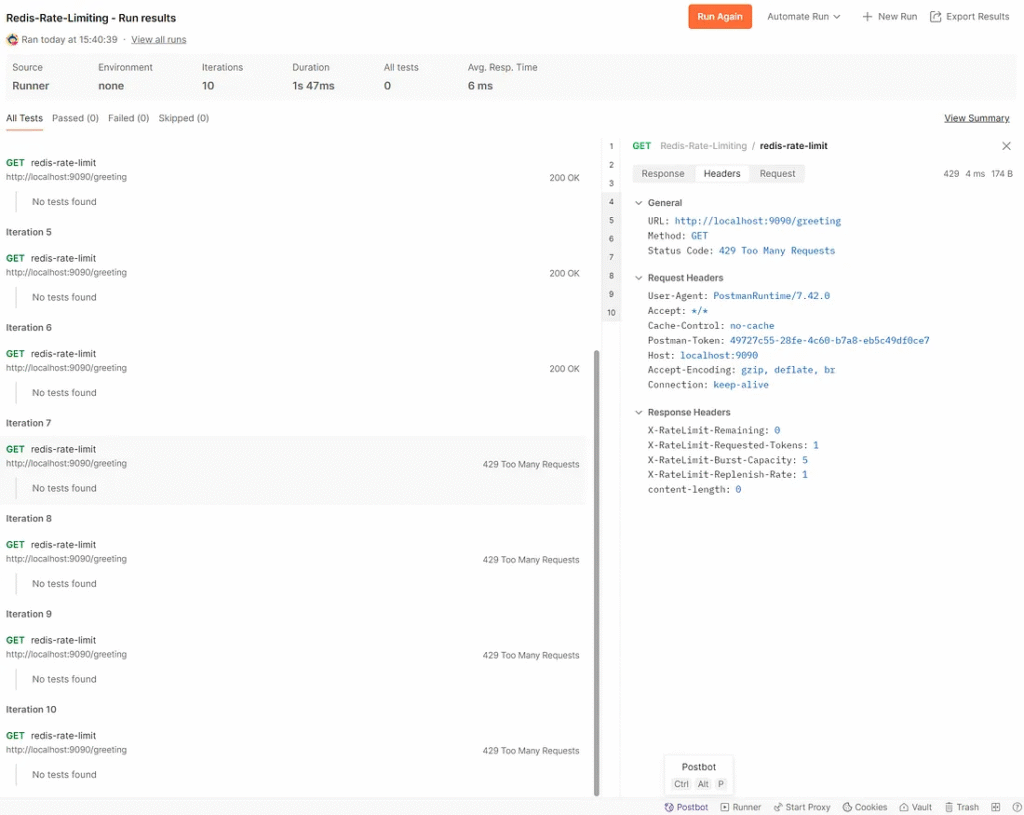
The developer views headersX-RateLimit-Remaining:0 , which means there are no tokens left for the request, then Redis Rate Limiting will return an HTTP status code 429. Too many requests.
Conclusion
In the intricate landscape of distributed systems, API Gateways play a pivotal role in safeguarding APIs and services from potential performance bottlenecks and resource overutilization. Spring Cloud Gateway’s rate-limiting capabilities, combined with the power of Redis and customizable rate-limiting strategies, empower developers to optimize their API performance and ensure a seamless user experience.
By leveraging rate-limiting techniques, developers can effectively mitigate the risks of denial-of-service attacks, cascading failures, and resource overuse, while simultaneously accommodating sporadic traffic bursts and tailoring rate-limiting strategies to their specific requirements.
As the demand for resilient and high-performing distributed systems continues to grow, the ability to effectively manage API consumption rates through rate limiting becomes an indispensable tool in every developer’s arsenal. With Spring Cloud Gateway’s comprehensive rate-limiting features, developers can confidently architect robust and scalable applications that deliver exceptional performance and reliability, even under the most demanding conditions.
Example Implementation
To illustrate the practical application of rate limiting with Spring Cloud Gateway, let’s explore a sample implementation that enforces rate limits based on the client’s IP address.
Step 1: Configure the Route
First, we need to configure a route that is subject to rate limiting. In this example, we’ll listen for requests on the /example endpoint and forward them to http://custom-service.
@Bean
public RouteLocator customRoutes(RouteLocatorBuilder locatorBuilder) {
    return locatorBuilder.routes()
        .route("custom_route", predicate -> predicate
            .path("/example")
            .filters(filter -> filter.requestRateLimiter(rateLimiter -> rateLimiter.setRateLimiter(customRateLimiter())))
            .uri("http://custom-service"))
        .build();
}
In this configuration, we set up a route named custom_route that matches requests made to the /example endpoint. We then apply the RequestRateLimiter filter, which will use a custom RateLimiter Implementation is defined by the customRateLimiter bean.
Step 2: Implement the KeyResolver
Next, we must define an KeyResolver implementation that resolves the client’s IP address from the incoming request.
@Component
public class ClientIpAddressResolver implements KeyResolver {
    @Override
    public Mono<String> resolve(ServerWebExchange exchange) {
        return Optional.ofNullable(exchange.getRequest().getRemoteAddress())
                .map(InetSocketAddress::getAddress)
                .map(InetAddress::getHostAddress)
                .map(Mono::just)
                .orElse(Mono.empty());
    }
}
This implementation extracts the client’s IP address from the RemoteAddress incoming request and returns it as the key for rate-limiting purposes.
Step 3: Configure the Rate Limiter
Finally, we must configure the rate limiter, specifying the desired rate-limiting parameters.
@Bean
public RedisRateLimiter customRateLimiter() {
    return new RedisRateLimiter(10, 20, 1);
}
In this example, we’re using the RedisRateLimiter implementation provided by Spring Cloud Gateway. The constructor arguments specify the following rate-limiting parameters:
replenishRate: The rate at which tokens are replenished in the token bucket (10 per second).burstCapacity: The maximum number of tokens allowed in the token bucket (20 tokens).requestedTokens: The number of tokens consumed by each incoming request (1 token per request).
With this configuration, the rate limiter will allow up to 10 requests per second from each unique client IP address, with a burst capacity of 20 requests. If a client exceeds the burst capacity, subsequent requests will be denied until the token bucket is replenished.
By combining these components, we’ve effectively implemented a rate-limiting strategy that enforces limits based on the client’s IP address, ensuring that no single client can overwhelm the system with excessive requests.
Monitoring and Logging
While rate limiting is an effective technique for managing API consumption rates, it’s essential to monitor and log the rate-limiting activities to gain insights into the system’s performance and identify potential issues or abuse patterns.
Spring Cloud Gateway provides built-in support for logging rate-limiting events, which can be customized through configuration settings. For example, the developer can adjust the log level for rate-limiting events or enable more detailed logging by setting the following properties:
# Set the log level for rate limiting events
logging.level.org.springframework.cloud.gateway.filter.ratelimit=DEBUG

# Enable detailed logging for rate limiting events
spring.cloud.gateway.filter.request-rate-limiter.log-requests=true
Additionally, developers can integrate Spring Cloud Gateway with monitoring and observability tools like Prometheus, Grafana, or Elastic Stack to visualize and analyze real-time rate-limiting metrics. These tools can provide valuable insights into the system’s performance, helping developers identify potential bottlenecks, optimize rate-limiting strategies, and proactively address potential issues.
Performance Tuning and Best Practices
While Spring Cloud Gateway’s rate-limiting capabilities offer a powerful solution for managing API consumption rates, there are several best practices and performance-tuning considerations to keep in mind:
- Caching: Implement caching mechanisms to reduce the load on backend services and improve overall system performance. Spring Cloud Gateway integrates seamlessly with caching solutions like Redis or Hazelcast, allowing developers to cache frequently accessed data and reduce the number of requests that need to be processed by backend services.
- Load Balancing: In a distributed environment, the developer must distribute incoming traffic across multiple instances of the API Gateway to prevent bottlenecks and ensure high availability. Spring Cloud Gateway supports various load balancing strategies, including round-robin, weighted round-robin, and least-connection, allowing developers to choose the most appropriate strategy for their use case.
- Circuit Breakers: Implement circuit breakers to prevent cascading failures and protect your system from overloading. Spring Cloud Gateway integrates with Netflix Hystrix, providing out-of-the-box circuit breaker functionality that can automatically failover to a fallback response or alternative service when a backend service becomes unresponsive or experiences high latency.
- Timeouts and Retries: Configure appropriate timeouts and retry policies for downstream service calls to prevent requests from hanging indefinitely and consuming valuable resources. Spring Cloud Gateway provides configuration options to set timeouts and retry policies for various scenarios, such as connection timeouts, read timeouts, and retry attempts.
- Resource Monitoring: Monitor system resources like CPU, memory, and network usage to identify potential bottlenecks and optimize resource allocation. Spring Cloud Gateway integrates with various monitoring tools and frameworks, allowing developers to collect and analyze real-time performance metrics.
- Horizontal Scaling: As your system’s load increases, consider scaling your API Gateway horizontally by adding more instances to distribute the load across multiple nodes. Spring Cloud Gateway supports various deployment strategies, including containerization with Docker and orchestration with Kubernetes, making it easy to scale your API Gateway infrastructure as needed.
By following these best practices and performance tuning recommendations, the developer can ensure that the Spring Cloud Gateway-based API Gateway remains highly performant, resilient, and capable of handling even the most demanding workloads.


