
A Spring Boot 3 application using Springdoc, a popular choice.
The developer can use the documents to communicate with the front-end developer. The developer can add descriptions of web services to the code and generate a document in JSON, HTML, ASCII text, or PDF format.
The key benefits of using Swagger
Swagger UI provides a web-based interface that allows users to interact with the API, view all endpoints, and understand the request and response formats without needing to read the source code.
The developer team reduced the time needed to create and maintain API documentation.
Swagger can generate client SDKs in various programming languages, making it easy for API consumers to integrate them into their applications.
Swagger allows you to define security schemes (like OAuth, JWT, etc.) and apply them to your API endpoints.
Integrate Swagger with Spring Boot 3 Using Springdoc.
1. Add Dependencies to “pom.xml”.
<!-- https://mvnrepository.com/artifact/org.springdoc/springdoc-openapi-starter-webmvc-ui -->
<dependency>
    <groupId>org.springdoc</groupId>
    <artifactId>springdoc-openapi-starter-webmvc-ui</artifactId>
    <version>2.6.0</version>
</dependency>
2. Create Spring Boot controllers.
import com.example.swagger.bean.UserProfileBean;
import io.swagger.v3.oas.annotations.Operation;
import io.swagger.v3.oas.annotations.media.Schema;
import io.swagger.v3.oas.annotations.responses.ApiResponse;
import io.swagger.v3.oas.annotations.responses.ApiResponses;
import io.swagger.v3.oas.annotations.tags.Tag;
import jakarta.validation.Valid;
import org.springframework.http.HttpStatus;
import org.springframework.http.MediaType;
import org.springframework.http.ResponseEntity;
import org.springframework.web.bind.annotation.PostMapping;
import org.springframework.web.bind.annotation.RequestBody;
import org.springframework.web.bind.annotation.RestController;

@Tag(name = "RESTful API User profile", description = "Manage user profile data.")
@RestController
public class UserProfileController {

    @PostMapping(path = "/user", produces = "application/json")
    @Operation(
            summary = "create user profile.",
            description = "create user profile and insert to database.")
    @ApiResponses(value = {
            @ApiResponse(responseCode = "201", description = "Successful operation",
                    content = @io.swagger.v3.oas.annotations.media.Content(mediaType = MediaType.APPLICATION_JSON_VALUE, schema = @Schema(implementation = UserProfileBean.class))),
            @ApiResponse(responseCode = "400", description = "Invalid request")
    })
    public ResponseEntity<String> create(@Valid @RequestBody UserProfileBean userProfile) {
        return new ResponseEntity<>("created", HttpStatus.CREATED);
    }

}
3. Create a user profile bean.
import jakarta.validation.constraints.Min;
import jakarta.validation.constraints.NotEmpty;
import lombok.Data;
import lombok.Getter;
import lombok.Setter;
@Getter
@Setter
public class UserProfile {
@NotEmpty
private String firstName;
@NotEmpty
private String lastName;
private String effectiveDate;
@Min(0)
private long age;
public UserProfile(String firstName,String lastName, int age, String effectiveDate){
this.firstName = firstName;
this.lastName = lastName;
this.effectiveDate = effectiveDate;
this.age = age;
}
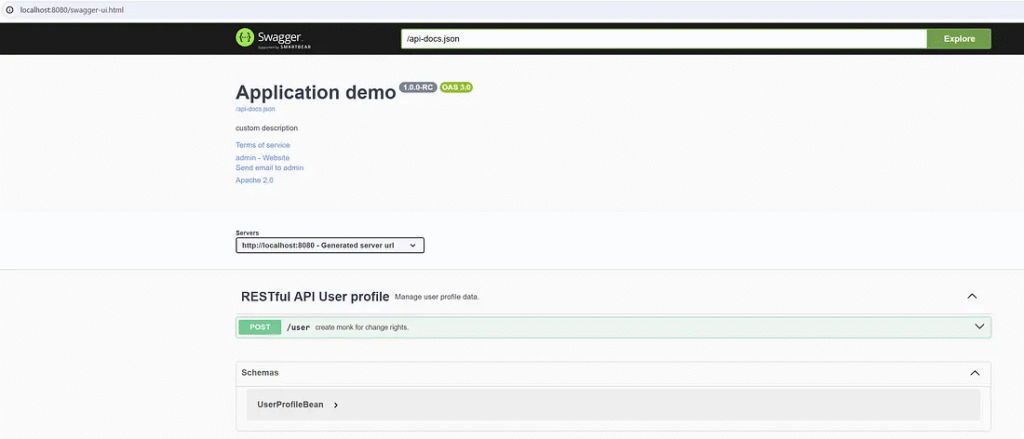
}4. Run the application and access the Swagger UI.
“http://localhost:8080/swagger-ui.html”.
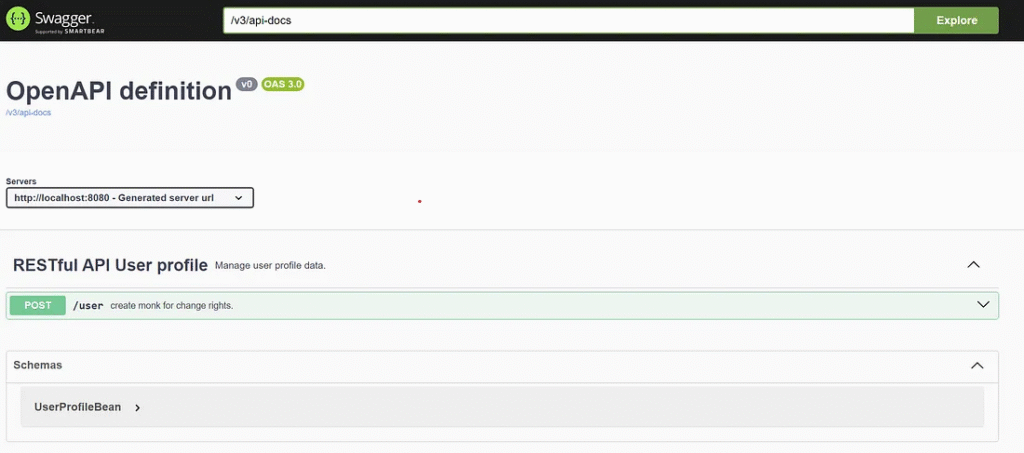
5. The developer can access the Swagger Specification.
“http://localhost:8080/v3/api-docs”
{
   "openapi":"3.0.1",
   "info":{
      "title":"OpenAPI definition",
      "version":"v0"
   },
   "servers":[
      {
         "url":"http://localhost:8080",
         "description":"Generated server url"
      }
   ],
   "tags":[
      {
         "name":"RESTful API User profile",
         "description":"Manage user profile data."
      }
   ],
   "paths":{
      "/user":{
         "post":{
            "tags":[
               "RESTful API User profile"
            ],
            "summary":"create user profile.",
            "description":"create user profile and insert to database.",
            "operationId":"create",
            "requestBody":{
               "content":{
                  "application/json":{
                     "schema":{
                        "$ref":"#/components/schemas/UserProfileBean"
                     }
                  }
               },
               "required":true
            },
            "responses":{
               "201":{
                  "description":"Successful operation",
                  "content":{
                     "application/json":{
                        "schema":{
                           "$ref":"#/components/schemas/UserProfileBean"
                        }
                     }
                  }
               },
               "400":{
                  "description":"Invalid request",
                  "content":{
                     "application/json":{
                        "schema":{
                           "type":"string"
                        }
                     }
                  }
               }
            }
         }
      }
   },
   "components":{
      "schemas":{
         "UserProfileBean":{
            "required":[
               "firstName",
               "lastName"
            ],
            "type":"object",
            "properties":{
               "firstName":{
                  "type":"string"
               },
               "lastName":{
                  "type":"string"
               },
               "effectiveDate":{
                  "type":"string"
               },
               "age":{
                  "minimum":0,
                  "type":"integer",
                  "format":"int64"
               }
            }
         }
      }
   }
}
Description in Java bean.
1. The developer can add a description in the Java bean to explain the variable.
By using Schema annotation.
import io.swagger.v3.oas.annotations.media.Schema;
import jakarta.validation.constraints.Min;
import jakarta.validation.constraints.NotEmpty;
import lombok.Getter;
import lombok.Setter;
@Getter
@Setter
public class UserProfileBean {
@Schema(example = "John", description = "First name")
@NotEmpty
private String firstName;
@Schema(example = "Doe", description = "Last name")
@NotEmpty
private String lastName;
@Schema(example = "16/07/2024", description = "Effective date")
private String effectiveDate;
@Schema(example = "24", description = "Age(year)")
@Min(0)
private long age;
public UserProfileBean(String firstName,String lastName, int age, String effectiveDate){
this.firstName = firstName;
this.lastName = lastName;
this.effectiveDate = effectiveDate;
this.age = age;
}
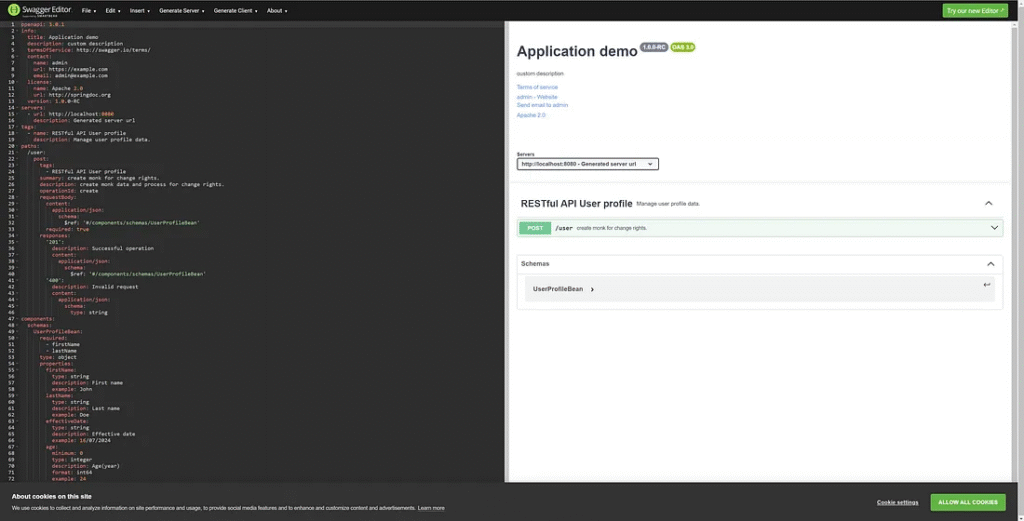
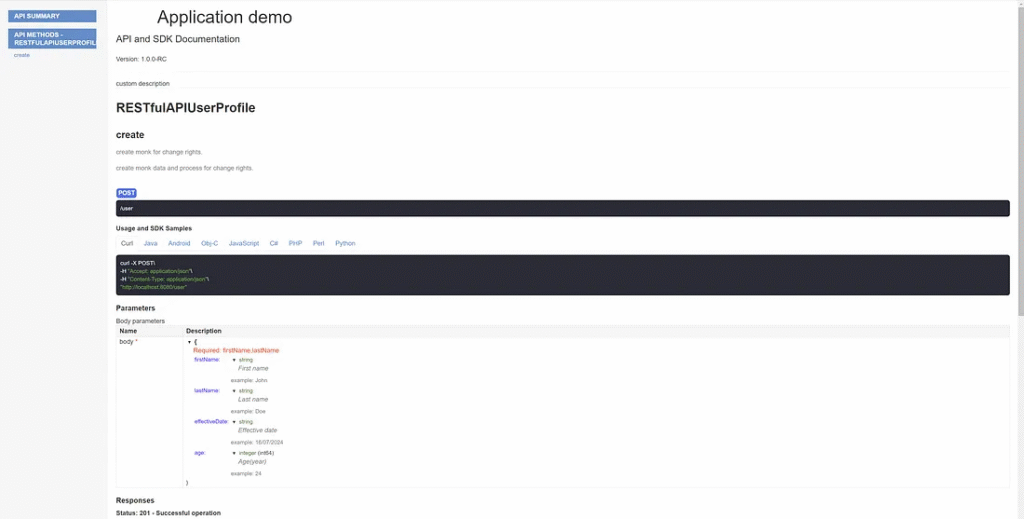
}2. Access Swagger UI. The developer clicks to expand the schema tab.
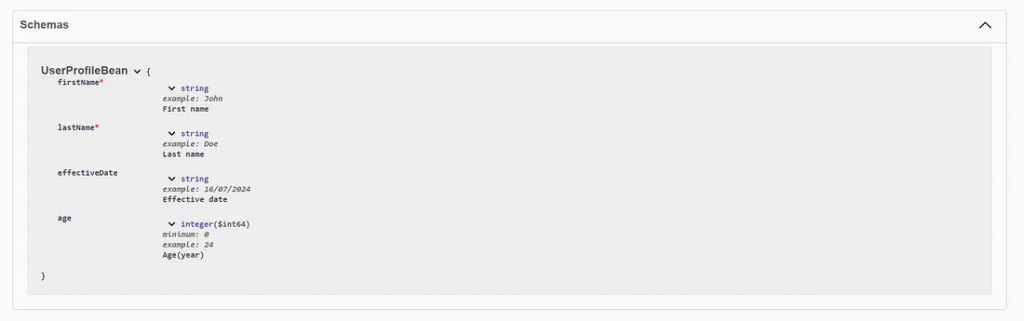
3. In the schema tab, information about variables in Java Bean is shown.
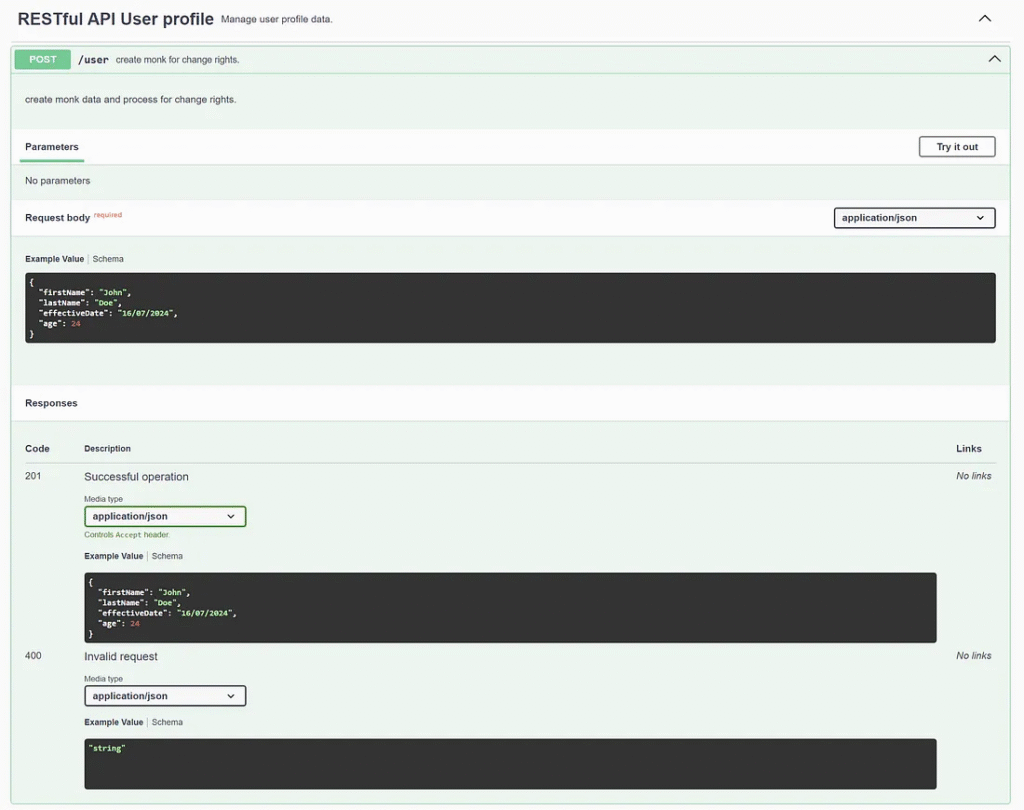
4. The post tab shows an example value about variables in Java Bean.
Custom Swagger Specification.
1. The developer can customize the Swagger Specification by using the Configuration annotation. The developer can add, edit, or remove tags in the specification.
import io.swagger.v3.oas.models.OpenAPI;
import io.swagger.v3.oas.models.info.Info;
import io.swagger.v3.oas.models.info.License;
import org.springframework.context.annotation.Bean;
import org.springframework.context.annotation.Configuration;

@Configuration
public class ConfigurationOpenAPI {
    @Bean
    public OpenAPI customOpenAPI() {

        return new OpenAPI().info(new Info()
                .title("Custom Title")
                .version("custom version")
                .description("custom description")
                .contact(new io.swagger.v3.oas.models.info.Contact().name("admin").url("https://example.com").email("admin@example.com"))
                .termsOfService("http://swagger.io/terms/")
                .license(new License().name("Apache 2.0").url("http://springdoc.org")));
    }

}
2. Access Swagger Specification.
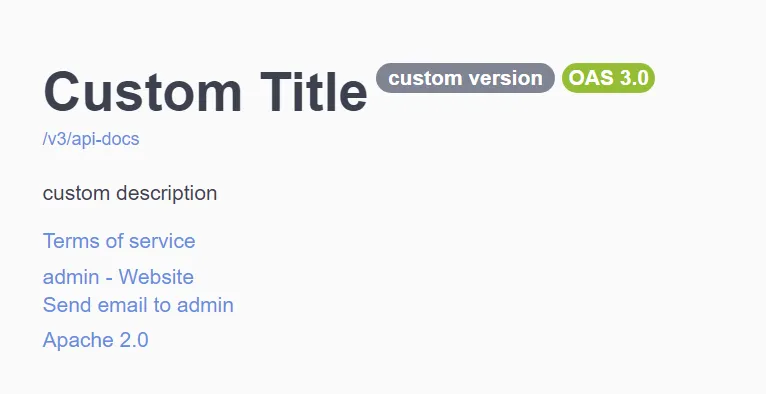
{
   "openapi":"3.0.1",
   "info":{
      "title":"Custom Title",
      "description":"custom description",
      "termsOfService":"http://swagger.io/terms/",
      "contact":{
         "name":"admin",
         "url":"https://example.com",
         "email":"admin@example.com"
      },
      "license":{
         "name":"Apache 2.0",
         "url":"http://springdoc.org"
      },
      "version":"custom version"
   },
   "servers":[
      {
         "url":"http://localhost:8080",
         "description":"Generated server url"
      }
   ],
   "tags":[
      {
         "name":"RESTful API User profile",
         "description":"Manage user profile data."
      }
   ],
...
Custom Swagger Specification with application properties.
1. The developer can use the value from application.properties and put it in the Swagger Specification.
2. In the application.properties file.
springdoc.title=Application demo
springdoc.version=1.0.0-RC
3. In configuration.
import io.swagger.v3.oas.models.OpenAPI;
import io.swagger.v3.oas.models.info.Info;
import io.swagger.v3.oas.models.info.License;
import org.springframework.beans.factory.annotation.Value;
import org.springframework.context.annotation.Bean;
import org.springframework.context.annotation.Configuration;

@Configuration
public class ConfigurationOpenAPI {
    @Bean
    public OpenAPI customOpenAPI(@Value("${springdoc.title}") String title, @Value("${springdoc.version}") String appVersion) {
        return new OpenAPI().info(new Info()
                .title(title)
                .version(appVersion)
                .description("custom description")
                .contact(new io.swagger.v3.oas.models.info.Contact().name("admin").url("https://example.com").email("admin@example.com"))
                .termsOfService("http://swagger.io/terms/")
                .license(new License().name("Apache 2.0").url("http://springdoc.org")));
    }

}
4. Access Swagger Specification.
{
   "openapi":"3.0.1",
   "info":{
      "title":"Application demo",
      "description":"custom description",
      "termsOfService":"http://swagger.io/terms/",
      "contact":{
         "name":"admin",
         "url":"https://example.com",
         "email":"admin@example.com"
      },
      "license":{
         "name":"Apache 2.0",
         "url":"http://springdoc.org"
      },
      "version":"1.0.0-RC"
   },
   "servers":[
      {
         "url":"http://localhost:8080",
         "description":"Generated server url"
      }
   ],
...
5. The title and version values have been updated according to the application.properties file.
Generate Swagger Specification into documentation.
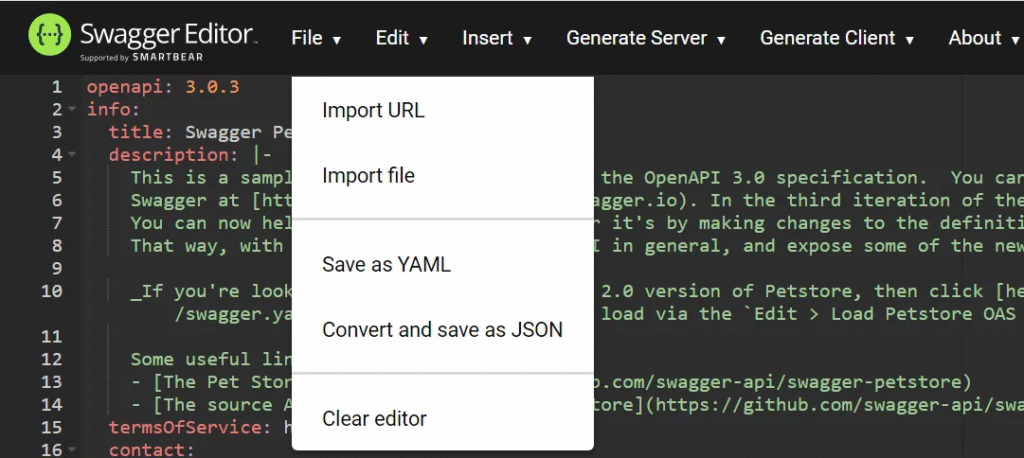
1. Swagger provides a website called Swagger Editor. link
2. Swagger Editor converts Swagger Specification into a document.
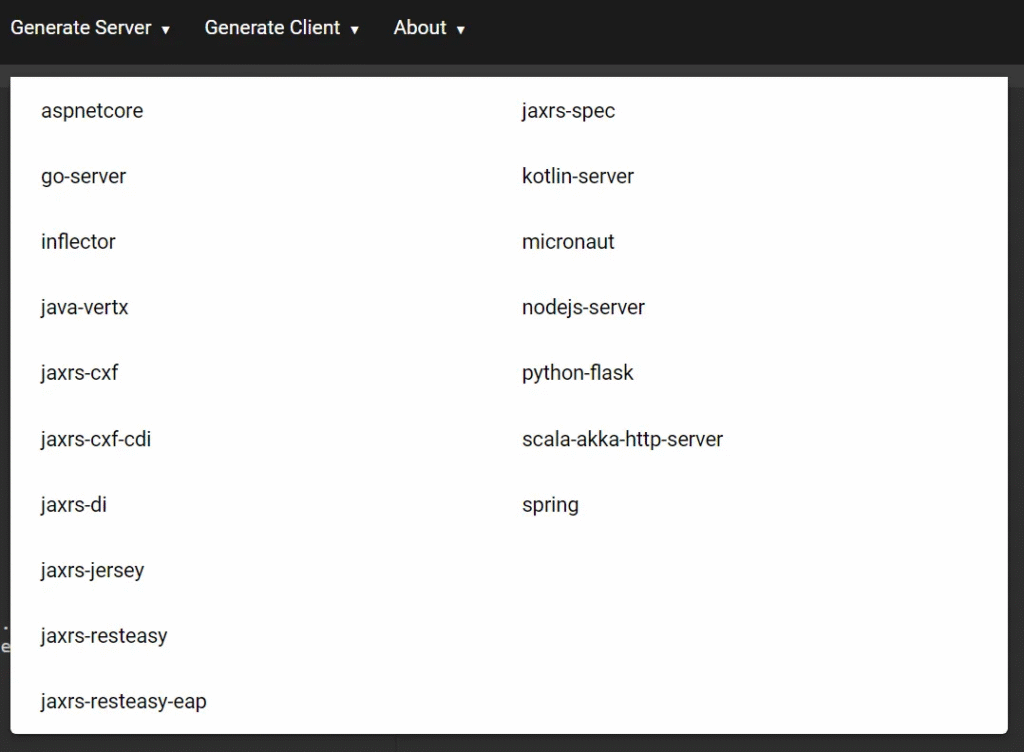
Import the Swagger Specification file to generate a Server or Client.
1. The developer exports the JSON file from the URL “/v3/api-docs”.
2. The developer imports JSON files to Swagger Editor.
3. The developer can choose to generate a server or a client.
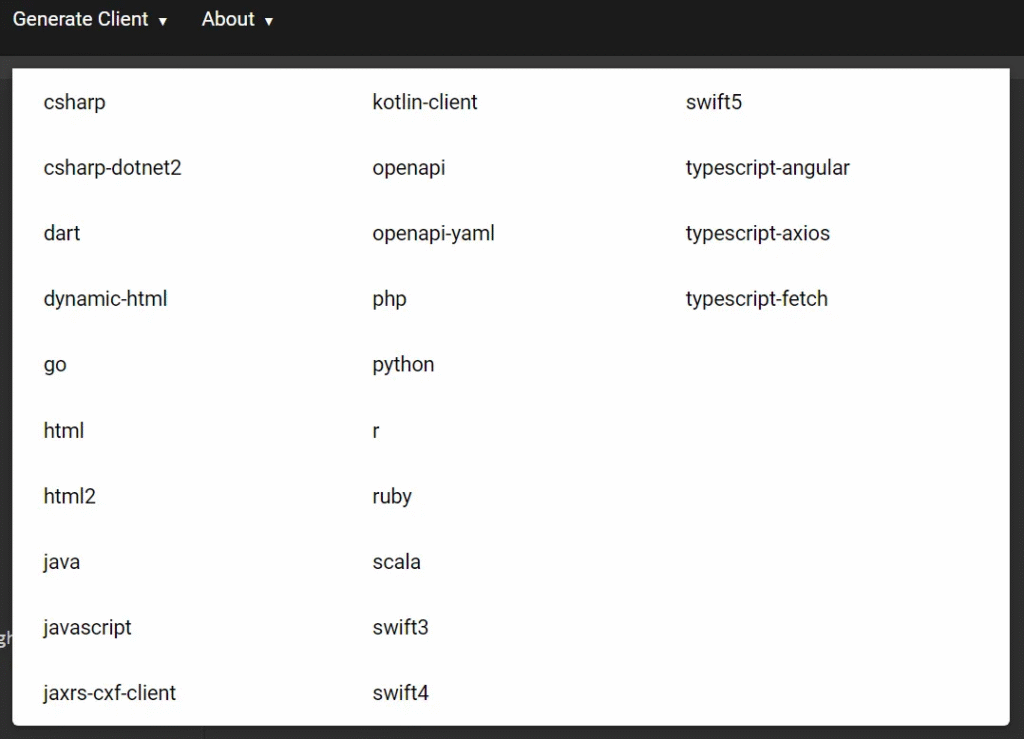
Generate client HTML2.
1. Export to HTML2. The developer gets the “html2-client-generated.zip” file.

2. HTML2 provides information about APIs and examples in various languages, including Java and Python.
Create a Swagger UI server.
1. The developer can separate Swagger UI from the RESTful API server.

2. Create a new Spring Boot project.
3. Copy “api-docs.json” to “src/main/resources/static”.
4. Create “swagger-ui.html” in “src/main/resources/static”.
5. Directory structure.
src
├── main
│   ├── java
│   │   └── com
│   │       └── example
│   │           └── demo
│   │               ├── DemoApplication.java
│   └── resources
│       ├── static
│       │   ├── api-docs.json
│       │   └── swagger-ui.html
│       └── application.properties
pom.xml
<!DOCTYPE html>
<html lang="en">
<head>
    <meta charset="UTF-8">
    <title>Swagger UI</title>
    <link rel="stylesheet" type="text/css" href="swagger-ui/swagger-ui.css" />
    <link rel="icon" type="image/png" href="swagger-ui/favicon-32x32.png" sizes="32x32" />
    <link rel="icon" type="image/png" href="swagger-ui/favicon-16x16.png" sizes="16x16" />
    <style>
        html {
            box-sizing: border-box;
            overflow: -moz-scrollbars-vertical;
            overflow-y: scroll;
        }
        *, *:before, *:after {
            box-sizing: inherit;
        }
        body {
            margin: 0;
            background: #fafafa;
        }
    </style>
</head>
<body>
<div id="swagger-ui"></div>
<script src="swagger-ui/swagger-ui-bundle.js"></script>
<script src="swagger-ui/swagger-ui-standalone-preset.js"></script>
<script>
    window.onload = function() {
        const ui = SwaggerUIBundle({
            url: "/api-docs.json",
            dom_id: '#swagger-ui',
            presets: [
                SwaggerUIBundle.presets.apis,
                SwaggerUIStandalonePreset
            ],
            layout: "StandaloneLayout"
        });

        window.ui = ui;
    };
</script>
</body>
</html>
6. Access Swagger UI by using “http://localhost:8080/swagger-ui.html”.
Create a PDF from Swagger Specification.
1. The developer can convert the Swagger Specification to a PDF file.

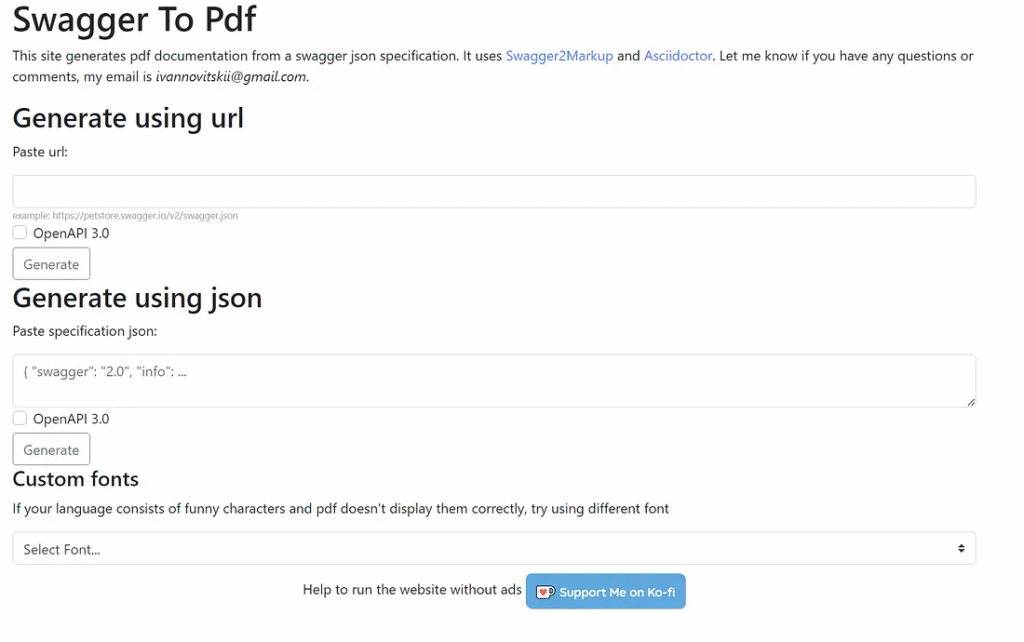
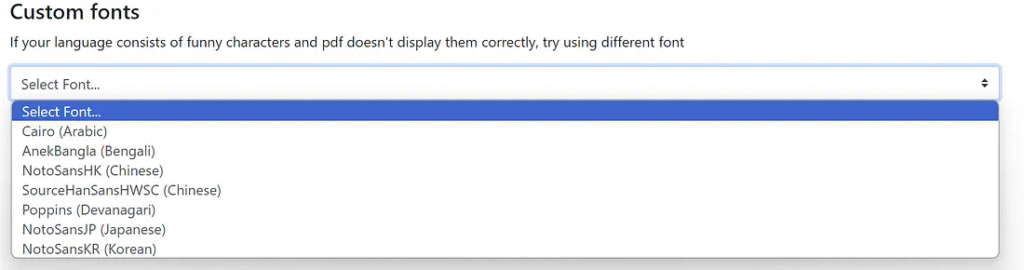
2. The developer copies Swagger specifications to generate PDF files and custom fonts.
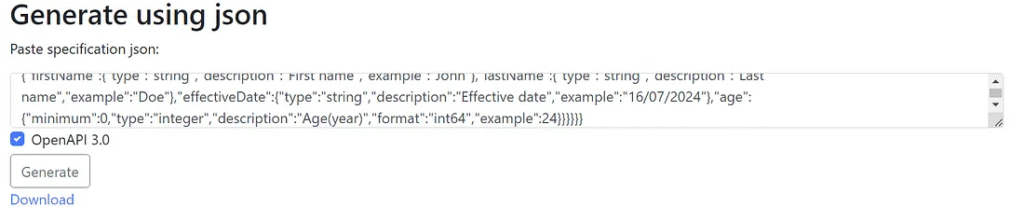
3. Download a PDF file. “api-documentation.pdf”.
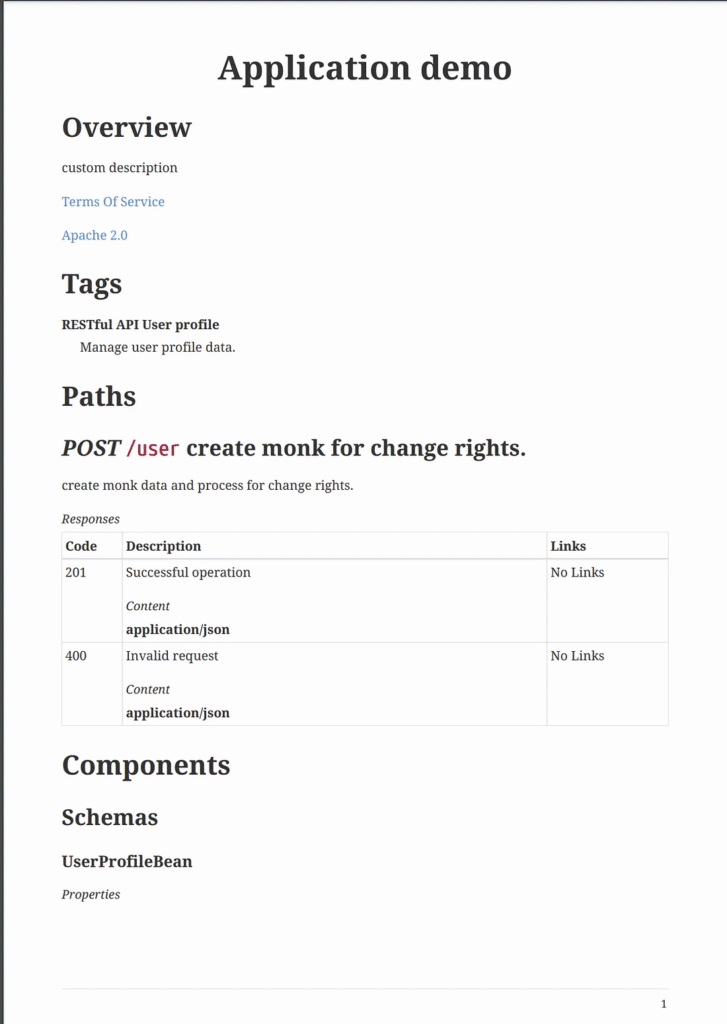
Finally
Swagger helps the developer create user manuals and documentation, which reduces the time needed to develop API documents.
The Swagger specifications support converting to many documents, such as HTML and PDF. The developer should learn to customize specifications to provide all the information the client requires.


