
JUnit 5 is the latest version of the widely used Java testing framework, bringing significant improvements over its predecessor, JUnit 4. It is designed to be more powerful, extensible, and modular, making it the preferred choice for modern Java applications. This comprehensive tutorial will explore the fundamentals of JUnit 5, its architecture, annotations, assertions, test execution, and advanced features.
1. Introduction to JUnit 5
JUnit 5 is an open-source unit testing framework for Java applications. It allows developers to write and execute tests to ensure their code behaves as expected. JUnit 5 consists of three main components:
- JUnit Platform: The foundation for launching testing frameworks.
- JUnit Jupiter: This module provides new programming models and annotations.
- JUnit Vintage: Backward compatibility support for running JUnit 3 and JUnit 4 tests.
Why Use JUnit 5?
- More Flexible: Supports multiple extensions.
- Improved Parameterized Tests: Allows dynamic test cases.
- Better Integration: Works well with modern IDEs and build tools like Maven and Gradle.
- Parallel Execution: Supports running tests in parallel for faster execution.
2. Setting Up JUnit 5
To start using JUnit 5 in your project, follow these steps:
Using Maven
Add the following dependencies to your pom.xml file:
<dependencies>
    <dependency>
        <groupId>org.junit.jupiter</groupId>
        <artifactId>junit-jupiter</artifactId>
        <version>5.12.1</version>
        <scope>test</scope>
    </dependency>
</dependencies>
After adding these dependencies, you can write and execute JUnit 5 tests.
3. Writing Your First JUnit 5 Test
A basic JUnit 5 test consists of test methods annotated with @Test.
Example: Simple Test Case
import org.junit.jupiter.api.Test;
import static org.junit.jupiter.api.Assertions.assertEquals;

class CalculatorTest {

    @Test
    void additionTest() {
        int result = 2 + 3;
        assertEquals(5, result, "Addition result should be 5");
    }
}
Explanation:
@TestMarks the method as a test case.assertEquals(expected, actual, message)Ensures the actual value matches the expected value.
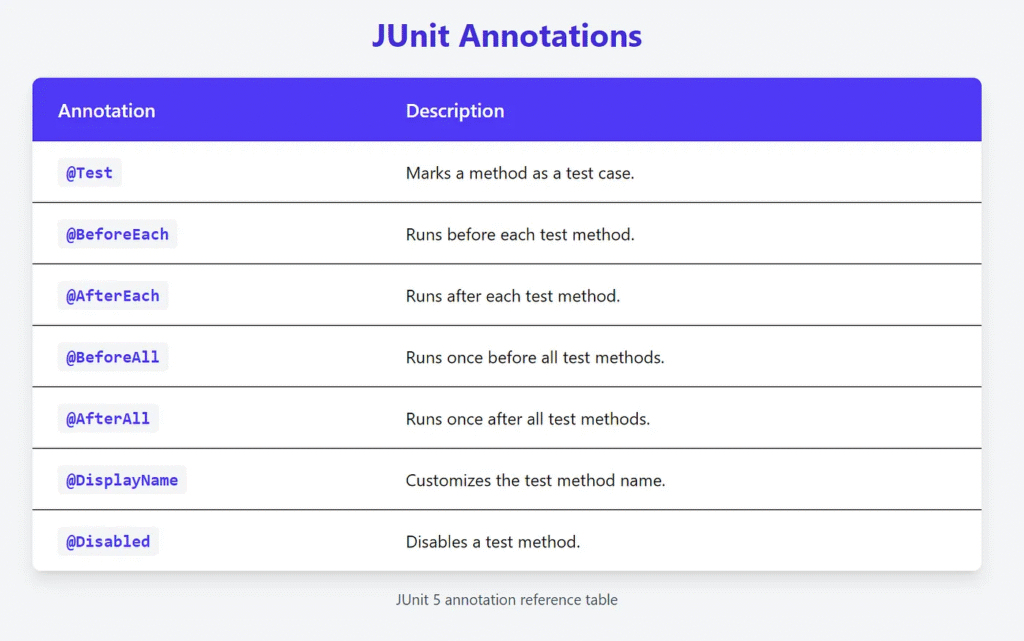
4. JUnit 5 Annotations
JUnit 5 provides various annotations for different test scenarios.
Example: Using Lifecycle Annotations
import org.junit.jupiter.api.*;

class LifecycleTest {

    @BeforeAll
    static void setupAll() {
        System.out.println("Executed once before all tests.");
    }

    @BeforeEach
    void setup() {
        System.out.println("Executed before each test.");
    }

    @Test
    void testExample() {
        System.out.println("Executing test method.");
    }

    @AfterEach
    void teardown() {
        System.out.println("Executed after each test.");
    }

    @AfterAll
    static void teardownAll() {
        System.out.println("Executed once after all tests.");
    }
}
Output
Executed once before all tests.
Executed before each test.
Executing test method.
Executed after each test.
Executed once after all tests.
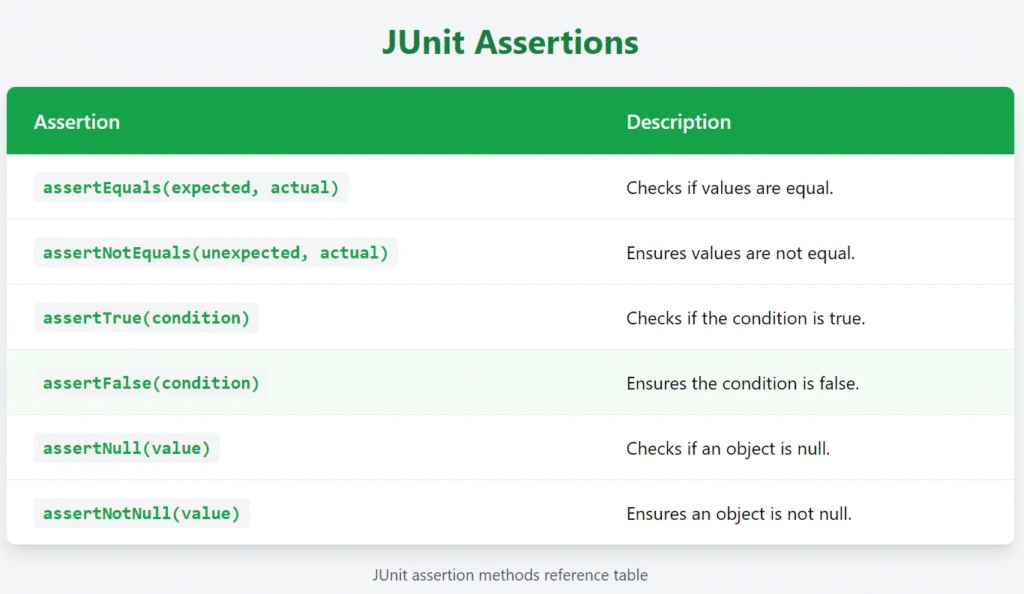
5. Assertions in JUnit 5
Assertions are used to validate test results.
Example: Using Assertions
import org.junit.jupiter.api.Test;
import static org.junit.jupiter.api.Assertions.*;

class AssertionTest {

    @Test
    void testAssertions() {
        int sum = 2 + 2;
        assertEquals(4, sum);
        assertTrue(sum > 0);
        assertNotNull(sum);
    }
}
6. Parameterized Tests
JUnit 5 supports parameterized tests using the @ParameterizedTest annotation.
Example: Using @ValueSource
import org.junit.jupiter.params.ParameterizedTest;
import org.junit.jupiter.params.provider.ValueSource;
import static org.junit.jupiter.api.Assertions.assertTrue;

class ParameterizedTestExample {

    @ParameterizedTest
    @ValueSource(ints = {2, 4, 6, 8})
    void evenNumbersTest(int number) {
        assertTrue(number % 2 == 0);
    }
}
Other Parameterized Test Sources
@CsvSource– Uses comma-separated values.@CsvFileSource– Reads values from a CSV file.@MethodSource– Provides test data using a method.
7. Exception Handling in JUnit 5
JUnit 5 provides assertThrows to test exception handling.
Example: Handling Exceptions
import org.junit.jupiter.api.Test;
import static org.junit.jupiter.api.Assertions.assertThrows;

class ExceptionTest {

    @Test
    void testException() {
        assertThrows(ArithmeticException.class, () -> {
            int result = 10 / 0;
        });
    }
}
8. Running JUnit 5 Tests
You can run JUnit 5 tests using:
- IDE: Most modern IDEs like IntelliJ IDEA, Eclipse, and VS Code support JUnit 5.

- Maven: Run tests with
mvn test. - Gradle: Execute
gradle test.
9. Advanced JUnit 5 Features
Tagging and Filtering Tests
Use @Tag to categorize tests.
import org.junit.jupiter.api.Tag;
import org.junit.jupiter.api.Test;

class TaggingTest {

    @Test
    @Tag("fast")
    void fastTest() {
        System.out.println("Fast test executed.");
    }

    @Test
    @Tag("slow")
    void slowTest() {
        System.out.println("Slow test executed.");
    }
}
Run tests by tag using:
mvn test -Dgroups="fast"
Conclusion
JUnit 5 is a powerful and flexible testing framework for Java applications. Its modular architecture, improved assertions, parameterized tests, and enhanced exception handling make it a must-have for modern development. By mastering JUnit 5, developers can write robust, maintainable, and efficient tests to improve code quality.


