
Unit testing is a cornerstone of reliable software development, and JUnit 5 offers modern, powerful capabilities for Java developers. While writing effective test cases is essential, generating test reports is equally important, especially for continuous integration (CI) pipelines, team collaboration, and debugging.
This tutorial will walk you through generating test reports with JUnit 5. We’ll look at basic usage, the tools you can use, and how to customize reports for your project needs.
Prerequisites
Before we dive in, make sure you have the following:
- Java 11 or newer
- Maven
- A basic understanding of JUnit 5 (JUnit Jupiter)
- An IDE like IntelliJ IDEA or Eclipse
Why Generate Test Reports?
Test reports help teams:
- Visualize test outcomes
- Detect flaky or failing tests
- Monitor test coverage
- Ensure code reliability during CI/CD
JUnit 5 does not generate detailed reports out of the box, but build tools like Maven and Gradle, along with plugins like Surefire, Failsafe, or Jacoco, bridge that gap.
Generating Reports with Maven
1. Add JUnit 5 Dependencies
In your pom.xml
<dependencies>
  <dependency>
    <groupId>org.junit.jupiter</groupId>
    <artifactId>junit-jupiter</artifactId>
    <version>5.10.0</version>
    <scope>test</scope>
  </dependency>
</dependencies>
2. Configure Maven Surefire Plugin
Surefire is the default plugin for running unit tests and generating basic reports.
<build>
  <plugins>
    <plugin>
      <groupId>org.apache.maven.plugins</groupId>
      <artifactId>maven-surefire-plugin</artifactId>
      <version>3.1.2</version>
    </plugin>
  </plugins>
</build>
3. Run the Tests
mvn test
4. Locate the Reports
After running the tests, Maven creates reports in:
target/surefire-reports/
You’ll find files like:
TEST-com.example.MyTest.xml(XML report)com.example.MyTest.txt(Plain text summary)
If you need an HTML report, you’ll want to add additional plugins like Surefire Report Plugin or use Allure (covered later).
Sample Test Class in JUnit 5
import org.junit.jupiter.api.Test;
import static org.junit.jupiter.api.Assertions.*;

public class CalculatorTest {

    @Test
    void testAddition() {
        assertEquals(5, 2 + 3, "2 + 3 should equal 5");
    }

    @Test
    void testMultiplication() {
        assertEquals(9, 3 * 3, "3 * 3 should equal 9");
    }
}
Once this is in your src/test/java directory, running Maven or Gradle will generate test reports as described above.
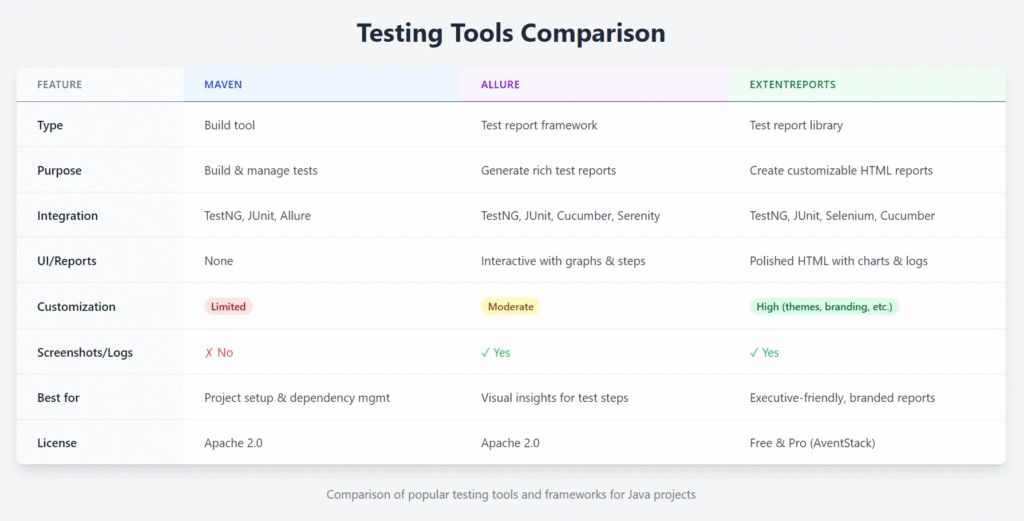
Why Use Third-Party Reporting Libraries?
Third-party libraries provide:
- Better visuals (dashboards, charts, breakdowns)
- Interactive HTML reports
- Support for attachments, screenshots, and logs
- Custom categories like tags, steps, and environments
- Improved integration with CI/CD platforms
Test Report Libraries Cover
- Allure Report — Powerful and interactive test reporting
- ExtentReports — Great for UI/automation testing with visuals
Allure Report
Allure is one of the most popular third-party libraries for generating advanced test reports. It supports annotations, attachments, steps, labels, and more.
Step 1: Add Allure Dependencies
For Maven, add these to your pom.xml:
<dependencies>
    <dependency>
        <groupId>org.junit.jupiter</groupId>
        <artifactId>junit-jupiter</artifactId>
        <version>5.12.1</version>
        <scope>test</scope>
    </dependency>

    <!-- JUnit 5 dependencies -->
    <dependency>
        <groupId>org.junit.jupiter</groupId>
        <artifactId>junit-jupiter-api</artifactId>
        <version>5.9.2</version>
        <scope>test</scope>
    </dependency>
    <dependency>
        <groupId>org.junit.jupiter</groupId>
        <artifactId>junit-jupiter-engine</artifactId>
        <version>5.9.2</version>
        <scope>test</scope>
    </dependency>

    <dependency>
        <groupId>io.qameta.allure</groupId>
        <artifactId>allure-junit5</artifactId>
        <version>2.24.0</version>
    </dependency>

</dependencies>

<build>
  <plugins>
    <plugin>
      <groupId>io.qameta.allure</groupId>
      <artifactId>allure-maven</artifactId>
      <version>2.11.2</version>
      <configuration>
          <reportVersion>2.21.0</reportVersion>
          <resultsDirectory>D:/workspaces/junit/junit/allure-results</resultsDirectory>
          <reportDirectory>D:/workspaces/junit/junit/target/allure-report</reportDirectory>
      </configuration>
    </plugin>
  </plugins>
</build>
Step 2: Write Test with Allure Annotations
package junit;

import io.qameta.allure.*;
import org.junit.jupiter.api.Test;

import io.qameta.allure.*;
import org.junit.jupiter.api.*;

@Epic("Calculator Application")
@Feature("Basic Operations")
public class CalculatorTest {

    @Test
    @Story("Addition Functionality")
    @Description("Test to verify addition of two numbers")
    @Severity(SeverityLevel.CRITICAL)
    public void testAddition() {
        Calculator calculator = new Calculator();
        Assertions.assertEquals(5, calculator.add(2, 3), "2 + 3 should equal 5");
    }

    @Test
    @Story("Subtraction Functionality")
    @Description("Test to verify subtraction of two numbers")
    @Severity(SeverityLevel.NORMAL)
    public void testSubtraction() {
        Calculator calculator = new Calculator();
        Assertions.assertEquals(1, calculator.subtract(3, 2), "3 - 2 should equal 1");
    }
}
package junit;
import io.qameta.allure.*;
import org.junit.jupiter.api.*;
@Epic("Calculator Application")
@Feature("Basic Operations")
public class CalculatorStepsTest {
@Test
@Story("Multiplication Functionality")
@Description("Test to verify multiplication with steps")
public void testMultiplicationWithSteps() {
Calculator calculator = new Calculator();
step("Create calculator instance");
step("Perform multiplication operation");
int result = calculator.multiply(4, 5);
step("Verify the result");
Assertions.assertEquals(20, result, "4 * 5 should equal 20");
}
@Step("{0}")
private void step(String description) {
// This method creates a step in the Allure report
}
}package junit;
public class Calculator {
public int add(int a, int b) {
return a + b;
}
public int subtract(int a, int b) {
return a - b;
}
public int multiply(int a, int b) {
return a * b;
}
public int divide(int a, int b) {
if (b == 0) {
throw new ArithmeticException("Cannot divide by zero");
}
return a / b;
}
}Step 3: Run Tests & Generate Report
Run tests:
mvn clean test

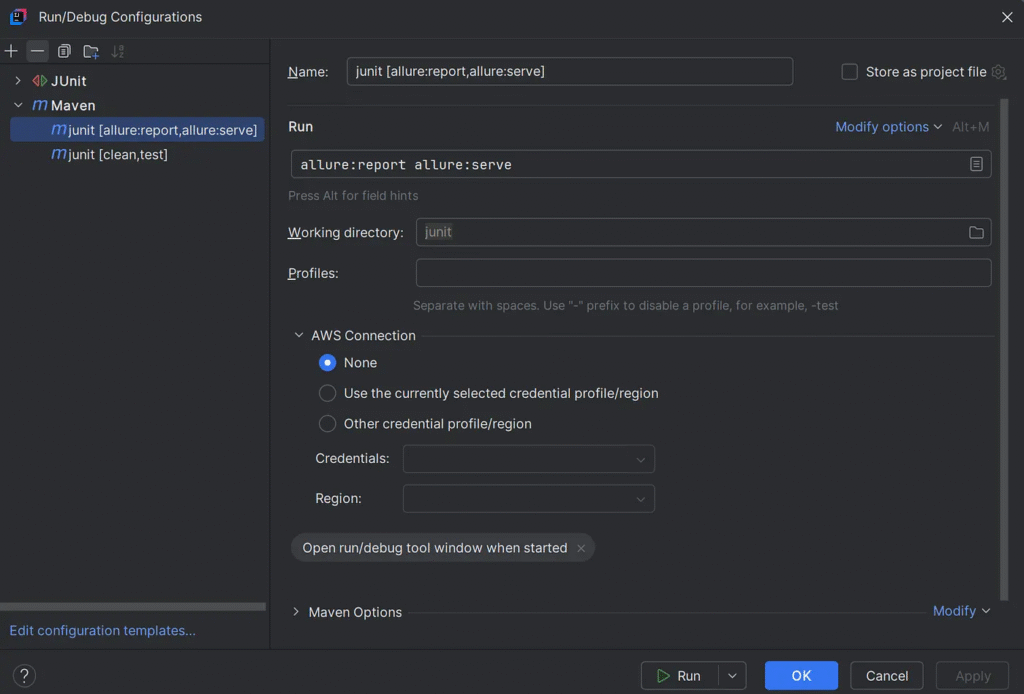
Generate and view the report:
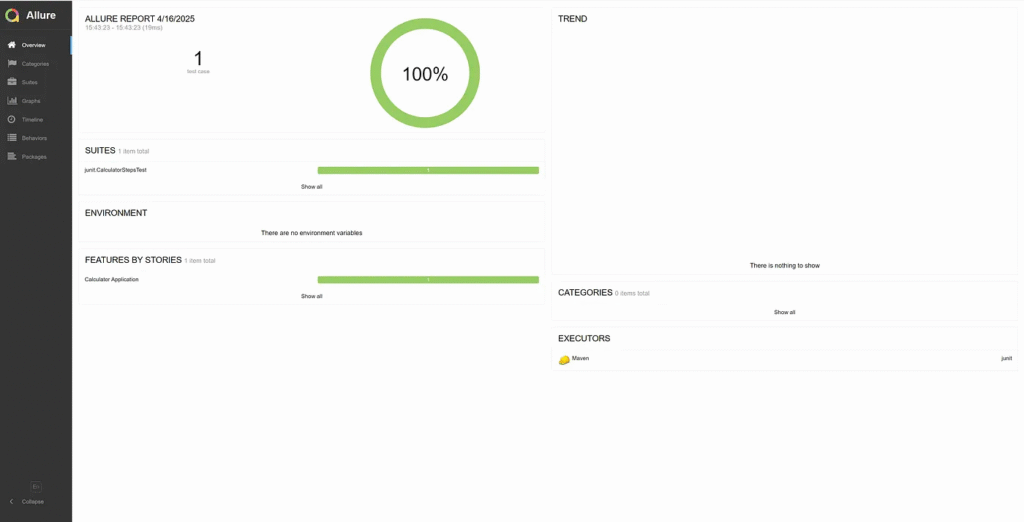
allure:report allure:serve
This opens a live HTML report with timelines, test breakdowns, steps, and logs.

ExtentReports with JUnit 5
ExtentReports offers a highly visual, customizable HTML reporting interface. While it’s typically used with Selenium, it works just as well with plain JUnit.
Step 1: Add Dependency (Maven)
<dependency>
    <groupId>com.aventstack</groupId>
    <artifactId>extentreports</artifactId>
    <version>5.1.2</version>
</dependency>
Step 2: Create a Custom JUnit Test Listener
JUnit 5 doesn’t have native support for ExtentReports, so you create an extension:
package junit;

import com.aventstack.extentreports.ExtentReports;
import com.aventstack.extentreports.ExtentTest;
import com.aventstack.extentreports.Status;
import com.aventstack.extentreports.reporter.ExtentSparkReporter;
import com.aventstack.extentreports.reporter.configuration.Theme;
import org.junit.jupiter.api.extension.*;

import java.io.File;
import java.util.Optional;
import java.util.concurrent.ConcurrentHashMap;

public class ExtentReportsExtension implements BeforeEachCallback, AfterEachCallback, BeforeAllCallback, AfterAllCallback {

    private static final ExtentReports extent = new ExtentReports();
    private static final ThreadLocal<ExtentTest> testThreadLocal = new ThreadLocal<>();
    private static final ConcurrentHashMap<String, ExtentTest> classTests = new ConcurrentHashMap<>();
    private static boolean isInitialized = false;

    @Override
    public void beforeAll(ExtensionContext context) {
        if (!isInitialized) {
            // Ensure directory exists
            File reportDir = new File("target/extent-reports");
            if (!reportDir.exists()) {
                reportDir.mkdirs();
            }

            // Set up reporter
            ExtentSparkReporter spark = new ExtentSparkReporter("target/extent-reports/extent-report.html");
            spark.config().setTheme(Theme.STANDARD);
            spark.config().setDocumentTitle("Test Execution Report");
            spark.config().setReportName("Test Results");

            extent.attachReporter(spark);
            extent.setSystemInfo("OS", System.getProperty("os.name"));
            extent.setSystemInfo("Java Version", System.getProperty("java.version"));

            // Add shutdown hook for safety
            Runtime.getRuntime().addShutdownHook(new Thread(() -> {
                System.out.println("Flushing ExtentReports from shutdown hook");
                extent.flush();
            }));

            isInitialized = true;
        }

        Optional<Class<?>> testClass = context.getTestClass();
        if (testClass.isPresent()) {
            String className = testClass.get().getSimpleName();
            ExtentTest classTest = extent.createTest(className);
            classTests.put(testClass.get().getName(), classTest);
        }
    }

    @Override
    public void beforeEach(ExtensionContext context) {
        Optional<Class<?>> testClass = context.getTestClass();
        Optional<String> testMethod = context.getTestMethod().map(method -> method.getName());

        if (testClass.isPresent() && testMethod.isPresent()) {
            ExtentTest classTest = classTests.get(testClass.get().getName());
            if (classTest != null) {
                ExtentTest test = classTest.createNode(testMethod.get());
                testThreadLocal.set(test);
            }
        }
    }

    @Override
    public void afterEach(ExtensionContext context) {
        ExtentTest test = testThreadLocal.get();
        if (test != null) {
            Optional<Throwable> exception = context.getExecutionException();

            if (exception.isPresent()) {
                test.log(Status.FAIL, "Test failed: " + exception.get().getMessage());
                test.fail(exception.get());
            } else {
                test.log(Status.PASS, "Test passed");
            }
        }
        testThreadLocal.remove();
    }

    @Override
    public void afterAll(ExtensionContext context) {
        // Force flush after each test class
        if (context.getTestClass().isPresent()) {
            System.out.println("Flushing report after test class: " + context.getTestClass().get().getSimpleName());
            extent.flush();
        }
    }

    // Helper methods to use in tests
    public static void logInfo(String message) {
        ExtentTest test = testThreadLocal.get();
        if (test != null) {
            test.log(Status.INFO, message);
        }
    }

    public static void logPass(String message) {
        ExtentTest test = testThreadLocal.get();
        if (test != null) {
            test.log(Status.PASS, message);
        }
    }

    public static void logFail(String message) {
        ExtentTest test = testThreadLocal.get();
        if (test != null) {
            test.log(Status.FAIL, message);
        }
    }

    public static void addScreenshot(String name, String base64Image) {
        ExtentTest test = testThreadLocal.get();
        if (test != null) {
            test.addScreenCaptureFromBase64String(base64Image, name);
        }
    }
}
Step 3: Create Tests
package junit;

import org.junit.jupiter.api.Test;
import org.junit.jupiter.api.extension.ExtendWith;
import static org.junit.jupiter.api.Assertions.*;

@ExtendWith(ExtentReportsExtension.class)
public class CalculatorTest {

    @Test
    public void testAddition() {
        ExtentReportsExtension.logInfo("Starting addition test");

        Calculator calculator = new Calculator();
        int result = calculator.add(5, 3);

        ExtentReportsExtension.logInfo("Performed addition: 5 + 3 = " + result);
        assertEquals(8, result, "Addition should work correctly");

        ExtentReportsExtension.logPass("Addition test passed successfully");
    }

    @Test
    public void testSubtraction() {
        ExtentReportsExtension.logInfo("Starting subtraction test");

        Calculator calculator = new Calculator();
        int result = calculator.subtract(10, 4);

        ExtentReportsExtension.logInfo("Performed subtraction: 10 - 4 = " + result);
        assertEquals(6, result, "Subtraction should work correctly");

        ExtentReportsExtension.logPass("Subtraction test passed successfully");
    }

    @Test
    public void testDivision() {
        ExtentReportsExtension.logInfo("Starting division test");

        Calculator calculator = new Calculator();

        // This will cause a failure to demonstrate reporting
        try {
            calculator.divide(5, 0);
            fail("Should have thrown exception");
        } catch (ArithmeticException e) {
            ExtentReportsExtension.logInfo("Caught expected exception: " + e.getMessage());
        }

        int result = calculator.divide(10, 2);
        assertEquals(5, result, "Division should work correctly");

        ExtentReportsExtension.logPass("Division test passed successfully");
    }
}
Step 4: Execute CalculatorTest
Output Location:
target/extent-reports/extent-report.html
Open it in a browser for a full-featured HTML report.

Best Practices
- Tag tests with meaningful annotations (e.g.
@Epic,@Story) - Separate test logic from reporting logic
- Use attachments (screenshots, logs) for debugging
- Automate report generation in CI builds
- Use versioned output folders to retain historical reports
Finally
Generating test reports in JUnit 5 with third-party libraries provides developers and testers with powerful tools to monitor, analyze, and visualize test results. Whether you need simple summaries or enterprise-level dashboards, there’s a library for your needs.


