
Learn how to set up and use the Spring Boot Configuration Server, a centralized solution for managing externalized configurations. This how-to guide will walk you through the process.
The Spring Boot Configuration Server is a centralized server that provides externalized configuration for distributed systems. It allows you to manage configuration properties for all your microservices or applications in one place, making maintaining consistency across environments such as development, testing, and production easier.
The server is embeddable in a Spring Boot application, by using the @EnableConfigServer annotation.
Consequently, the following application is a config server:
Benefits.
The Configuration Server stores all application properties of every microservice in one place, making the application easy to maintain and scalable, such as in microservices architectures or large-scale applications.
Use case scenario.
The software architecture design creates a configuration server containing the application properties of each microservice, application properties separated into three zones: development, test, and production zones. When the application is deployed, it can get value from the application properties of that zone from the configuration server.
Set Up the Configuration Server.
1. Initialize a configuration server and client from spring initializr

2. Add Dependencies
<dependencies>
    <dependency>
        <groupId>org.springframework.cloud</groupId>
        <artifactId>spring-cloud-config-server</artifactId>
    </dependency>
    <dependency>
        <groupId>org.springframework.boot</groupId>
        <artifactId>spring-boot-starter-actuator</artifactId>
    </dependency>
</dependencies>
Enable Config Server.
The developer enables the config by using the EnableConfigServer annotation.
@SpringBootApplication
@EnableConfigServer
public class ConfigServerApplication {
    public static void main(String[] args) {
        SpringApplication.run(ConfigServerApplication.class, args);
    }
}
Configure the Config Server.
1. The developer can get the properties file from the directory location.
spring:
    application:
        name: config_server
    profiles:
        active: native
    cloud:
        config:
            server:
                native:
                    search-locations:
                        - file:///D:/workspaces/config_server/conf/dev
                        - file:///D:/workspaces/config_server/conf/test
                        - file:///D:/workspaces/config_server/conf/production
server:
    port: 8888
2. The search locations can’t reach the subfolder because of a recursion problem.

Organize Your Configuration Files.
1. Directory structure.
/path/to/your/config/directory/
  dev/
    my-client-app-dev.yml
  test/
    my-client-app-test.yml
  production/
    my-client-app-production.yml
application: name: my-dev-app
application:
  name: my-production-app
application:
  name: my-test-app
2. Access the properties file.
>curl http://localhost:8888/my-client-app/dev
{"name":"my-client-app","profiles":["dev"],"label":null,"version":null,"state":null,"propertySources":[{"name":"file:/D:/workspaces/config_server/conf/dev/my-client-app-dev.yml","source":{"spring.application.name":"my-dev-app"}}]}
>curl http://localhost:8888/my-client-app/test
{"name":"my-client-app","profiles":["test"],"label":null,"version":null,"state":null,"propertySources":[{"name":"file:/D:/workspaces/config_server/conf/test/my-client-app-test.yml","source":{"spring.application.name":"my-test-app"}}]}>curl http://localhost:8888/my-client-app/production
{"name":"my-client-app","profiles":["production"],"label":null,"version":null,"state":null,"propertySources":[{"name":"file:/D:/workspaces/config_server/conf/production/my-client-app-production.yml","source":{"spring.application.name":"my-production-app"}}]}3. The configuration server is ready for the client to retrieve values from a properties file.
Set Up the Clients.
1. The developer creates an API client to get the value from the Configuration server.
2. Add Dependencies.
<dependency>
  <groupId>org.springframework.boot</groupId>
  <artifactId>spring-boot-starter-actuator</artifactId>
</dependency>
<dependency>
  <groupId>org.springframework.boot</groupId>
  <artifactId>spring-boot-starter-web</artifactId>
</dependency>
<dependency>
  <groupId>org.springframework.cloud</groupId>
  <artifactId>spring-cloud-starter-config</artifactId>
</dependency>

<dependency>
  <groupId>org.springframework.boot</groupId>
  <artifactId>spring-boot-devtools</artifactId>
  <scope>runtime</scope>
  <optional>true</optional>
</dependency>
<dependency>
  <groupId>org.projectlombok</groupId>
  <artifactId>lombok</artifactId>
  <optional>true</optional>
</dependency>
<dependency>
  <groupId>org.springframework.boot</groupId>
  <artifactId>spring-boot-starter-test</artifactId>
  <scope>test</scope>
</dependency>
Configure the Clients.
1. In each client’s application.yml file, specify the configuration server’s URI.
spring:
  application:
    name: my-client-app
  config:
    import: configserver:http://localhost:8888
  profiles:
    active: dev
server:
  port: 8080
2. Create an API to get the application name from the properties file on the configuration server.
import org.springframework.beans.factory.annotation.Value;
import org.springframework.http.ResponseEntity;
import org.springframework.web.bind.annotation.GetMapping;
import org.springframework.web.bind.annotation.RestController;

@RestController
public class AppName {

    @Value("${spring.application.name}")
    private String appName;

    @GetMapping(path = "/app-name")
    public ResponseEntity<String> appName(){
        return ResponseEntity.ok(appName);
    }

}
Running the Applications.
1. The developer is running the application and configuration server.
>curl http://localhost:8080/app-name
my-dev-app
2. When the developer changes the profile active in application properties to test and executes the command.
>curl http://localhost:8080/app-name
my-test-app
3. When the developer changes the profile active in application properties to production and executes the command.
>curl http://localhost:8080/app-name
my-production-app
Multi-Profile Setup.
1. The developer can activate multiple profiles from application properties.
spring:
  application:
    name: my-client-app
  config:
    import: configserver:http://localhost:8888
  profiles:
    active: production, test
server:
  port: 8080
2. The properties from the test and production will be loaded into the application properties, but if the key in the properties file is duplicated, the last key will overwrite the value in that key.
3. For example, when active, both production and test follow this order: the value in “test” will overwrite the value in production
Multi-Client Setup.
1. The developer can store more than one client application property.
2. Directory structure.
/path/to/your/config/directory/
  dev/
    my-client-app-dev.yml
    client-2-app-dev.yml
  test/
    my-client-app-test.yml
    client-2-app-test.yml
  production/
    my-client-app-production.yml
    client-2-app-production.yml
3. The configuration server returns the configuration following the application name.
Alternatively, the developer can design a directory structure by service name and then change the config location in the configuration file.
/path/to/your/config/directory/
  my-client-app/
    my-client-app-dev.yml
    my-client-app-production.yml
    my-client-app-test.yml
  client-2-app/
    client-2-app-dev.yml
    client-2-app-production.yml
    client-2-app-test.yml
spring:
application:
name: config_server
profiles:
active: native
cloud:
config:
server:
native:
search-locations:
- file:///D:/workspaces/config_server/conf/my-client-app
- file:///D:/workspaces/config_server/conf/client-2-app
server:
port: 8888Conclusion
The configuration server provides application properties from the file correctly, following the rule “{app_name}-{zone}.yml”.
Configuration Server from GIT.
The developer can create the configuration on GIT, and the configuration server can read the properties files from git. The developer can choose a repository and a branch on git.
1. Configure the Config Server.
spring:
    application:
        name: config_server
    cloud:
        config:
            server:
                git:
                    uri: https://github.com/nithidol/config-server #https://github.com/{your-repo}/config-repo
                    default-label: main #branch
                    search-paths:
                        - dev
                        - test
                        - production
server:
    port: 8888
2. Access configuration.
>curl http://localhost:8888/my-client-app/dev
{"name":"my-client-app","profiles":["dev"],"label":null,"version":"b5caa847e92ca3c62b216cd753380be3087ef432","state":null,"propertySources":[{"name":"https://github.com/nithidol/config-server/dev/my-client-app-dev.yml","source":{"spring.application.name":"my-dev-app-git"}}]}
>curl http://localhost:8888/my-client-app/test
{"name":"my-client-app","profiles":["test"],"label":null,"version":"b5caa847e92ca3c62b216cd753380be3087ef432","state":null,"propertySources":[{"name":"https://github.com/nithidol/config-server/test/my-client-app-test.yml","source":{"spring.application.name":"my-test-app-git"}}]}>curl http://localhost:8888/my-client-app/production
{"name":"my-client-app","profiles":["production"],"label":null,"version":"b5caa847e92ca3c62b216cd753380be3087ef432","state":null,"propertySources":[{"name":"https://github.com/nithidol/config-server/production/my-client-app-production.yml","source":{"spring.application.name":"my-production-app-git"}}]}Conclusion
The configuration server supports reading application properties files from the git server.
Configuration Server from GIT with credentials.
The developer can secure repository and application properties by creating a private git.
1. The developer can create a private repository on GitHub.

spring:
    application:
        name: config_server
    cloud:
        config:
            server:
                git:
                    uri: https://github.com/nithidol/config-server-private #repository
                    default-label: main #branch
                    search-paths:
                        - dev
                        - test
                        - production
server:
    port: 8888
2. When the configuration server accesses a private repository, the server gets an error message. The developer must use the access token to access the private repository.
Caused by: org.eclipse.jgit.errors.TransportException: https://github.com/nithidol/config-server-private: Authentication is required but no CredentialsProvider has been registered
Beginning August 13, 2021, we will no longer accept account passwords when authenticating Git operations on GitHub.com.
Generate an access token on GitHub.
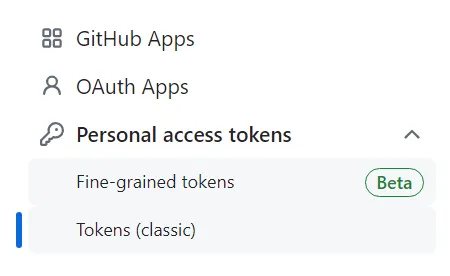
1. The developer can create an access token settings and
select developers settings. Create an access token on the
Tokens (classic)menu.
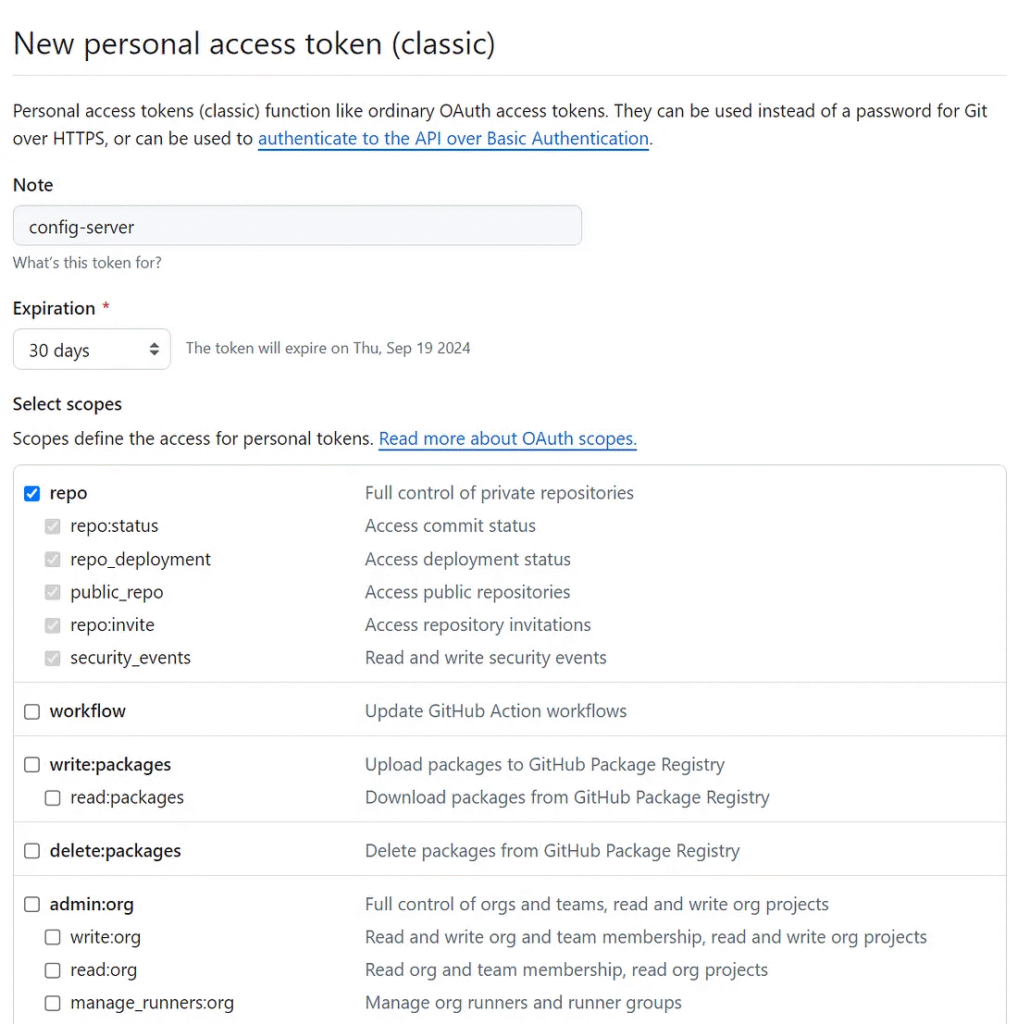
2. Generate a new token. The developer can restrict the privileges and expiration of this access token. When the developer finishes setting the privilege, click the “Generate Token” button.
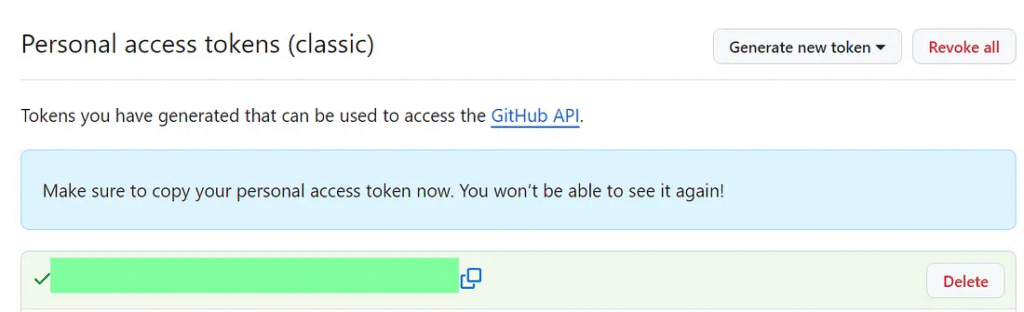
3. The developer can use this access token to access the private repository.
spring:
    application:
        name: config_server
    cloud:
        config:
            server:
                git:
                    uri: https://github.com/nithidol/config-server-private #repo
                    default-label: main #branch
                    username: nithidol
                    password: {access_token}
                    clone-on-start: true
                    search-paths:
                        - dev
                        - test
                        - production
server:
    port: 8888
4. To identify the configuration server, get the value from the properties file in the private repository on GitHub. The developer can modify spring.application.name to avoid confusion in the previous section.
5. The example has changed the application name to
my-{zone}-app-git-private
6. Access configuration.
>curl http://localhost:8888/my-client-app/dev
{"name":"my-client-app","profiles":["dev"],"label":null,"version":"e1d91aa6f7d3ad4070d4354db75dcdb68cfdeebb","state":null,"propertySources":[{"name":"https://github.com/nithidol/config-server-private/dev/my-client-app-dev.yml","source":{"spring.application.name":"my-dev-app-git-private"}}]}
>curl http://localhost:8888/my-client-app/test
{"name":"my-client-app","profiles":["test"],"label":null,"version":"e1d91aa6f7d3ad4070d4354db75dcdb68cfdeebb","state":null,"propertySources":[{"name":"https://github.com/nithidol/config-server-private/test/my-client-app-test.yml","source":{"spring.application.name":"my-test-app-git-private"}}]}>curl http://localhost:8888/my-client-app/production
{"name":"my-client-app","profiles":["production"],"label":null,"version":"e1d91aa6f7d3ad4070d4354db75dcdb68cfdeebb","state":null,"propertySources":[{"name":"https://github.com/nithidol/config-server-private/production/my-client-app-production.yml","source":{"spring.application.name":"my-production-app-git-private"}}]}Conclusion
The configuration server supports a private repository on git with authentication by using an access token. The developer can secure application properties by using a private repository and generating an access token to access a private repository.
Finally
The configuration server helps the developer manage and effortlessly maintain the application properties of microservices.
The developer should consider application architectures or the scale of applications to determine whether the configuration server is suitable for the project.


