A smooth deployment pipeline ensures your code reaches production fast. Developers prefer automated pipelines because they save time and reduce mistakes. GitLab CI/CD provides a robust system for automating the build, testing, and deployment of code.
In this tutorial, we’ll create a complete CI/CD pipeline for a Spring Boot project. The project will use Docker for containerization. We’ll connect GitLab to Docker using tcp://localhost:2375 without TLS. This setup works perfectly for local environments and learning.
Our pipeline will handle both automatic and manual deployments. You will also learn how to trigger deployments directly from the GitLab web interface. Each step is explained clearly and includes working code examples.
By the end, you’ll have a working Spring Boot app that builds, tests, and deploys with a single commit. Let’s start by preparing the project structure and understanding the basic tools involved.
Set up the GitLab server and runner.
Understanding the Required Tools
You’ll need GitLab, Docker, and Java installed. GitLab provides the CI/CD pipeline. Docker runs the application in containers. Spring Boot delivers a production-ready application framework with minimal setup.
Start by ensuring Docker runs on your machine. Check its connection using this command:
docker -H tcp://localhost:2375 info
Client:
 Version:    28.3.2
 Context:    default
 Debug Mode: false
 Plugins:
  ai: Docker AI Agent - Ask Gordon (Docker Inc.)
    Version:  v1.9.11
    Path:     C:\Program Files\Docker\cli-plugins\docker-ai.exe
...
If Docker responds, the socket is working correctly. We will configure GitLab to use this same connection.
Spring Boot simplifies Java web development. It bundles Tomcat and automatically manages dependencies. GitLab integrates with it easily, using Maven or Gradle.
We’ll use Maven in this guide. However, you can adapt the pipeline for Gradle. Each tool plays a role in creating a complete CI/CD pipeline. Docker isolates your app, while GitLab automates the build and deployment process.
Next, we’ll create the Spring Boot project structure and write a minimal example application.
Creating the Spring Boot Application
Open your terminal and create a new Spring Boot project using the Spring Initializr:

This command generates a base structure. Inside the src/main/java folder, create a simple controller:
package com.example.demo;

import org.springframework.web.bind.annotation.GetMapping;
import org.springframework.web.bind.annotation.RestController;

@RestController
public class HelloController {

    @GetMapping("/")
    public String home() {
        return "Hello, GitLab Deployment Pipeline!";
    }
}
Next, configure the application to run on a defined port. Add this to src/main/resources/application.properties:
server.port=8080
You can now build the project using Maven:
mvn clean package
Once built, you’ll have a JAR file inside the target folder. This JAR will later be containerized with Docker. The following section outlines the steps to create a Dockerfile.
Writing the Dockerfile
A Dockerfile defines the steps to build an image for your application. It ensures consistent builds across environments. Create a file named Dockerfile in the project root and insert the following:
# ---------------------------------------------------------------------
# Stage 1: Build the application (Uses JDK + Maven)
# ---------------------------------------------------------------------
FROM maven:3.9.6-eclipse-temurin-21 AS build

# Set the working directory for all subsequent commands in this stage
WORKDIR /app

# Copy the Maven project files first to leverage Docker's layer caching.
# This ensures dependencies are only re-downloaded if pom.xml changes.
COPY pom.xml .
COPY src /app/src

# Build the Spring Boot application (creates the JAR in target/)
# The -DskipTests flag is optional but speeds up the build process.
RUN mvn clean package -DskipTests

# ---------------------------------------------------------------------
# Stage 2: Create the final runtime image (Uses JRE only)
# ---------------------------------------------------------------------
# Use a minimal JRE image for a smaller and more secure final image.
FROM eclipse-temurin:21-jre-jammy AS final

# Set up a non-root user for security best practice
RUN groupadd --system appuser && useradd --system -g appuser appuser
WORKDIR /app

# Copy the built JAR artifact from the 'build' stage
# The JAR file name is typically <artifact-id>-<version>.jar, but
# we'll use a wildcard or a standard name like app.jar for simplicity.
COPY --from=build /app/target/*.jar /app/app.jar

# Expose the default port for Spring Boot
EXPOSE 8080

# Switch to the non-root user
USER appuser

# Command to run the Spring Boot application
# The MaxRAMPercentage flag is a best practice for JVM in containers.
ENTRYPOINT ["java", "-XX:MaxRAMPercentage=75.0", "-jar", "app.jar"]
This file uses a lightweight OpenJDK base image. It copies your application JAR into the container and defines the startup command.
You can test this Dockerfile manually by running:
docker build -t demo-deployment .
docker run -p 8080:8080 demo-deployment
Visit http://localhost:8080 to confirm it works. The “Hello, GitLab Deployment Pipeline!” message should appear. Once verified, the Docker configuration can be automated in GitLab.
Next, we’ll prepare the .gitlab-ci.yml file to define the build and deployment steps.
Creating the GitLab CI/CD Configuration
The .gitlab-ci.yml file controls how GitLab executes each stage. Create it in your project’s root directory with this content:
stages:
  - build
  - test
  - deploy

variables:
  DOCKER_HOST: tcp://host.docker.internal:2375
  DOCKER_TLS_CERTDIR: ""
  IMAGE_NAME: "demo-deployment:latest"

build_job:
  stage: build
  image: maven:3.9.6-eclipse-temurin-21
  script:
    - mvn clean package -DskipTests

test_job:
  stage: test
  image: maven:3.9.6-eclipse-temurin-21
  script:
    - mvn test

deploy_auto:
  stage: deploy
  when: on_success
  image: docker:latest
  services:
    - docker:dind
  before_script:
    - export SHELL=/bin/bash
  script:
    - docker build -t $IMAGE_NAME .
    - docker stop demo-container || true
    - docker rm demo-container || true
    - docker run -d --name demo-container -p 8080:8080 $IMAGE_NAME
  only:
    - master
This file defines three pipeline stages. The build stage compiles your code. The test stage runs unit tests. Finally, the deploy stage builds and runs the Docker image automatically when changes are pushed to master.
Explaination
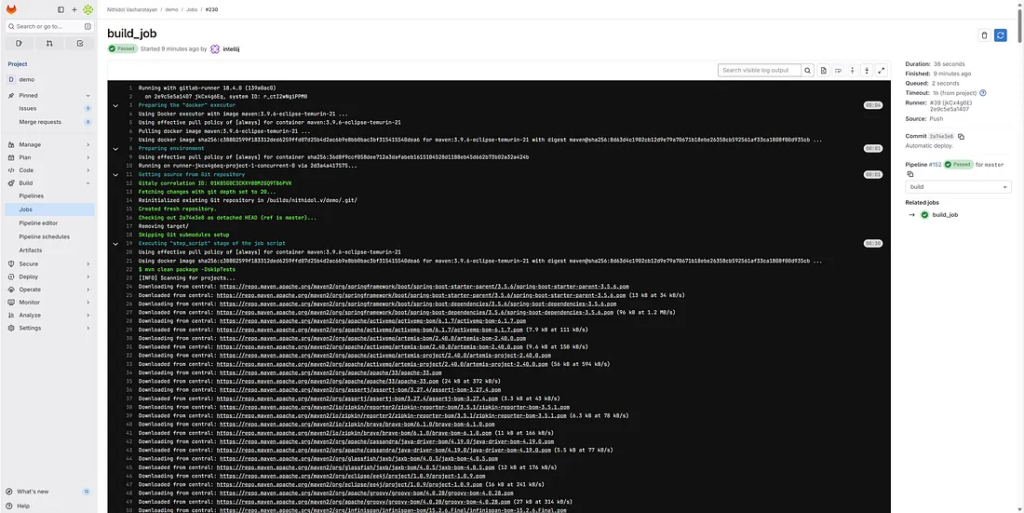
1. Build Stage (build_job)
The build_job uses a Maven Docker image (maven:3.9.6-eclipse-temurin-21) to ensure the necessary tools (Maven and Java) are available. It executes mvn clean package -DskipTests to compile the Java code and package it into a JAR file, skipping unit tests during the build.
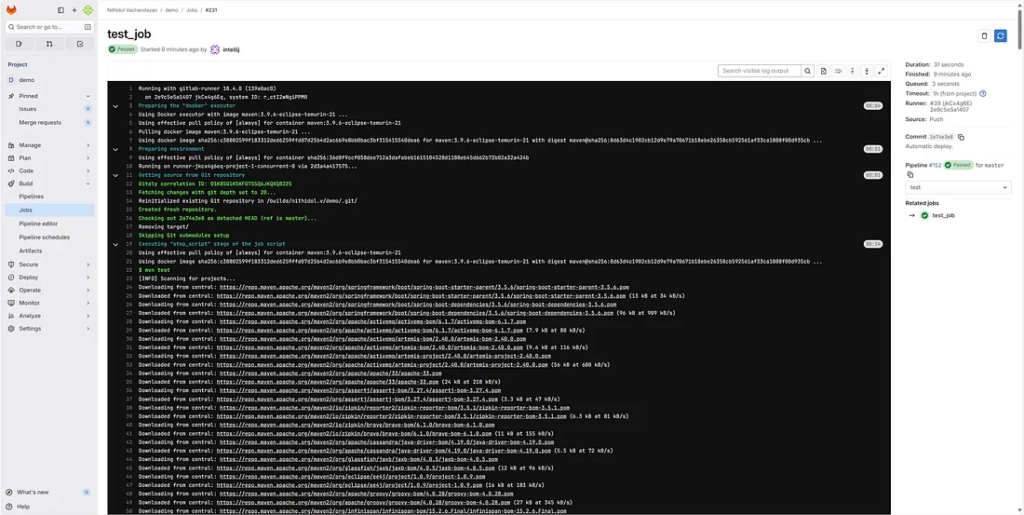
2. Test Stage (test_job)
The test_job also uses the same Maven image. It executes mvn test the unit tests on the compiled code, verifying the application’s functionality before deployment.
3. Deploy Stage (deploy_auto)
The deploy_auto job is triggered only on the success of the previous stages and only on the master branch.
- It uses the
docker:latestimage and thedocker:dind(Docker-in-Docker) service, which provides the necessary Docker daemon for building and managing containers. - The
before_scriptlineexport SHELL=/bin/bashis a fix to ensure the script runs using Bash syntax, allowing the use of|| trueto gracefully handle errors if the container doesn’t exist (docker stop/docker rm). - The script then builds a new Docker image from your project’s
Dockerfile, stops and removes any existing container nameddemo-container, and finally starts a new container (demo-container) in detached mode, exposing port8080.
Next, we’ll improve the pipeline to support manual deployment triggers.
Adding Manual Deployment in GitLab
Automatic deployment works well, but sometimes you need control. GitLab allows manual triggers through its web interface. You can configure this with a simple change.
Add the following job to your .gitlab-ci.yml file:
deploy_manual:
  stage: deploy
  image: docker:latest
  services:
    - docker:dind
  before_script:
    - export SHELL=/bin/bash
  script:
    - docker build -t $IMAGE_NAME .
    - docker stop demo-container || true
    - docker rm demo-container || true
    - docker run -d --name demo-container -p 8080:8080 $IMAGE_NAME
  when: manual
  only:
    - master
Now, GitLab will display a “Deploy Manual” button on the pipeline page. Clicking it will start deployment manually. This is useful when you need to verify changes before deploying to production.
Both automatic and manual deployments share the same Docker setup. You can easily customize ports or environment variables. For example, change the container name or use secrets for configuration.
The Deploy job waits for the manual run job.

If you want a manual build pipeline for all jobs, you can addwhen: manual to all jobs.

The following section focuses on connecting GitLab Runner with Docker using a TCP connection.
Connecting GitLab Runner to Docker via tcp://localhost:2375
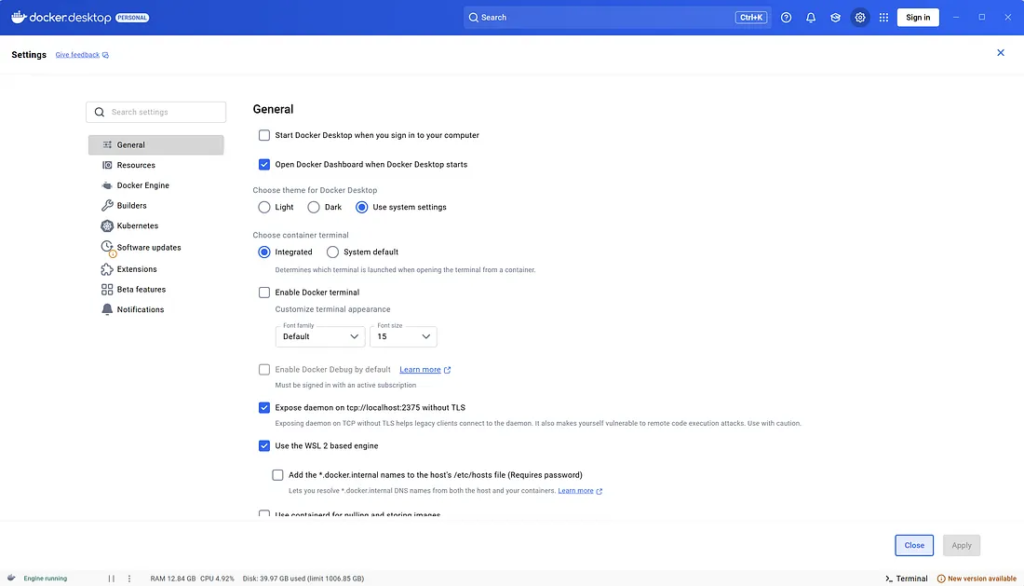
To allow GitLab to build and run Docker containers, the runner must access Docker. Instead of using the Docker socket file, we use a TCP connection on port 2375.
Open the Docker settings and enable remote API access. Add this flag to your Docker service configuration.
Docker desktop
Check on Expose daemon on tcp://localhost:2375 without TLS
Press enter or click to view image in full size
Registering the GitLab runner
config.toml:
concurrent = 1
check_interval = 0
shutdown_timeout = 0

[session_server]
  session_timeout = 1800

[[runners]]
  name = "2e9c5e5a1407"
  url = "http://host.docker.internal"
  id = 39
  token = "glrtr-jkCx4g6Eq1exXfkhuabAWm86MQpwOjEKdDozCw.01.121jo4qyd"
  token_obtained_at = 2025-10-15T18:12:35Z
  token_expires_at = 0001-01-01T00:00:00Z
  executor = "docker"
  clone_url = "http://host.docker.internal"
  [runners.cache]
    MaxUploadedArchiveSize = 0
    [runners.cache.s3]
    [runners.cache.gcs]
    [runners.cache.azure]
  [runners.docker]
    tls_verify = false
    image = "docker:latest"
    privileged = true
    disable_entrypoint_overwrite = false
    oom_kill_disable = false
    disable_cache = false
    volumes = ["/cache"]
    shm_size = 0
    network_mtu = 0
    host = "tcp://host.docker.internal:2375"
Running and Testing the Pipeline
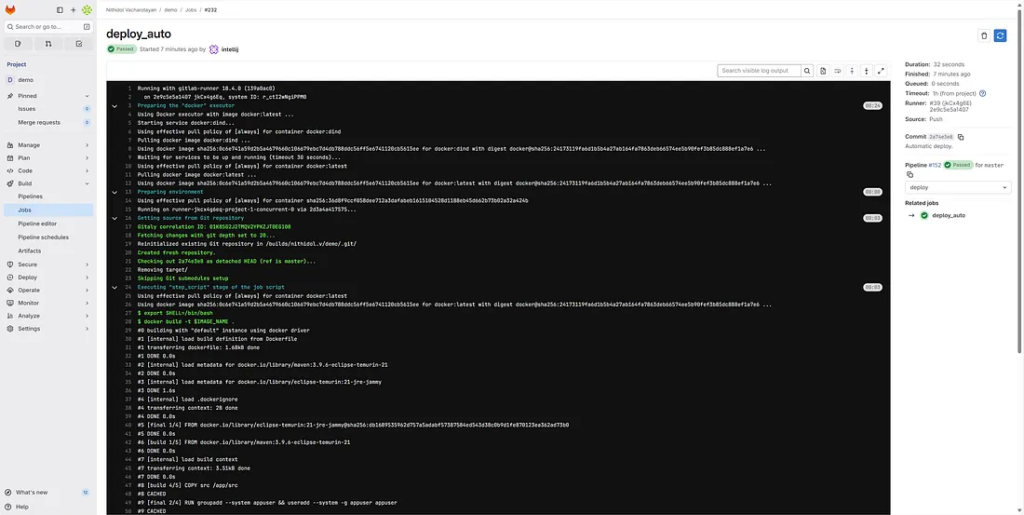
Push your project to your GitLab repository. The pipeline should start automatically. You can monitor progress in the CI/CD > Pipelines section of GitLab.
Each stage will run sequentially. The build stage compiles the code, the test stage executes unit tests, and the deploy stage builds and runs the container.
http://localhost/nithidol.v/demo/-/pipelines


Check your logs for messages similar to:
Successfully built demo-deployment:latest
Container started: demo-container
Open your browser at http://localhost:8080 to see the running app. If you trigger the manual job, use port 8081 instead.
If the pipeline fails, review the error messages carefully. Common issues include missing Maven dependencies or Docker connection errors. Fixing these quickly ensures smoother automation later.

Once your pipeline completes successfully, you’ll have an automated deployment setup ready for continuous integration. Next, we’ll secure and improve the configuration.
Docker desktop

Securing and Optimizing the Pipeline
Running Docker without TLS is fine for local use. However, never expose tcp://localhost:2375 on public networks. Always restrict access to local or private environments.
For better security, limit the runner’s permissions. Ensure it runs with the minimum required privileges. Consider moving credentials and sensitive data to GitLab CI/CD variables instead of hardcoding them.
Example of adding environment variables in GitLab:
- Navigate to your project’s Settings > CI/CD.
- Expand Variables.
- Add entries like
DOCKER_USERandDOCKER_PASS.
Then update the deploy script:
script:
  - docker login -u $DOCKER_USER -p $DOCKER_PASS
  - docker build -t $IMAGE_NAME .
  - docker push $IMAGE_NAME
This allows you to store and manage credentials securely. You can also use private container registries for deployment targets. Optimization ensures your pipeline runs fast, securely, and reliably.
Next, we’ll discuss monitoring and troubleshooting techniques.
Monitoring and Troubleshooting the Pipeline
Once your pipeline runs, monitoring becomes essential. GitLab provides detailed logs for each job. These logs help you detect errors quickly. You can view them by clicking each job name in the pipeline view.
For deeper monitoring, use Docker commands. Check container logs using:
>docker logs demo-container
 /\\ / ___'_ __ _ _(_)_ __  __ _ \ \ \ \
( ( )\___ | '_ | '_| | '_ \/ _` | \ \ \ \
 \\/  ___)| |_)| | | | | || (_| |  ) ) ) )
  '  |____| .__|_| |_|_| |_\__, | / / / /
 =========|_|==============|___/=/_/_/_/

 :: Spring Boot ::                (v3.5.6)

2025-10-22T08:20:55.997Z  INFO 1 --- [gitlab-demo] [           main] c.e.gitlab_demo.GitlabDemoApplication    : Starting GitlabDemoApplication v0.0.1-SNAPSHOT using Java 21.0.8 with PID 1 (/app/app.jar started by appuser in /app)
2025-10-22T08:20:55.999Z  INFO 1 --- [gitlab-demo] [           main] c.e.gitlab_demo.GitlabDemoApplication    : No active profile set, falling back to 1 default profile: "default"
2025-10-22T08:20:56.864Z  INFO 1 --- [gitlab-demo] [           main] o.s.b.w.embedded.tomcat.TomcatWebServer  : Tomcat initialized with port 8080 (http)
2025-10-22T08:20:56.881Z  INFO 1 --- [gitlab-demo] [           main] o.apache.catalina.core.StandardService   : Starting service [Tomcat]
2025-10-22T08:20:56.881Z  INFO 1 --- [gitlab-demo] [           main] o.apache.catalina.core.StandardEngine    : Starting Servlet engine: [Apache Tomcat/10.1.46]
2025-10-22T08:20:56.911Z  INFO 1 --- [gitlab-demo] [           main] o.a.c.c.C.[Tomcat].[localhost].[/]       : Initializing Spring embedded WebApplicationContext
2025-10-22T08:20:56.913Z  INFO 1 --- [gitlab-demo] [           main] w.s.c.ServletWebServerApplicationContext : Root WebApplicationContext: initialization completed in 851 ms
2025-10-22T08:20:57.394Z  INFO 1 --- [gitlab-demo] [           main] o.s.b.w.embedded.tomcat.TomcatWebServer  : Tomcat started on port 8080 (http) with context path '/'
2025-10-22T08:20:57.419Z  INFO 1 --- [gitlab-demo] [           main] c.e.gitlab_demo.GitlabDemoApplication    : Started GitlabDemoApplication in 1.877 seconds (process running for 2.448)
2025-10-22T08:24:43.036Z  INFO 1 --- [gitlab-demo] [nio-8080-exec-1] o.a.c.c.C.[Tomcat].[localhost].[/]       : Initializing Spring DispatcherServlet 'dispatcherServlet'
2025-10-22T08:24:43.037Z  INFO 1 --- [gitlab-demo] [nio-8080-exec-1] o.s.web.servlet.DispatcherServlet        : Initializing Servlet 'dispatcherServlet'
2025-10-22T08:24:43.039Z  INFO 1 --- [gitlab-demo] [nio-8080-exec-1] o.s.web.servlet.DispatcherServlet        : Completed initialization in 2 ms
If you notice any connection issues, confirm Docker is accessible through tcp://localhost:2375. Also, verify that the GitLab Runner is using the correct environment variable. You can re-run failed jobs directly from GitLab.
Automated notifications in GitLab can alert you when pipelines fail—Configure email or Slack integration under project settings. Continuous feedback ensures quick issue resolution.
Once you’ve verified stability, your deployment system is ready for continuous delivery. This pipeline enables developers to push changes with confidence, knowing that deployments are predictable and repeatable.
Conclusion
You’ve built a full GitLab CI/CD pipeline using Docker and Spring Boot. The setup used a direct TCP connection without TLS for simplicity. You implemented automatic and manual deployments, making the process both flexible and efficient.
This pipeline can grow with your project. You can add more stages, integrate testing frameworks, or deploy to cloud environments. The principles remain the same — automate, verify, and deploy consistently.
Following this tutorial gives you a solid foundation in GitLab CI/CD automation with Docker. Every deployment now becomes a simple, controlled, and repeatable process.
This article was originally published on Medium.