Creating a modern chat application feels easier today thanks to reactive frameworks. Angular provides solid tooling for real-time interfaces. PrimeNG adds polished components with minimal effort. Spring Boot supports streaming responses with its reactive stack. When you combine these technologies, you can build a smooth chat experience that updates instantly. This tutorial shows you how to send chat prompts to a Spring Boot backend and stream the model’s responses using Flux. It also guides you through the Angular side of things. You will learn how to consume server-sent events and display messages inside a PrimeNG chat-style interface.
The tutorial assumes that you are already familiar with the basics of Angular and Spring Boot. However, you will still find all the essential pieces of code. The entire workflow stays clean and straightforward. You start by building a minimal reactive backend. After that, you integrate Angular’s HttpClient and EventSource to capture the streamed output. Then, you connect everything to a PrimeNG panel. The final result feels smooth, reactive, and professional.
Preparing the Spring Boot Reactive Chat Endpoint
A chat application needs a backend that returns messages as they arrive. Spring Boot makes this simple using the Flux API. A Flux stream sends data chunks one at a time. Each chunk represents a line of text from your model or service. Because the response streams, your UI updates instantly. You avoid delays and keep the interface responsive.
First, create a new Spring Boot project with WebFlux enabled. You include spring-boot-starter-webflux in your Maven file. This dependency activates Reactor and enables streaming support. Then, define a service that forwards user prompts to your AI provider. The service should return a Flux of strings. Each emitted string becomes one part of the model’s final message.
GeminiService.java
@Service
@Slf4j
public class GeminiService {

    public Flux<String> ask(String input) {
        log.debug("input {}", input);

        return chatClient
                .prompt()
                .user(input)
                .stream()
                .content()
                .map(chunk -> chunk + " ")
                .doOnSubscribe(sub -> log.info("Streaming started..."))
                .doOnComplete(() -> log.info("Streaming finished."))
                .retryWhen(Retry.backoff(3, Duration.ofSeconds(2))
                        .filter(throwable -> throwable instanceof WebClientResponseException.ServiceUnavailable)
                        .doBeforeRetry(retrySignal ->
                                log.warn("Retrying request due to 503, attempt: {}", retrySignal.totalRetries() + 1)
                        )
                )
                .onErrorResume(e -> {
                    log.error("Error during streaming from ChatClient for input: {}", input, e);
                    return Flux.error(new RuntimeException("AI Stream Error", e));
                });
    }

}
StreamController.java
package com.example.spring_ai.controller;

import com.example.spring_ai.service.GeminiService;
import lombok.RequiredArgsConstructor;
import lombok.extern.slf4j.Slf4j;
import org.springframework.http.MediaType;
import org.springframework.web.bind.annotation.GetMapping;
import org.springframework.web.bind.annotation.RequestParam;
import org.springframework.web.bind.annotation.RestController;
import reactor.core.publisher.Flux;

@RestController
@RequiredArgsConstructor
@Slf4j
public class StreamController {

    private final GeminiService geminiService;

    @GetMapping(value = "/ask", produces = MediaType.TEXT_EVENT_STREAM_VALUE)
    public Flux<String> ask(@RequestParam String q) {
        log.info("q {}", q);
        return geminiService.ask(q)
                .onErrorResume(e -> {
                    log.error("Gemini API call failed", e);
                    return Flux.error(new RuntimeException("API Error during generation", e));
                })
                .map(response -> response);
    }

}
Setting Up Angular for Reactive Streaming
Angular introduces several improvements in performance and developer experience. Working with SSE streams remains simple. The HttpClient does not handle SSE directly, but the EventSource API does. You only need a service that wraps the EventSource inside an Observable. This approach keeps your Angular logic reactive. Components can subscribe to and update the interface immediately.

Create a Reactive chat
Begin by creating a new Angular project:
ng new reactive-chat
cd reactive-chat
Install PrimeNG and PrimeIcons:
npm install primeng primeicons
Then, add a theme in your styles configuration. This step ensures that the chat UI looks polished. PrimeNG themes work out of the box with minimal customization.
Now build the SSE service. The service needs a function that opens an EventSource and turns the events into stream values. You can do this with an RxJS Observable. The Observable listens for each message event. Angular components subscribe to and update their view with new messages.
Create chat.service.ts:
import { Injectable, NgZone } from '@angular/core';
import { Observable } from 'rxjs';

@Injectable({ providedIn: 'root' })
export class ChatService {

  constructor(private zone: NgZone) { }

  ask(q: string): Observable<string> {
    return new Observable(obs => {
      const url = `http://localhost:8080/ask?q=${encodeURIComponent(q)}`;
      const es = new EventSource(url);

      es.onmessage = event => {
        this.zone.run(() => {
          obs.next(event.data);
        });
      };

      es.onerror = error => {
        this.zone.run(() => {
          obs.error(error);
          es.close();
        });
      };

      return () => es.close();
    });
  }
}
This service handles the connection. Whenever Spring Boot sends a new chunk, Angular receives it inside onmessage. The Observable sends the chunk to any subscription. The connection closes once the component unsubscribes.
Next, create a component that displays messages. This component should hold an array of message strings. Each incoming chunk extends the array. The component also needs an input box. A user types a message and submits it. The UI sends the text to the backend and listens for the stream.
Create chat.ts:
import { ChangeDetectorRef, Component, NgZone } from '@angular/core';
import { ChatService } from '../../services/chat.service';
import { PanelModule } from 'primeng/panel';
import { InputTextModule } from 'primeng/inputtext';
import { FormsModule } from '@angular/forms';
import { ButtonModule } from 'primeng/button';
import { catchError, of, Subscription } from 'rxjs';
import { CommonModule } from '@angular/common';
import { CardModule } from 'primeng/card';

@Component({
  standalone:true,
  selector: 'app-chat',
  templateUrl: './chat.html',
  imports: [PanelModule, InputTextModule, FormsModule, ButtonModule, CommonModule, CardModule],
})
export class ChatComponent {

  constructor(private chat: ChatService, private cdr: ChangeDetectorRef, private zone: NgZone) {}

  messages: { user: string; content: string }[] = [];
  userInput: string = '';
  loading: boolean = false;

  askQuestion() {
    if (!this.userInput.trim()) return;

    // Add user's question to messages
    this.messages.push({ user: 'User', content: this.userInput });

    // 2. Add a placeholder for the AI's response and start streaming into it
    const aiMessage = { user: 'AI', content: '' };
    this.messages.push(aiMessage);

    this.loading = true;
    let streamingText = '';

    this.chat.ask(this.userInput).subscribe({
      next: (chunk) => {
        // 3. Append the new chunk directly to the AI message content
        console.log('chunk:' + chunk);
        streamingText += chunk;

        // Update only the last message
        this.zone.run(() => {
          this.messages[this.messages.length - 1].content = streamingText;
          this.cdr.detectChanges();
        });
      },
      error: (err) => {
        //aiMessage.content += `\n[Error retrieving response: ${err}]`;
        this.loading = false;
        this.cdr.detectChanges();
      },
      complete: () => {
        this.loading = false;
        this.cdr.detectChanges();
      },
    });

    this.userInput = '';

  }
}
The component stays simple. It pushes messages as they arrive. The chat application now functions, but it still requires styling and refinement in terms of structure. PrimeNG helps improve this part.
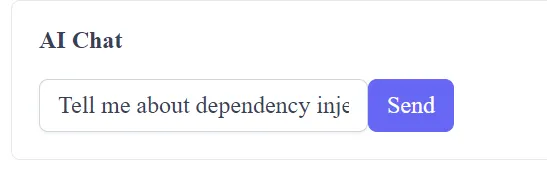
Building the Chat Interface with PrimeNG
PrimeNG offers powerful UI components for Angular. You can build a professional chat layout with just a few elements. You only need a panel, a list, and an input form. These components provide elegant spacing and responsive behavior.
Start by creating the template. Use PrimeNG’s p-card or p-panel to wrap the chat:
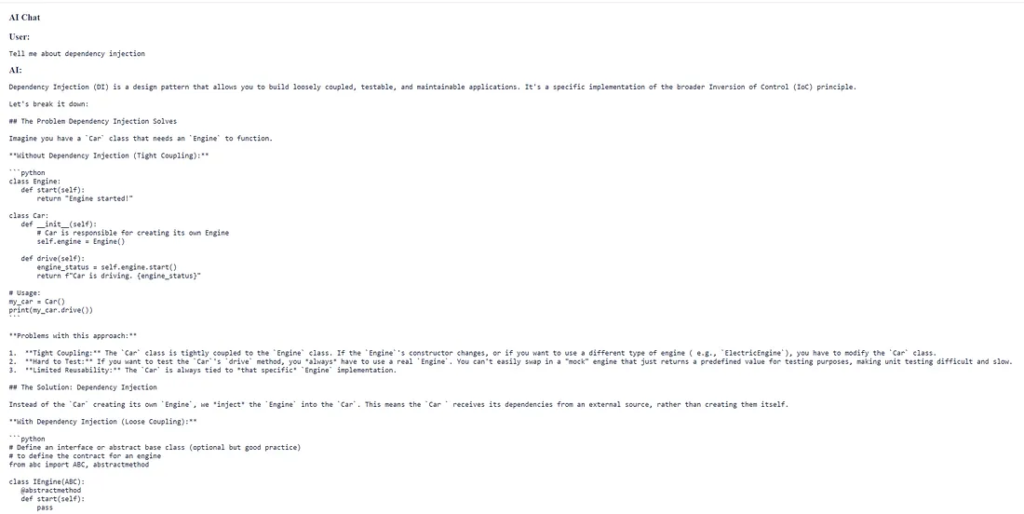
<p-panel header="AI Chat">
  <div class="messages">
    @for (message of messages; track $index) {
      <div class="chat-bubble" [ngClass]="{'user-bubble': message.user === 'User', 'ai-bubble': message.user === 'AI'}">
        <strong>{{ message.user }}:</strong>
        <pre class="code-block">{{ message.content }}</pre>
      </div>
    }
  </div>

  <div class="input-row">
    <input pInputText [(ngModel)]="userInput" />
    <button pButton label="Send" (click)="askQuestion()" [disabled]="loading"></button>
  </div>
</p-panel>
Next, add some CSS to ensure proper spacing:
.messages {
  max-height: 300px;
  overflow-y: auto;
  margin-bottom: 1rem;
}

.message {
  padding: .5rem;
  background: #f4f4f4;
  border-radius: 4px;
  margin-bottom: .5rem;
}

.input-row {
  display: flex;
  gap: .5rem;
}
Now your chat UI feels clean and responsive. You see each streaming chunk in real time. The reactive flow remains smooth. PrimeNG handles the visual experience without much effort.
You can extend the interface further. For example, you may add avatars or timestamps. You can also adopt the PrimeNG chat module if you prefer a more stylized look. The panel approach works well for lightweight prototypes or minimal interfaces.
At this point, you have a functioning reactive chat. Angular receives the messages as the server emits them. Spring Boot gathers each chunk from your AI model. The chat updates instantly.
Deploying and Testing the Chat Application
Before deployment, verify that your project works in development mode. Run Spring Boot on port 8080. Start Angular with:
ng serve
Open the Angular interface in the browser. Enter a message and submit it. You should see the streamed chunks immediately. The experience should feel smooth. If you face CORS issues, configure Spring Boot with:
@Bean
public WebMvcConfigurer corsConfigurer() {
    return new WebMvcConfigurer() {
        @Override
        public void addCorsMappings(CorsRegistry registry) {
            registry.addMapping("/**")
                    .allowedMethods("*")
                    .allowedOrigins("http://localhost:4200");
        }
    };
}
This configuration ensures that Angular can establish a connection. You can tighten the settings later for production.
After testing, build your Angular files:
ng build --configuration production
Serve the static output through Nginx or Spring Boot. The backend manages SSE. The frontend loads normally as static files. Streaming remains stable in any modern browser.
For further optimization, consider enabling gzip or caching. You may also introduce authentication. For enterprise setups, you can use WebFlux security. PrimeNG already works well with corporate UI systems. The interface stays clean while still extensible.
As you extend your application, keep the reactive pattern consistent. Avoid blocking calls in your backend. Maintain short and precise change detection in Angular. These practices ensure continued responsiveness.
The chat system will scale well because SSE connections are lightweight. Large user volumes can be supported with minimal resource usage. As long as the server emissions stay efficient, the system remains snappy.
Finally, test the app under load. Use tools like JMeter or k6. Measure response times and connection stability. Spring Boot WebFlux performs reliably under most workloads.
Markdown Pipe and Sanitization
The best way to handle this in Angular is to create a custom Markdown Pipe that uses a third-party library to parse the Markdown string and then informs Angular that it’s safe to render the resulting HTML.
Step 1: Install a Markdown Library
You’ll need a library to parse the raw text. marked (or @markedjs/marked) is a common choice.
npm install marked
Step 2: Create a Custom Pipe
Create a pipe that uses the marked library to convert the string and use Angular DomSanitizer to mark the output as safe HTML.
// safe-markdown.pipe.ts
import { Pipe, PipeTransform } from '@angular/core';
import { DomSanitizer, SafeHtml } from '@angular/platform-browser';
import { marked } from 'marked';

@Pipe({
  name: 'safeMarkdown',
  // Required for use in standalone components
  standalone: true
})
export class SafeMarkdownPipe implements PipeTransform {

  constructor(private sanitizer: DomSanitizer) {}

  transform(value: string | null): SafeHtml {
    if (!value) return '';

    // Convert markdown string to HTML string
    const html = marked(value);

    // Tell Angular it's safe to render the HTML
    return this.sanitizer.bypassSecurityTrustHtml(html as string);
  }
}
Step 3: Use the Pipe in Your Template
Finally, you apply this pipe to the message content in your HTML template using property binding and the innerHTML property, which tells Angular to render the string as HTML elements.
<div class="chat-message-row" [ngClass]="{'user-row': message.user === 'User', 'ai-row': message.user === 'AI'}">
    <p-fieldset [legend]="message.user">
        <div [innerHTML]="message.content | safeMarkdown"></div>
    </p-fieldset>
</div>
This sequence — Parse (marked) -> Sanitize (DomSanitizer) -> Render (innerHTML) — is the standard pattern for securely displaying user-generated or external content that contains styling markup.
Finally
You now have a complete guide that shows how to build a reactive chat using Angular, PrimeNG, and Spring Boot. The workflow stays simple but powerful. Angular consumes each streamed chunk. Spring Boot emits messages through Flux. PrimeNG presents everything with a polished interface. Together, these technologies create a smooth, modern chatting experience.
This architecture also supports many extensions. You can integrate authentication or add conversation history. You can adopt a real AI model and stream generated tokens. The backend can log and analyze prompts. The frontend can switch to a multi-thread or multi-chat interface. Because the structure remains reactive, performance stays strong.
Experiment with new layouts and interactions. Explore additional PrimeNG components to enhance your UI. Consider adding markdown rendering or copy buttons to improve the user experience. The chat experience can grow with minimal effort. You now know how each part works. You can extend the system confidently.
This article was originally published on Medium.