RabbitMQ is a powerful message broker that facilitates communication between different system parts. It supports various messaging patterns, including pub-sub, work queues, and routing, making it an excellent choice for scalable and distributed applications.
Spring Boot provides seamless integration with RabbitMQ, simplifying the configuration and implementation of messaging features. In this article, we’ll explore how to integrate RabbitMQ with Spring Boot, including setup, message production, and consumption.
1. Understanding RabbitMQ
What is RabbitMQ?
RabbitMQ is an open-source message broker implementing the Advanced Message Queuing Protocol (AMQP). It enables asynchronous communication between microservices and helps improve scalability, decoupling, and fault tolerance.
Key Features:
- Message Queues: Stores messages until they are processed.
- Exchanges & Bindings: Routes messages to queues based on routing keys.
- Acknowledgments & Durability: Ensures message delivery reliability.
- Multiple Exchange Types: Direct, Fanout, Topic, and Headers exchanges.
- High Availability: Supports clustering and federated queues.
2. Setting Up RabbitMQ

3. Creating a Spring Boot Application with RabbitMQ
3.1 Adding Dependencies
Include the following dependencies in pom.xml:
<dependency>
    <groupId>org.springframework.boot</groupId>
    <artifactId>spring-boot-starter-amqp</artifactId>
</dependency>
This will add Spring AMQP and RabbitMQ support to our project.
3.2 Configuring RabbitMQ in Spring Boot
Modify application.properties:
spring.rabbitmq.host=localhost
spring.rabbitmq.port=5672
spring.rabbitmq.username=guest
spring.rabbitmq.password=guest
Alternatively, for application.yml:
spring:
  rabbitmq:
    host: localhost
    port: 5672
    username: guest
    password: guest
4. Implementing a RabbitMQ Producer
4.1 Defining a Message Queue
Create a RabbitMQConfig class:
import org.springframework.amqp.core.Queue;
import org.springframework.context.annotation.Bean;
import org.springframework.context.annotation.Configuration;

@Configuration
public class RabbitMQConfig {
    @Bean
    public Queue queue() {
        return new Queue("myQueue", false);
    }
}
This creates a queue named "myQueue".
4.2 Creating a Producer to Send Messages
Create a MessageProducer class:
import org.springframework.amqp.rabbit.core.RabbitTemplate;
import org.springframework.beans.factory.annotation.Autowired;
import org.springframework.stereotype.Service;

@Service
public class MessageProducer {
    private final RabbitTemplate rabbitTemplate;

    @Autowired
    public MessageProducer(RabbitTemplate rabbitTemplate) {
        this.rabbitTemplate = rabbitTemplate;
    }

    public void sendMessage(String message) {
        rabbitTemplate.convertAndSend("myQueue", message);
        System.out.println("Sent: " + message);
    }
}
This producer sends messages to "myQueue".
4.3 Testing the Producer
Modify CommandLineRunner in Application.java to test the producer:
import org.springframework.boot.CommandLineRunner;
import org.springframework.boot.SpringApplication;
import org.springframework.boot.autoconfigure.SpringBootApplication;
import org.springframework.beans.factory.annotation.Autowired;

@SpringBootApplication
public class Application implements CommandLineRunner {

    @Autowired
    private MessageProducer producer;

    public static void main(String[] args) {
        SpringApplication.run(Application.class, args);
    }

    @Override
    public void run(String... args) throws Exception {
        producer.sendMessage("Hello, RabbitMQ!");
    }
}
Run the application, and you should see the message being sent.
Sent: Hello, RabbitMQ!
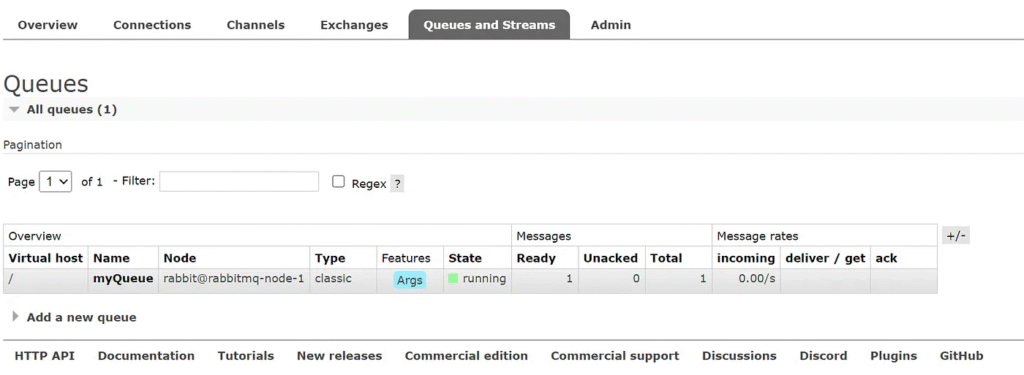
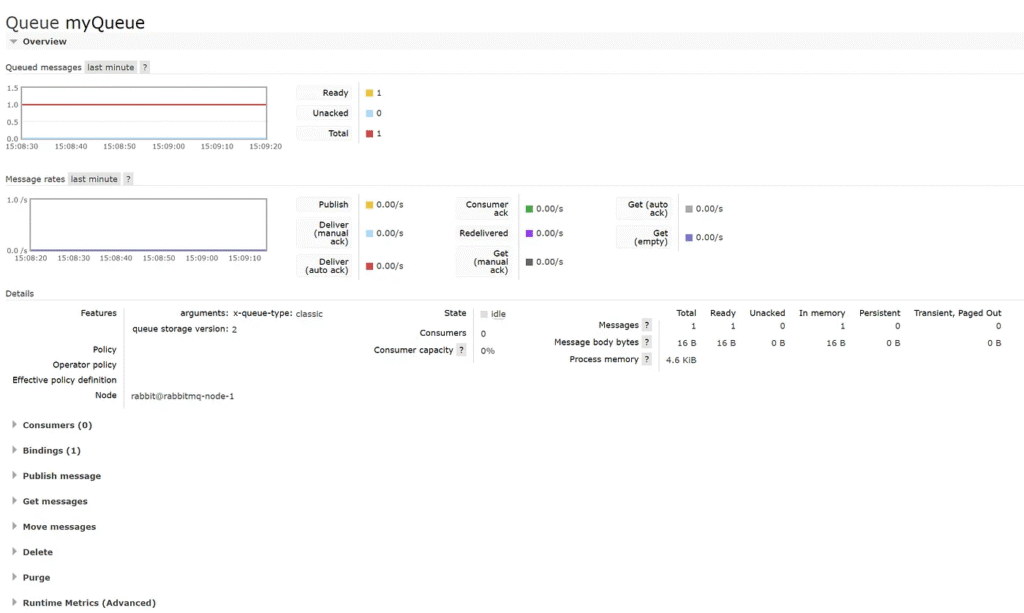
Access RabbitMQ WebUI
http://localhost:15672/#/queues
5. Implementing a RabbitMQ Consumer
5.1 Creating a Consumer
Create a MessageConsumer class:
import org.springframework.amqp.rabbit.annotation.RabbitListener;
import org.springframework.stereotype.Service;

@Service
public class MessageConsumer {
    @RabbitListener(queues = "myQueue")
    public void receiveMessage(String message) {
        System.out.println("Received: " + message);
    }
}
This consumer listens for messages on "myQueue" and prints them.
5.2 Running the Consumer
When the application runs, the producer will send a message, and the consumer will receive and display it:
Sent: Hello, RabbitMQ!
Received: Hello, RabbitMQ!
6. Implementing Exchanges and Routing
6.1 Declaring a Direct Exchange
Modify RabbitMQConfig:
import org.springframework.amqp.core.DirectExchange;
import org.springframework.amqp.core.Queue;
import org.springframework.amqp.core.Binding;
import org.springframework.amqp.core.BindingBuilder;
import org.springframework.context.annotation.Bean;
import org.springframework.context.annotation.Configuration;

@Configuration
public class RabbitMQConfig {

    @Bean
    public Queue myQueue() {
        return new Queue("myQueue", false);
    }

    @Bean
    public DirectExchange directExchange() {
        return new DirectExchange("myExchange");
    }

    @Bean
    public Binding binding(Queue myQueue, DirectExchange exchange) {
        return BindingBuilder.bind(myQueue).to(exchange).with("routingKey");
    }
}
6.2 Updating the Producer
Modify MessageProducer:
public void sendMessage(String message) {
    rabbitTemplate.convertAndSend("myExchange", "routingKey", message);
    System.out.println("Sent: " + message);
}
7. Advanced Features
7.1 Handling Message Acknowledgments
Modify the consumer:
import org.springframework.amqp.rabbit.annotation.RabbitListener;
import org.springframework.amqp.support.AcknowledgeMode;
import org.springframework.stereotype.Service;
import org.springframework.amqp.rabbit.listener.api.ChannelAwareMessageListener;
import com.rabbitmq.client.Channel;

@Service
public class ManualAckConsumer {

    @RabbitListener(queues = "myQueue", ackMode = "MANUAL")
    public void receiveMessage(String message, Channel channel) throws Exception {
        System.out.println("Received: " + message);
        channel.basicAck(1L, false);
    }
}
Explanation of Parameters:
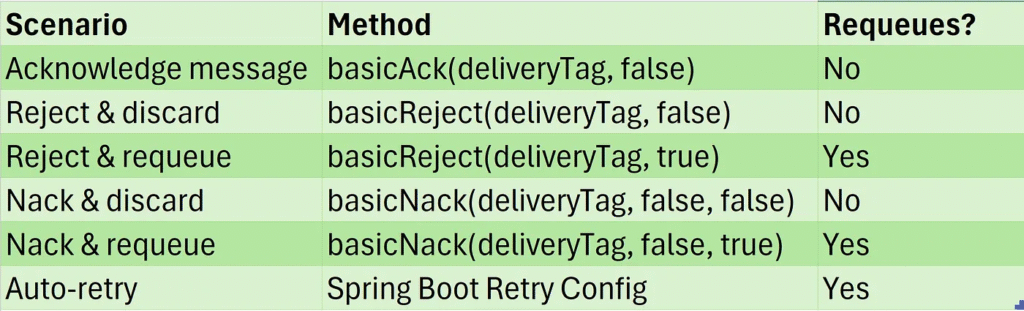
1L(delivery tag) → Identifies the specific message being acknowledged.false(multiple) → Only acknowledges this specific message, not multiple messages.
7.1.1 Reject a Message Without Requiring
Using basicNack (for multiple messages)
channel.basicNack(deliveryTag, false, false);
deliveryTag: The message identifier.false: Only rejects this specific message.false: Do not requeue (send it to a dead-letter queue if configured).
Using basicReject (for a single message)
channel.basicReject(deliveryTag, false);
The second parameter (false) ensures the message is not re-queued.
7.1.2 Requeue Message When Not Processed
If you want RabbitMQ to retry the message later, set requeue = true:
channel.basicNack(deliveryTag, false, true);
or
channel.basicReject(deliveryTag, true);
This will send the message back to the queue for another consumer to process.
7.1.3 Configure a Dead-Letter Queue (DLQ) for Unprocessed Messages
If you want unprocessed messages to go to a separate dead-letter queue instead of being lost, configure the queue with a dead-letter exchange (DLX):
Queue Configuration (Spring Boot — YAML)
spring:
  rabbitmq:
    listener:
      simple:
        acknowledge-mode: manual
    queue:
      name: my-queue
      arguments:
        x-dead-letter-exchange: my-dlx-exchange
        x-dead-letter-routing-key: my-dlx-routing-key
Java Code for DLQ Binding
@Bean
public Queue myQueue() {
    return QueueBuilder.durable("my-queue")
            .withArgument("x-dead-letter-exchange", "my-dlx-exchange")
            .withArgument("x-dead-letter-routing-key", "my-dlx-routing-key")
            .build();
}

@Bean
public Exchange dlxExchange() {
    return ExchangeBuilder.directExchange("my-dlx-exchange").durable(true).build();
}

@Bean
public Binding dlqBinding() {
    return BindingBuilder.bind(new Queue("my-dlx-queue"))
            .to(dlxExchange())
            .with("my-dlx-routing-key")
            .noargs();
}
7.1.4 Error Handling with Retry Mechanism
Configure retries in application.properties:
spring.rabbitmq.listener.simple.retry.enabled=true
spring.rabbitmq.listener.simple.retry.max-attempts=5
spring.rabbitmq.listener.simple.retry.initial-interval=1000
Alternative application.yml:
spring:
  rabbitmq:
    listener:
      simple:
        retry:
          enabled: true
          max-attempts: 5
          initial-interval: 1000
This retries failed messages up to 5 times.
Summary
7.2 Message Serialization
Modify application.yml:
spring:
  jackson:
    serialization:
      WRITE_DATES_AS_TIMESTAMPS: false
Define a Structured Message DTO
import lombok.Data;
import java.io.Serializable;

@Data
public class OrderMessage implements Serializable {
    private String orderId;
    private String product;
    private int quantity;

    public OrderMessage(String orderId, String product, int quantity) {
        this.orderId = orderId;
        this.product = product;
        this.quantity = quantity;
    }
}
Configure a RabbitMQ Message Converter
import org.springframework.amqp.core.Binding;
import org.springframework.amqp.core.BindingBuilder;
import org.springframework.amqp.core.DirectExchange;
import org.springframework.amqp.core.Queue;
import org.springframework.amqp.rabbit.connection.ConnectionFactory;
import org.springframework.amqp.rabbit.core.RabbitTemplate;
import org.springframework.amqp.support.converter.Jackson2JsonMessageConverter;
import org.springframework.context.annotation.Bean;
import org.springframework.context.annotation.Configuration;

@Configuration
public class RabbitMQConfig {
    @Bean
    public Queue queue() {
        return new Queue("myQueue", false);
    }

    @Bean
    public DirectExchange directExchange() {
        return new DirectExchange("myExchange");
    }

    @Bean
    public Binding binding(Queue myQueue, DirectExchange exchange) {
        return BindingBuilder.bind(myQueue).to(exchange).with("routingKey");
    }

    @Bean
    public Jackson2JsonMessageConverter converter() {
        return new Jackson2JsonMessageConverter();
    }

    @Bean
    public RabbitTemplate rabbitTemplate(ConnectionFactory connectionFactory,
                                         Jackson2JsonMessageConverter converter) {
        RabbitTemplate rabbitTemplate = new RabbitTemplate(connectionFactory);
        rabbitTemplate.setMessageConverter(converter);
        return rabbitTemplate;
    }
}
Producer — Send JSON Messages
import com.example.programming.model.rabbitmq.OrderMessage;
import lombok.extern.slf4j.Slf4j;
import org.springframework.amqp.rabbit.core.RabbitTemplate;
import org.springframework.beans.factory.annotation.Autowired;
import org.springframework.stereotype.Service;

@Service
@Slf4j
public class MessageProducer {
    private final RabbitTemplate rabbitTemplate;

    @Autowired
    public MessageProducer(RabbitTemplate rabbitTemplate) {
        this.rabbitTemplate = rabbitTemplate;
    }

    public void sendMessageJson(OrderMessage order) {
        log.info("Sending message: {}", order);
        rabbitTemplate.convertAndSend("myExchange", "routingKey", order);
    }
}
Consumer — Receive JSON Messages
@Service
@Slf4j
public class MessageConsumer {

    @RabbitListener(queues = "myQueue")
    public void receiveMessage(OrderMessage order) {
        log.info("Received message: {}", order);
    }
}
Testing the Setup
import com.example.programming.model.rabbitmq.OrderMessage;
import com.example.programming.service.rabbitmq.MessageProducer;
import org.springframework.beans.factory.annotation.Autowired;
import org.springframework.boot.CommandLineRunner;
import org.springframework.boot.SpringApplication;
import org.springframework.boot.autoconfigure.SpringBootApplication;
import org.springframework.context.annotation.EnableAspectJAutoProxy;

@SpringBootApplication
@EnableAspectJAutoProxy
public class ProgrammingApplication implements CommandLineRunner {

     @Autowired
     private MessageProducer producer;

     public static void main(String[] args) {
        SpringApplication.run(ProgrammingApplication.class, args);
     }

     @Override
     public void run(String... args) throws Exception {
        producer.sendMessageJson(new OrderMessage("A0001","Apple",2));
     }

}
Sending message: OrderMessage(orderId=A0001, product=Apple, quantity=2) Received message: OrderMessage(orderId=A0001, product=Apple, quantity=2)
External Logging and Monitoring Solutions
- Prometheus + Grafana: For long-term metrics visualization.
- ELK Stack (Elasticsearch, Logstash, Kibana): Store and analyze RabbitMQ logs.
- RabbitMQ Firehose Tracing: Captures message flow but requires additional setup.
- RabbitMQ Shovel / Federation Plugin: This can be used to duplicate messages for logging.
Conclusion
Spring Boot and RabbitMQ are excellent for building scalable, distributed systems. We covered:
- Setting up RabbitMQ
- Creating a producer and consumer
- Using exchanges and routing
- Implementing acknowledgments and retries
This article was originally published on Medium.