
Spring Boot, a popular framework for building Java-based applications, provides powerful caching mechanisms that improve performance by storing frequently accessed data. Integrating with Redis, a high-performance in-memory data structure store, creates an optimized caching solution. This article explores integrating Spring Boot caching with Redis, covering setup, configuration, and best practices.
What is Caching and Why Redis?
Caching is a mechanism to store frequently accessed data in memory for quick retrieval. It reduces database access and enhances application speed and scalability. Redis is a preferred caching solution because:
- High Performance: Redis operates in-memory, ensuring ultra-low latency.
- Flexibility: Supports data structures like strings, lists, sets, and more.
- Scalability: Can handle millions of operations per second.
- Persistence Options: Can persist cached data to disk for durability.
Setting Up the Redis Server
The developer can create a Redis server on Docker following the tutorial.

Setting Up Spring Boot and Redis
Prerequisites
- Java Development Kit (JDK) 8 or later.
- A running Redis server.
- Maven or Gradle for dependency management.
Step 1: Add Dependencies
Include the necessary dependencies in your pom.xml (for Maven):
<dependencies>
    <dependency>
        <groupId>org.springframework.boot</groupId>
        <artifactId>spring-boot-starter-data-redis</artifactId>
    </dependency>
    <dependency>
        <groupId>org.springframework.boot</groupId>
        <artifactId>spring-boot-starter-cache</artifactId>
    </dependency>
</dependencies>
Step 2: Spring Boot Configuration
Add Redis-specific configuration in application.properties or application.yml:
spring.redis.host=localhost
spring.redis.port=6379
spring.cache.type=redis
Alternatively, use application.yml:
spring:
  redis:
    host: localhost
    port: 6379
  cache:
    type: redis
For Redis cluster
spring:
  redis-cluster-nodes: 192.168.100.11:6379,192.168.100.12:6379,192.168.100.13:6379
Enabling Caching in Spring Boot
Spring Boot makes it easy to enable caching. Use the @EnableCaching annotation in your main application class:
@SpringBootApplication
@EnableCaching
public class RedisCachingApplication {
    public static void main(String[] args) {
        SpringApplication.run(RedisCachingApplication.class, args);
    }
}
Using Redis Cache in Spring Boot Application
Caching Service Implementation
1. Create a service with methods that use caching.
Use the @Cacheable, @CacheEvict, and @CachePut annotations to manage cache behavior.
@Service
@RequiredArgsConstructor
public class UserProfileCacheService {

    private final UserProfileRepository userProfileRepository;

    @Cacheable(value = "users", key = "#uuid")
    public UserProfile getUserById(UUID uuid) {
        // Expensive database operation
        return userProfileRepository.findById(uuid).orElseThrow(() -> new ResponseStatusException(HttpStatus.NOT_FOUND));
    }

    @CachePut(value = "users", key = "#result.id")
    public UserProfile updateUser(UserProfile user) {
        return userProfileRepository.save(user);
    }

    @CacheEvict(value = "users", key = "#id")
    public void deleteUser(UUID id) {
        userProfileRepository.deleteById(id);
    }

    @CacheEvict(value = "users", key = "#id")
    public void deleteCacheByKey(UUID id) {
        //
    }

    @CacheEvict(value = "users", allEntries = true)
    public void clearUsersCache() {
        // Clear operation
    }

}
Explain an annotation
@Cacheable: Caches the result of the method call.@CacheEvict: Removes data from the cache.@CachePut: Updates the cache without affecting the method execution.
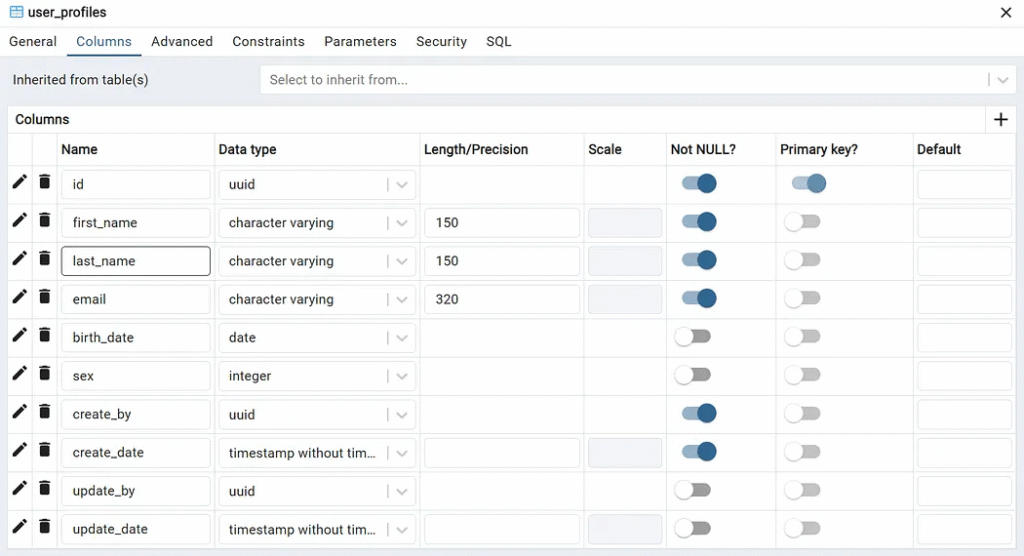
2. Create a user profile bean.
@Data
@Entity
@Table(name = "user_profiles", schema = "public")
@NoArgsConstructor
public class UserProfile {

    @Id
    @GeneratedValue(strategy = GenerationType.UUID)
    private UUID id;

    @Column(name = "first_name", nullable = false)
    private String firstName;

    @Column(name = "last_name", nullable = false)
    private String lastName;

    @Column(name = "email", nullable = false, unique = true)
    private String email;

    @Column(name = "birth_date", nullable = false)
    private LocalDateTime birthDate;

    @Column(name = "sex", nullable = false)
    private Integer sex;

    @Column(name = "create_by", nullable = false)
    private UUID createBy;

    @Column(name = "create_date", nullable = false)
    private LocalDateTime createDate;

    @Column(name = "update_by")
    private UUID updateBy;

    @Column(name = "update_date")
    private LocalDateTime updateDate;

}
3. Create a user profile repository
@Repository
public interface UserProfileRepository extends JpaRepository<UserProfile, UUID> {}
Redis Configuration for Caching
Redis can be further customized by creating a RedisCacheManager bean:
import com.fasterxml.jackson.annotation.JsonTypeInfo;
import com.fasterxml.jackson.databind.ObjectMapper;
import com.fasterxml.jackson.databind.SerializationFeature;
import com.fasterxml.jackson.datatype.jsr310.JavaTimeModule;
import org.springframework.cache.annotation.EnableCaching;
import org.springframework.context.annotation.Bean;
import org.springframework.context.annotation.Configuration;
import org.springframework.data.redis.cache.RedisCacheConfiguration;
import org.springframework.data.redis.cache.RedisCacheManager;
import org.springframework.data.redis.connection.RedisConnectionFactory;
import org.springframework.data.redis.serializer.GenericJackson2JsonRedisSerializer;
import org.springframework.data.redis.serializer.RedisSerializationContext;
import org.springframework.data.redis.serializer.StringRedisSerializer;
import java.time.Duration;

@Configuration
@EnableCaching
public class RedisConfig {

    @Bean
    public RedisCacheManager cacheManager(RedisConnectionFactory connectionFactory) {
        ObjectMapper objectMapper = new ObjectMapper();

        // Register JavaTimeModule to handle Java 8 date/time types
        objectMapper.registerModule(new JavaTimeModule());
        objectMapper.disable(SerializationFeature.WRITE_DATES_AS_TIMESTAMPS);

        // Configure ObjectMapper for proper typing
        objectMapper.activateDefaultTyping(
                objectMapper.getPolymorphicTypeValidator(),
                ObjectMapper.DefaultTyping.NON_FINAL,
                JsonTypeInfo.As.PROPERTY
        );

        // Configure JSON serializer with the custom ObjectMapper
        GenericJackson2JsonRedisSerializer serializer = new GenericJackson2JsonRedisSerializer(objectMapper);

        RedisCacheConfiguration config = RedisCacheConfiguration.defaultCacheConfig()
                .entryTtl(Duration.ofMinutes(60))
                .serializeKeysWith(RedisSerializationContext.SerializationPair
                        .fromSerializer(new StringRedisSerializer()))
                .serializeValuesWith(RedisSerializationContext.SerializationPair
                        .fromSerializer(serializer));

        return RedisCacheManager.builder(connectionFactory)
                .cacheDefaults(config)
                .build();
    }

}
For Redis Cluster Configuration for Caching
@Value("${spring.redis-cluster-nodes}")
private String[] redisClusterNodes;


@Bean
public RedisConnectionFactory redisConnectionFactory() {
    log.info("redis cluster {}", Arrays.asList(redisClusterNodes));
    // Create RedisClusterConfiguration using the nodes from the properties
    RedisClusterConfiguration clusterConfig = new RedisClusterConfiguration(
            Arrays.asList(redisClusterNodes)
    );
    return new LettuceConnectionFactory(clusterConfig);
}
Create a database
The developer creates a database following this tutorial.

application.yml
spring:
  jpa:
    hibernate:
      ddl-auto: none
      naming:
        implicit-strategy: org.hibernate.boot.model.naming.ImplicitNamingStrategyLegacyJpaImpl
        physical-strategy: org.hibernate.boot.model.naming.PhysicalNamingStrategyStandardImpl
    show-sql: true
    properties:
      hibernate:
        dialect: org.hibernate.dialect.PostgreSQLDialect
  datasource:
    url: jdbc:postgresql://localhost:5432/demo
    username: admin
    password: password
    driver-class-name: org.postgresql.Driver
To deploy an application on Docker, change the URL in the application.yml file.
jdbc:postgresql://172.21.0.1:5432/demo
Deploy Spring Boot Application on Docker
1. Directory structure
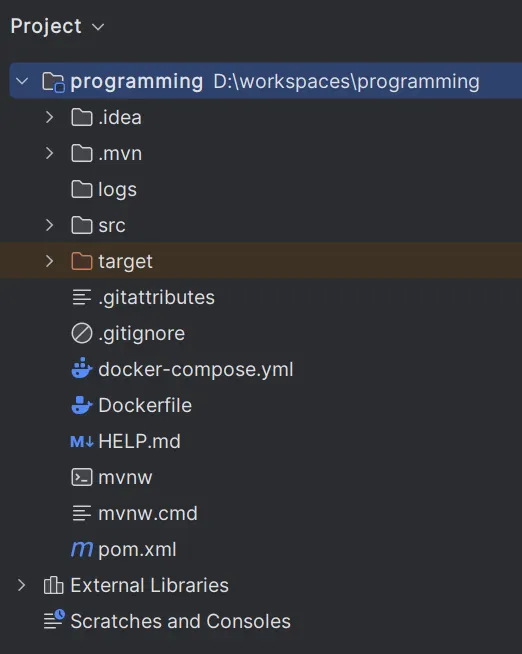
2. Create Dockerfile
# Stage 1: Build the application with Maven
FROM maven:3.9.9-amazoncorretto-21 AS build

# Set the working directory inside the container
WORKDIR /app

# Copy the pom.xml and src directory for building the app
COPY pom.xml .
COPY src ./src

# Run Maven to clean and build the application (skip tests if needed)
RUN mvn clean package -DskipTests

# Stage 2: Create the final image to run the app
FROM openjdk:21-jdk-slim

# Set the working directory inside the container
WORKDIR /app

# Copy the built JAR file from the build stage
COPY --from=build /app/target/*.jar app.jar

# Expose the port the app will run on
EXPOSE 8080

# Run the Spring Boot application
ENTRYPOINT ["java", "-jar", "app.jar"]
3. Create docker-compose.yml
services:
  spring-boot-app:
    build:
      context: .
      dockerfile: Dockerfile
    container_name: spring-boot-container
    ports:
      - "8080:8080" # Map the container port to the host port
    environment:
      SPRING_PROFILES_ACTIVE: docker # Use the "docker" profile for Spring Boot (optional)
    volumes:
      - ./logs:/app/logs # Bind a volume for application logs (optional)
    networks:
      - redis_redis-network
      - postgres_my-network

networks:
  redis_redis-network:
    external: true
  postgres_my-network:
    external: true
Explain Network
Connects the spring-boot-app service to two external networks:
redis_redis-network: To communicate with a Redis service running in another Docker Compose environment.postgres_my-network: To communicate with a PostgreSQL service running in another Docker Compose environment.
4. The developer can inspect Docker networks using the Docker command.
docker network ls
NETWORK ID     NAME                            DRIVER    SCOPE
b09af9a41b15   bridge                          bridge    local
90e23212ded7   host                            host      local
61218b2c7675   none                            null      local
5483b4087e6b   postgres_my-network             bridge    local
51e470e2cc34   redis_redis-network             bridge    local
5. Deploy the Spring Boot application.
docker compose up
6. Check container status.
docker ps
CONTAINER ID   IMAGE                         COMMAND                  CREATED              STATUS              PORTS                                              NAMES
0e25469ba14d   programming-spring-boot-app   "java -jar app.jar"      About a minute ago   Up About a minute   0.0.0.0:8080->8080/tcp                             spring-boot-container
277135a9898e   redis/redisinsight:latest     "./docker-entry.sh n…"   23 hours ago         Up 43 minutes       5000/tcp, 0.0.0.0:5540->5540/tcp                   redisinsight
2c7dd97affb4   redis:latest                  "docker-entrypoint.s…"   23 hours ago         Up 4 minutes        0.0.0.0:6381->6379/tcp, 0.0.0.0:16381->16379/tcp   redis-node-3-1
7e8a53fa9502   redis:latest                  "docker-entrypoint.s…"   23 hours ago         Up 4 minutes        0.0.0.0:6383->6379/tcp                             redis-node-5-1
8dba4ab3eeae   redis:latest                  "docker-entrypoint.s…"   23 hours ago         Up 4 minutes        0.0.0.0:6380->6379/tcp, 0.0.0.0:16380->16379/tcp   redis-node-2-1
49c3147a86a6   redis:latest                  "docker-entrypoint.s…"   23 hours ago         Up 4 minutes        0.0.0.0:6382->6379/tcp                             redis-node-4-1
c1951110af9d   redis:latest                  "docker-entrypoint.s…"   23 hours ago         Up 4 minutes        0.0.0.0:6384->6379/tcp                             redis-node-6-1
ba8e5777905f   redis:latest                  "docker-entrypoint.s…"   23 hours ago         Up 4 minutes        0.0.0.0:6379->6379/tcp, 0.0.0.0:16379->16379/tcp   redis-node-1-1
5eec2b6b186f   postgres                      "docker-entrypoint.s…"   6 months ago         Up 43 minutes       0.0.0.0:5432->5432/tcp                             postgres-db-1
Monitoring and Debugging
Enable Redis CLI
Use Redis CLI to monitor cache operations:
redis-cli
127.0.0.1:6379> KEYS *
Enable Spring Boot Logs
Add logging configuration to monitor cache behavior:
logging.level.org.springframework.cache=DEBUG
Redis insight
http://localhost:5540
Testing the Cache
1. Run the Application: Start your Spring Boot application.
2. Access Endpoints: Use an API testing tool (e.g., Postman) or a simple REST client to test the caching.
@RestController
@RequestMapping("/api/v1/users-cache")
@Slf4j
@RequiredArgsConstructor
public class UserCacheController {

    private final UserProfileCacheService userProfileCacheService;

    private final CacheManager cacheManager;

    Random random = new Random();

    @GetMapping("/{id}")
    public ResponseEntity<UserProfile> getUserById(@PathVariable String id) {
        UUID uuid = UUID.fromString(id);
        UserProfile user = userProfileCacheService.getUserById(uuid);
        return ResponseEntity.ok(user);
    }

    @PostMapping("/{name}")
    public ResponseEntity<UserProfile> createUserProfile(@PathVariable String name) {
        // Create a demo UserProfile instance using @Builder
        UserProfile demoUserProfile = new UserProfile();
        demoUserProfile.setId(UUID.randomUUID());
        demoUserProfile.setFirstName(name);
        demoUserProfile.setLastName("Doe");
        demoUserProfile.setEmail(name.toLowerCase() + ".doe@example.com");

        long start = LocalDateTime.of(1990, 1, 1, 0, 0, 0, 0).toEpochSecond(ZoneOffset.UTC);
        long end = LocalDateTime.of(2022, 12, 31, 23, 59, 59, 999999999).toEpochSecond(ZoneOffset.UTC);

        // Generate a random number of seconds within the range
        long randomSeconds = ThreadLocalRandom.current().nextLong(start, end);

        // Convert the random seconds back to LocalDateTime
        LocalDateTime randomDateTime = LocalDateTime.ofEpochSecond(randomSeconds, 0, ZoneOffset.UTC);

        demoUserProfile.setBirthDate(randomDateTime);
        int randomSex = random.nextInt(2) + 1;
        demoUserProfile.setSex(randomSex);
        demoUserProfile.setCreateBy(UUID.randomUUID());
        demoUserProfile.setCreateDate(LocalDateTime.now());
        demoUserProfile.setUpdateBy(null);
        demoUserProfile.setUpdateDate(null);
        UserProfile user = userProfileCacheService.updateUser(demoUserProfile);
        return ResponseEntity.ok(user);
    }

    @DeleteMapping("/{id}")
    public ResponseEntity<String> deleteUserProfile(@PathVariable String id) {
        UUID uuid = UUID.fromString(id);
        userProfileCacheService.deleteUser(uuid);
        return ResponseEntity.ok("delete success.");
    }

    @DeleteMapping
    public ResponseEntity<String> clearCache() {
        userProfileCacheService.clearUsersCache();
        return ResponseEntity.ok("clear cache success.");
    }
Test case: HTTP GET Method
In this test case, developers get users by UUID
1. GET User by ID:
/api/v1/users-cache/81f867c4–86e9–47e6–9f50-bbf22dfe13eb

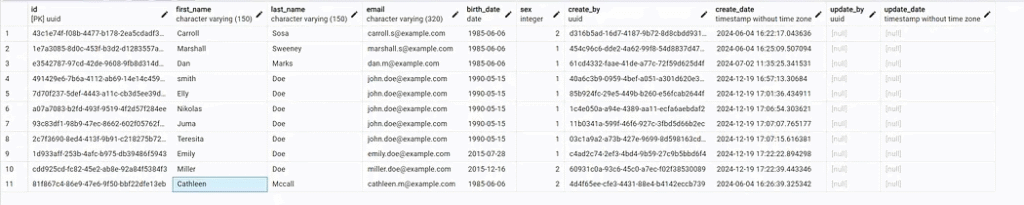
2. In the console log application, connect to the database.
Hibernate: select up1_0.id,up1_0.birth_date,up1_0.create_by,up1_0.create_date,up1_0.email,up1_0.first_name,up1_0.last_name,up1_0.sex,up1_0.update_by,up1_0.update_date from public.user_profiles up1_0 where up1_0.id=?
3. Check the cache in Redis Insight.
http://localhost:5540/

When developers request again, the application does not connect to the database, indicating that it uses a cache from Redis.
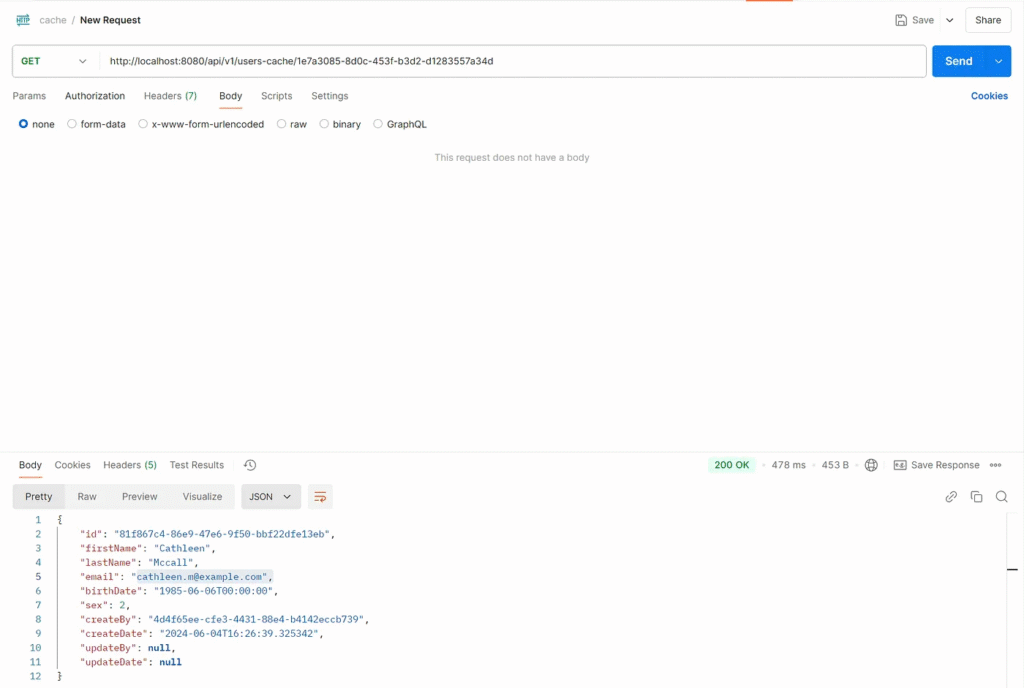
4. GET User by ID with a different UUID:
/api/v1/users-cache/
1e7a3085-8d0c-453f-b3d2-d1283557a34d


Test case: HTTP POST Method
In the test scenario, the user sends a request to insert the database, and the Redis server saves the user profile in a cache using UUID as a key. The user sends a request to get data from the user profile. The Redis server sends cache data as response data.
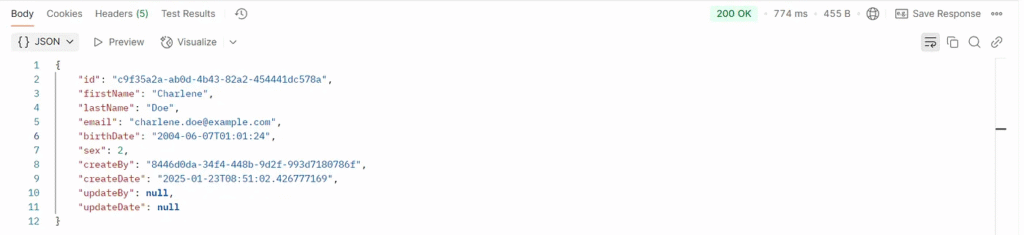
1. POST create a user profile : /api/v1/users-cache/Charlene

2. Check the cache in Redis Insight.

The cache key is the UUID of the data in the database.
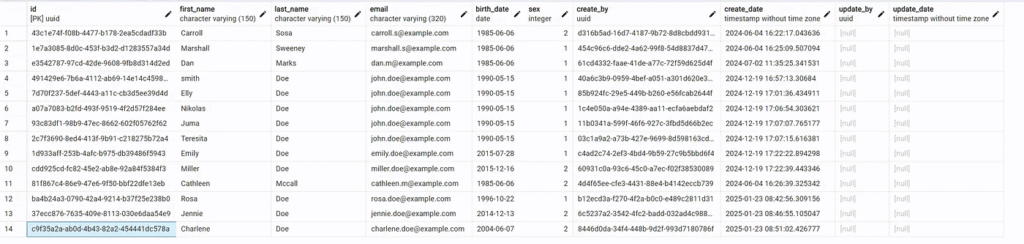
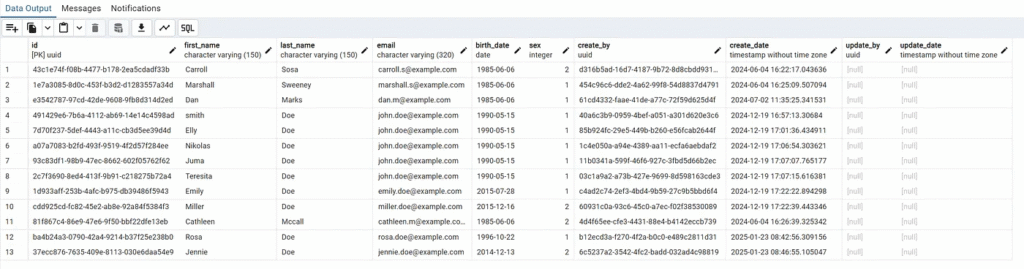
3. Check Database
SELECT id, first_name, last_name, email, birth_date, sex, create_by, create_date, update_by, update_date
 FROM public.user_profiles where first_name = 'Charlene';

4. Check the log on Docker
spring-boot-container  | Hibernate: select up1_0.id,up1_0.birth_date,up1_0.create_by,up1_0.create_date,up1_0.email,up1_0.first_name,up1_0.last_name,up1_0.sex,up1_0.update_by,up1_0.update_date from public.user_profiles up1_0 where up1_0.id=?
spring-boot-container  | Hibernate: insert into public.user_profiles (birth_date,create_by,create_date,email,first_name,last_name,sex,update_by,update_date,id) values (?,?,?,?,?,?,?,?,?,?)
5. GET User by ID with UUID from POST request:
/api/v1/users-cache/
c9f35a2a-ab0d-4b43-82a2-454441dc578a

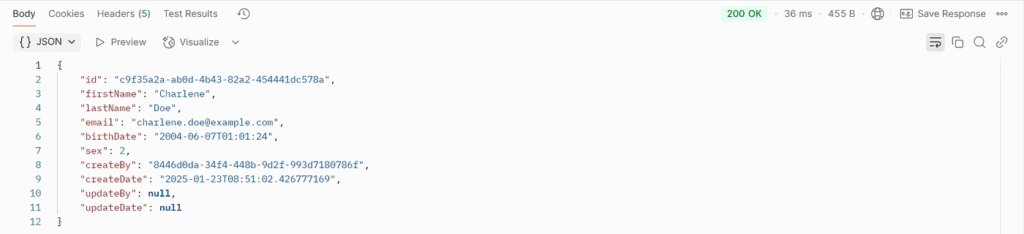
Response data from Spring Boot application using a Cache from the Redis server.
DELETE Test case
1. Delete a user profile using UUID : /api/v1/users-cache/
c9f35a2a-ab0d-4b43-82a2-454441dc578a


2. Check the Redis server and Database

The cache and data in the database have been deleted.
DELETE All Test cases
1. Delete a user profile : /api/v1/users-cache/


2. Check the Redis server.

All caches in the Redis Server have been deleted.
Best Practices
- Set TTL (Time-to-Live): Prevent stale data by configuring cache expiry.
- Use Efficient Keys: Use meaningful and unique keys to avoid collisions.
- Avoid Caching Sensitive Data: Ensure sensitive information is encrypted or not cached.
- Monitor Cache Performance: Use tools like RedisInsight to analyze cache metrics.
Conclusion
When integrated with Redis, Spring Boot’s caching capabilities create a robust, high-performance solution for modern applications. With minimal configuration, developers can achieve significant performance improvements. Following this article’s steps and best practices, you can seamlessly implement caching in your Spring Boot applications and leverage Redis for optimal performance.


