Redis, a powerful in-memory data store, has become a go-to technology for caching, real-time analytics, and pub/sub messaging. Combining its flexibility with Docker, a popular containerization platform, streamlines Redis deployment and scalability. Additionally, incorporating a Graphical User Interface (GUI) enhances accessibility and management, making Redis more user-friendly for developers and administrators.
This article will delve into deploying Redis on Docker and managing it effectively using GUI tools.
What is Redis?
Redis stands for Remote Dictionary Server, an open-source NoSQL database that operates primarily in memory for fast read and write operations. It supports various data structures, including strings, hashes, lists, and sorted sets. Redis is versatile and widely used for caching, session storage, leaderboards, and geospatial data.
Why Use Docker for Redis?
Docker simplifies application deployment by packaging software and its dependencies into isolated containers. When it comes to Redis, Docker offers numerous advantages:
- Isolation: Redis instances run independently of other system components, ensuring stability.
- Scalability: Spin up multiple Redis containers to handle increased load.
- Portability: Docker containers can run consistently across different environments.
- Simplified Deployment: Prebuilt Redis Docker images reduce setup time.
Setting Up Redis on Docker
Prerequisites
Before you begin, ensure Docker is installed on your system. For installation instructions, visit the Docker documentation.
Pulling the Redis Image
Docker Hub provides an official Redis image. To download it, run:
docker pull redis
Running a Redis Container
To start a Redis container, use:
docker run --name redis-container -d redis
This command:
- Names the container
redis-container. - Runs it in detached mode (
-d).
Verifying Redis Installation
Ensure the container is running:
docker ps
Connect to the Redis CLI:
docker exec -it redis-container redis-cli
You can now issue Redis commands, such as PING, to check its status.
Redis Configuration in Docker
Docker allows customizing Redis configurations through:
1. Environment Variables: Example:
docker run --name redis-container -d -e REDIS_PASSWORD=yourpassword redis
2. Custom Configuration Files: Mount a configuration file using:
docker run --name redis-container -d -v /path/to/redis.conf:/usr/local/etc/redis/redis.conf redis redis-server /usr/local/etc/redis/redis.conf
Introducing GUIs for Redis Management
While Redis CLI is powerful, GUIs make managing Redis instances more intuitive by providing visualization tools and user-friendly interfaces.
Popular Redis GUIs
1. RedisInsight:
- Description: Developed by Redis, RedisInsight is a feature-rich GUI offering visual exploration, query execution, and performance analysis.
- Installation: Download from the RedisInsight website.
- Usage: After launching RedisInsight, connect to your instance by entering the host, port, and authentication details.
2. Medis:
- Description: A cross-platform, open-source Redis GUI with real-time updates.
- Features:
- View and edit keys.
- Monitor keyspace metrics.
Setting Up RedisInsight on Docker
Setting up RedisInsight on Docker is a straightforward process. Follow these steps to get RedisInsight up and running quickly:
Step 1: Pull the RedisInsight Docker Image
The official RedisInsight image is available on Docker Hub. Use the following command to download it:
docker pull redis/redisinsight
Step 2: Run the RedisInsight Container
Run a RedisInsight container using the following command:
docker run -d \
  --name redisinsight \
  -p 5540:5540\
  redis/redisinsight
Explanation:
-d: Runs the container in detached mode.--name redisinsight: Names the container for easier management.-p 5540:5540: Maps the port5540of the container to the port5540on the host machine.redis/redisinsight: Specifies the image to use.
Step 3: Access RedisInsight
Once the container is running:
1. Open a web browser.
2. Navigate to http://localhost:5540 (or replace localhost with your Docker host’s IP if running Docker remotely).
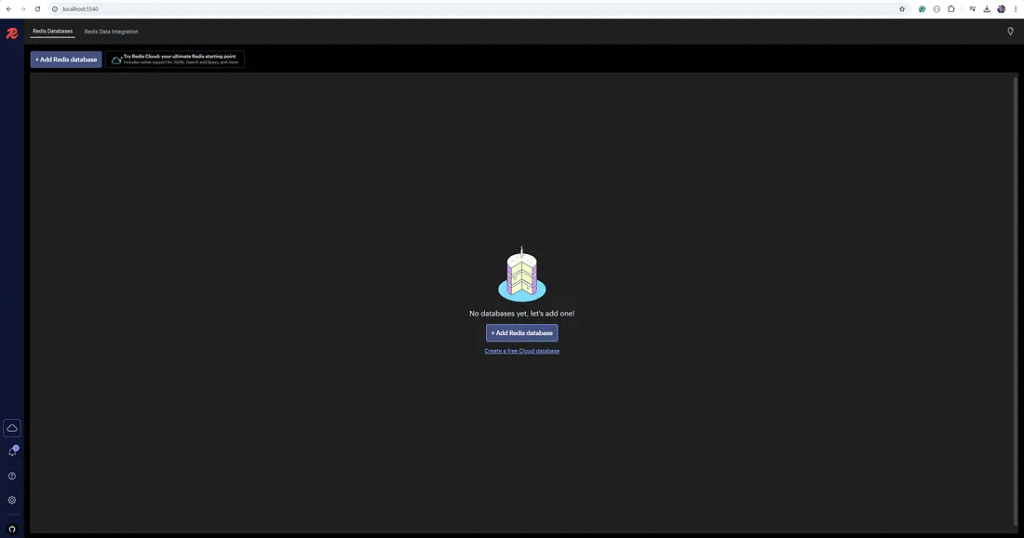
Step 4: Connect RedisInsight to a Redis Instance
After accessing RedisInsight:
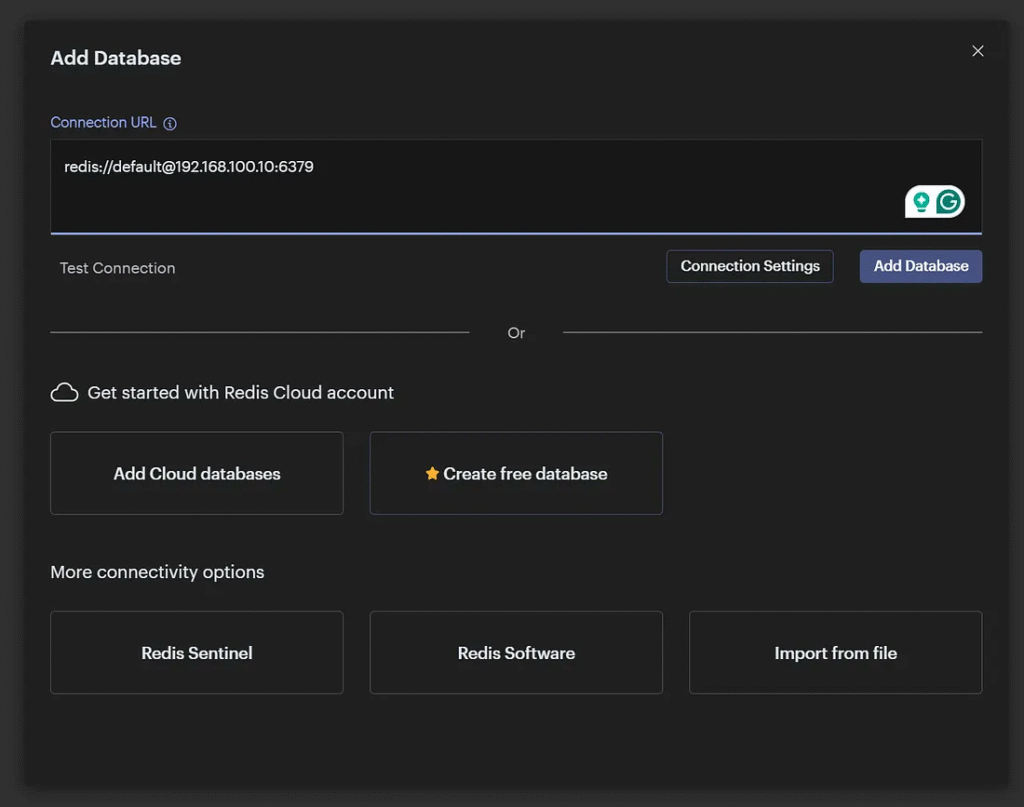
1. Click “Add Redis Database”.
2. Fill in the connection details:
- Host: IP address or hostname of your Redis instance (e.g.,
localhostor the Redis container name if on the same Docker network). - Port: Redis listens on
6379by default. - Password: (Optional) If your Redis instance is password-protected, provide the password.
3. Click “Add” to connect.

Optional Configurations
Persistent Data for RedisInsight
To retain RedisInsight configurations after a container restart, map a volume for the configuration data:
networks:
  custom-network:
    driver: bridge
    ipam:
      config:
        - subnet: 192.168.100.0/24

services:
  redis:
    image: redis:latest
    container_name: redis
    networks:
      custom-network:
        ipv4_address: 192.168.100.10
    ports:
      - "6379:6379"
    volumes:
      - redis-data:/data
    command: ["redis-server", "--save", "60", "1", "--loglevel", "warning"]
    restart: always

  redisinsight:
    image: redis/redisinsight:latest
    container_name: redisinsight
    networks:
      custom-network:
        ipv4_address: 192.168.100.20
    ports:
      - "5540:5540"
    restart: always

volumes:
  redis-data:
Connecting RedisInsight to a Dockerized Redis
If your Redis instance is also running in a Docker container:
Ensure both containers are on the same network:
docker network create redis-network
docker network connect redis-network redisinsight
docker network connect redis-network redis-container
Use the Redis container name (e.g., redis-container) as the host when adding the Redis database in RedisInsight.
Managing RedisInsight
Start/Stop the Container:
docker start redisinsight
docker stop redisinsight
Check Logs:
docker logs redisinsight
Connecting GUIs to Dockerized Redis
Steps:
1. Identify the Redis container’s IP address using
docker inspect redis-container
2. Configure the GUI to connect to the Redis instance:
- Host: Redis container’s IP or
localhostif bound to host. - Port: Default is
6379. - Password: If configured.
Example: Connecting RedisInsight
- Launch RedisInsight.
- Add a Redis database using the above details.
- Explore data structures, monitor performance, and debug.
Scaling Redis cluster with Docker Compose
Docker Compose facilitates managing multi-container applications. Here’s how to deploy Redis with Docker Compose.
*** ERROR: Invalid configuration for cluster creation.
*** Redis Cluster requires at least 3 master nodes.
*** This is not possible with 3 nodes and 1 replicas per node.
*** At least 6 nodes are required.
Redis Cluster requires at least 3 master nodes to function. If you set 1 replica per master, you need 6 nodes total (3 masters + 3 replicas). With only 3 nodes, all nodes would become masters, leaving no room for replicas, thus violating the cluster requirements.
Step 1: Create the docker-compose.yml File
Create a docker-compose.yml file for a Redis cluster with multiple nodes. Below is an example configuration:
networks:
  redis-network:
    driver: bridge
    ipam:
      config:
        - subnet: 192.168.100.0/24

services:
  node-1:
    image: redis:latest
    command: ["redis-server", "/usr/local/etc/redis/redis.conf", "--cluster-enabled", "yes", "--cluster-config-file", "nodes.conf", "--appendonly", "yes"]
    ports:
      - "6379:6379"
    volumes:
      - redis-data-1:/data
      - ./redis.conf:/usr/local/etc/redis/redis.conf
    networks:
      redis-network:
        ipv4_address: 192.168.100.11

  node-2:
    image: redis:latest
    command: ["redis-server", "/usr/local/etc/redis/redis.conf", "--cluster-enabled", "yes", "--cluster-config-file", "nodes.conf", "--appendonly", "yes"]
    ports:
      - "6380:6379"
    volumes:
      - redis-data-2:/data
      - ./redis.conf:/usr/local/etc/redis/redis.conf
    networks:
      redis-network:
        ipv4_address: 192.168.100.12

  node-3:
    image: redis:latest
    command: ["redis-server", "/usr/local/etc/redis/redis.conf", "--cluster-enabled", "yes", "--cluster-config-file", "nodes.conf", "--appendonly", "yes"]
    ports:
      - "6381:6379"
    volumes:
      - redis-data-3:/data
      - ./redis.conf:/usr/local/etc/redis/redis.conf
    networks:
      redis-network:
        ipv4_address: 192.168.100.13

  node-4:
    image: redis:latest
    command: ["redis-server", "/usr/local/etc/redis/redis.conf", "--cluster-enabled", "yes", "--cluster-config-file", "nodes.conf", "--appendonly", "yes"]
    ports:
      - "6382:6379"
    volumes:
      - redis-data-4:/data
      - ./redis.conf:/usr/local/etc/redis/redis.conf
    networks:
      redis-network:
        ipv4_address: 192.168.100.14

  node-5:
    image: redis:latest
    command: ["redis-server", "/usr/local/etc/redis/redis.conf", "--cluster-enabled", "yes", "--cluster-config-file", "nodes.conf", "--appendonly", "yes"]
    ports:
      - "6383:6379"
    volumes:
      - redis-data-5:/data
      - ./redis.conf:/usr/local/etc/redis/redis.conf
    networks:
      redis-network:
        ipv4_address: 192.168.100.15

  node-6:
    image: redis:latest
    command: ["redis-server", "/usr/local/etc/redis/redis.conf", "--cluster-enabled", "yes", "--cluster-config-file", "nodes.conf", "--appendonly", "yes"]
    ports:
      - "6384:6379"
    volumes:
      - redis-data-6:/data
      - ./redis.conf:/usr/local/etc/redis/redis.conf
    networks:
      redis-network:
        ipv4_address: 192.168.100.16

volumes:
  redis-data-1:
  redis-data-2:
  redis-data-3:
  redis-data-4:
  redis-data-5:
  redis-data-6:
Step 2: Create a redis.conf File
In the same directory, create a redis.conf file with the following content:
port 6379
cluster-enabled yes
cluster-config-file nodes.conf
cluster-node-timeout 5000
appendonly yes
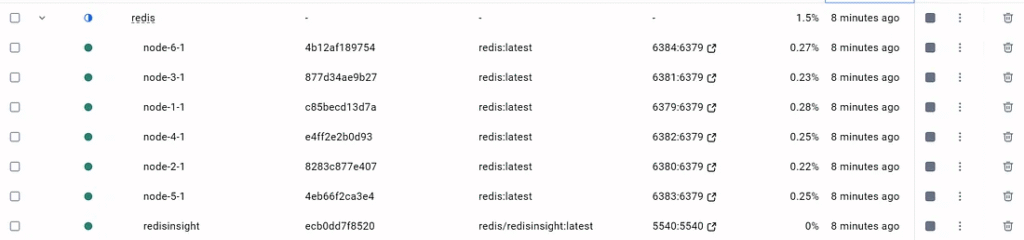
Step 3: Start the Redis Cluster Containers
Run the following command to bring up all Redis nodes:
docker-compose up -d
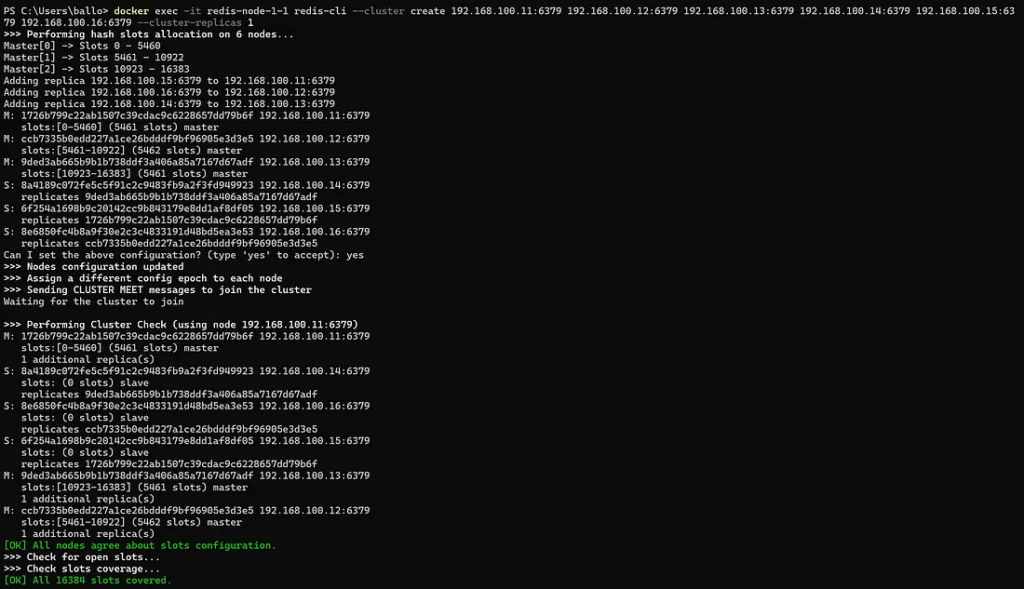
Step 4: Create the Redis Cluster
Once all the containers run, you must connect them into a cluster.
Run the CLUSTER CREATE command to set up the cluster. Use the --cluster create Option and specify the IPs of all nodes:
docker exec -it redis-node-1-1 redis-cli --cluster create 192.168.100.11:6379 192.168.100.12:6379 192.168.100.13:6379 192.168.100.14:6379 192.168.100.15:6379 192.168.100.16:6379 --cluster-replicas 1
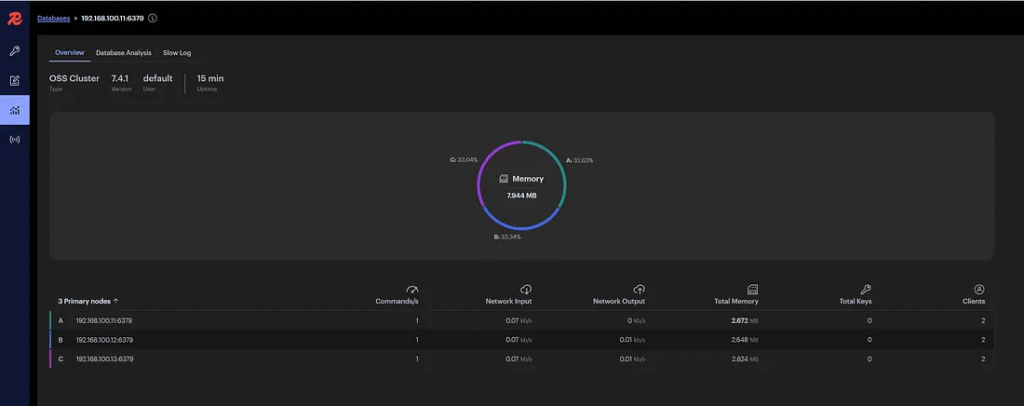
Step 5: Verify the Cluster
1. Check the cluster status:
docker exec -it redis-node-1-1 redis-cli cluster info
cluster_state:ok
cluster_slots_assigned:16384
cluster_slots_ok:16384
cluster_slots_pfail:0
cluster_slots_fail:0
cluster_known_nodes:6
cluster_size:3
cluster_current_epoch:6
cluster_my_epoch:1
cluster_stats_messages_ping_sent:674
cluster_stats_messages_pong_sent:671
cluster_stats_messages_sent:1345
cluster_stats_messages_ping_received:666
cluster_stats_messages_pong_received:674
cluster_stats_messages_meet_received:5
cluster_stats_messages_received:1345
total_cluster_links_buffer_limit_exceeded:0
2. View the node roles and configuration:
docker exec -it redis-node-1-1 redis-cli cluster nodes
1726b799c22ab1507c39cdac9c6228657dd79b6f 192.168.100.11:6379@16379 myself,master - 0 0 1 connected 0-5460
8a4189c072fe5c5f91c2c9483fb9a2f3fd949923 192.168.100.14:6379@16379 slave 9ded3ab665b9b1b738ddf3a406a85a7167d67adf 0 1735035444447 3 connected
8e6850fc4b8a9f30e2c3c4833191d48bd5ea3e53 192.168.100.16:6379@16379 slave ccb7335b0edd227a1ce26bdddf9bf96905e3d3e5 0 1735035444000 2 connected
6f254a1698b9c20142cc9b843179e8dd1af8df05 192.168.100.15:6379@16379 slave 1726b799c22ab1507c39cdac9c6228657dd79b6f 0 1735035445452 1 connected
9ded3ab665b9b1b738ddf3a406a85a7167d67adf 192.168.100.13:6379@16379 master - 0 1735035445050 3 connected 10923-16383
ccb7335b0edd227a1ce26bdddf9bf96905e3d3e5 192.168.100.12:6379@16379 master - 0 1735035444448 2 connected 5461-10922
Step 6: Test the Cluster
1. Add a key to Redis:
docker exec -it redis-node-1-1 redis-cli -c SET key1 "value1"
The -c option enables cluster mode and ensures commands are forwarded to the correct node.
2. Check exist key:
>docker exec -it redis-node-1-1 redis-cli -c EXISTS key1
(integer) 1
3. Retrieve the key:

docker exec -it redis-node-1 redis-cli -c GET key1
"value1"
Best Practices for Redis on Docker
1. Use Persistent Storage:
- By default, Redis stores data in memory—mount volumes to prevent data loss during container restarts.
2. Secure Access:
- Configure a password and limit access to trusted clients.
- Use environment variables to hide sensitive information.
3. Monitor Performance:
- Use GUIs or tools like Prometheus and Grafana for real-time insights.
4. Enable Backups:
- Automate backups to avoid data loss during unexpected failures.
Conclusion
Deploying Redis on Docker simplifies setup and scalability, while GUIs like RedisInsight enhance usability for developers and administrators. By combining these tools, you can manage Redis efficiently and leverage its full potential for your applications.
Start exploring Redis with Docker and GUIs to modernize your data management practices today!
This article was originally published on Medium.