For developers building AI-powered applications, containerization ensures consistency and reliability. Whether you’re coding on a Mac or deploying on Linux, Docker keeps it stable. That’s why we’ll use docker-compose.yml to define our Ollama setup.
Why Run Ollama with Docker?
Docker makes life easier for developers. Instead of struggling with local installations, you run applications in containers. These containers hold everything the app needs. That means fewer conflicts, simpler sharing, and faster deployments.
When you run Ollama with Docker, you avoid heavy system dependencies. You spin up the container, and Ollama is ready. No more broken paths or mismatched libraries. Just clean, portable environments.
Additionally, Docker Compose facilitates the management of multiple containers. With one YAML file, you can start Ollama, databases, and supporting services together. It’s like having a universal remote control for your stack.
Step 1: Install Docker and Docker Compose
Before we begin, ensure Docker is installed. If you don’t have it yet, grab it from the official Docker site. Installation is straightforward. Follow the steps specific to your operating system.
Once Docker is running, check the version. Open a terminal and type:
docker --version
docker-compose --version
If both commands return versions, you’re good to go. If not, troubleshoot the installation first. It’s better to confirm before moving ahead.
Docker Compose may come bundled with Docker Desktop. On Linux, you might need to install it separately. Once installed, you’ll use it to orchestrate your containers.
Step 2: Create a Docker Project for Ollama
Let’s organize things. First, make a project folder.
mkdir ollama-docker
cd ollama-docker
Inside this folder, we’ll add our configuration. Creating a clean workspace avoids confusion later. Keep your files together, and version control becomes simple.
The heart of our setup is the docker-compose.yml file. This file describes the container. You’ll define the image, ports, and any volumes needed. Think of it as a blueprint for Docker.
Step 3: Write the docker-compose.yml File
Now let’s build the YAML file. Open your favorite editor and create docker-compose.yml. Paste the following:
services:
  ollama:
    image: ollama/ollama:latest
    container_name: ollama-container
    ports:
      - "11434:11434"
    volumes:
      - ./ollama-data:/root/.ollama
    restart: unless-stopped
Let’s break this down:
- Version: Defines Docker Compose format.
- Services: Lists our containers. Here we have only
ollama. - Image: Uses the latest Ollama image from Docker Hub.
- container_name: Assigns a readable name.
- Ports: Maps container port
11434to the same host port. - Volumes: Stores Ollama data outside the container for persistence.
- Restart: Restarts automatically unless stopped.
This file alone will run Ollama in a neat, isolated container.
Step 4: Start Ollama with Docker Compose
Once the YAML file is ready, start the service. Run:
docker-compose up -d
The -d flag runs the container in the background. Docker will download the Ollama image if it’s missing. Then it launches the container.
Check the status with:
docker ps
CONTAINER ID   IMAGE                       COMMAND                  CREATED          STATUS          PORTS                                             NAMES
d57acc3d9909   ollama/ollama:latest        "/bin/ollama serve"      55 minutes ago   Up 55 minutes   0.0.0.0:11434->11434/tcp, [::]:11434->11434/tcp   ollama-container
You should see ollama-container running. If not, check logs with:
docker-compose logs
Congratulations! You now have Ollama running inside Docker. That’s half the journey completed.
Step 5: Test Ollama Locally
Testing ensures everything works. You can curl the Ollama endpoint to check:
curl http://localhost:11434
StatusCode        : 200
StatusDescription : OK
Content           : Ollama is running
RawContent        : HTTP/1.1 200 OK
                    Content-Length: 17
                    Content-Type: text/plain; charset=utf-8
                    Date: Wed, 27 Aug 2025 08:56:52 GMT

                    Ollama is running
Forms             : {}
Headers           : {[Content-Length, 17], [Content-Type, text/plain; charset=utf-8], [Date, Wed, 27 Aug 2025 08:56:52
                    GMT]}
Images            : {}
InputFields       : {}
Links             : {}
ParsedHtml        : mshtml.HTMLDocumentClass
RawContentLength  : 17
If Ollama responds, the container is active. Some images may require initialization. In that case, logs will guide you.
At this stage, you have a working Ollama environment. Next, let’s connect it with Spring AI.
Install ollama2 in a Docker container.
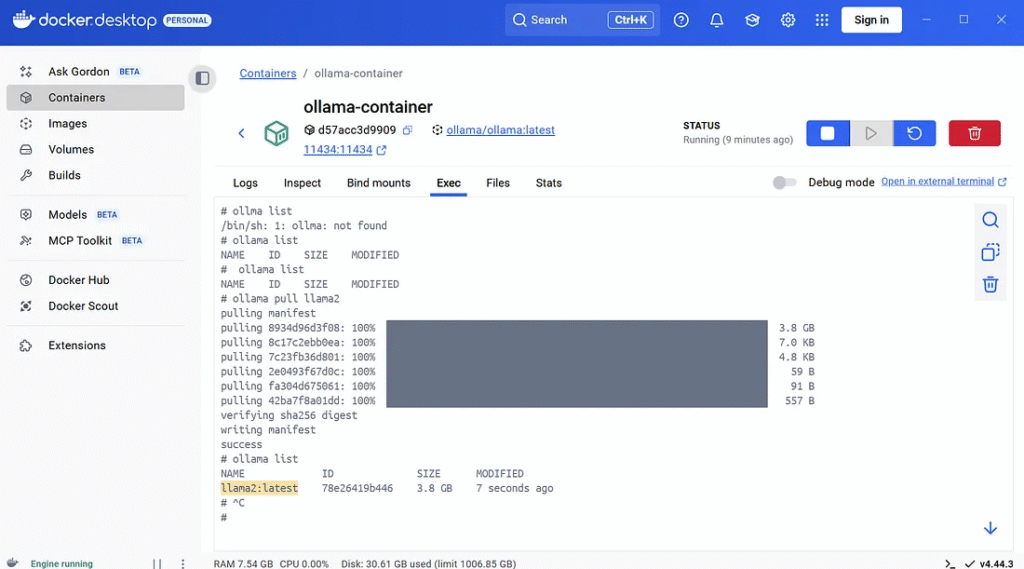
Check the ollama model.
ollama list
NAME ID SIZE MODIFIED
Suppose you get an empty model. You must install the model to ollama.
ollama pull llama2
Recheck the ollama model.
>ollama list
NAME             ID              SIZE      MODIFIED
llama2:latest    78e26419b446    3.8 GB    7 seconds ago
Step 6: Why Connect Ollama with Spring AI?
Spring AI simplifies AI integration into Java apps. It offers abstractions for prompts, models, and APIs. With Spring AI, you don’t need to handle raw HTTP calls manually. Instead, you use friendly interfaces that fit well with Spring Boot.
By connecting Ollama and Spring AI, you bring local AI power into your applications—eliminating the need to rely solely on cloud APIs. You control the model environment. That’s great for privacy, experimentation, and cost management.
Think of it as having your personal AI server, wrapped neatly inside your Java project.
Step 7: Add Spring AI Dependencies
Open your Spring Boot project. In pom.xml, add Spring AI dependencies. Here’s an example:
https://start.spring.io/
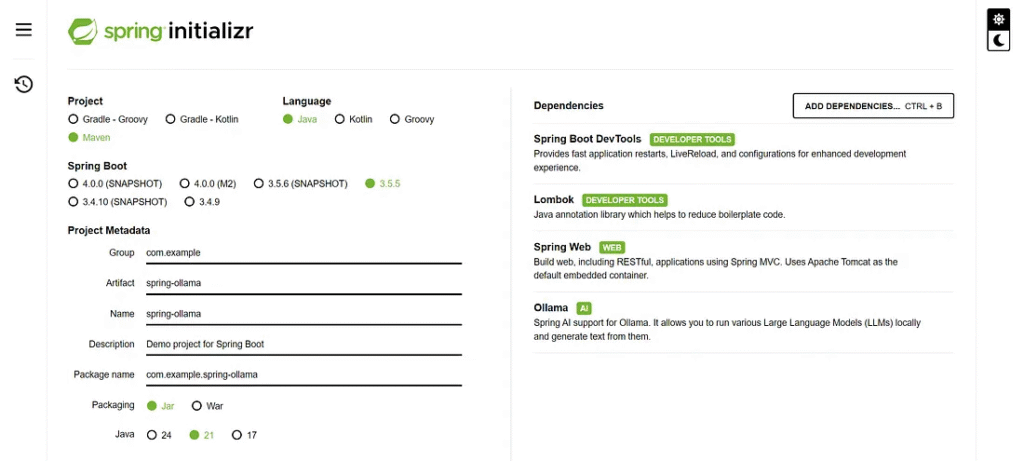
These dependencies allow your project to speak with the Ollama container.
<properties>
   <java.version>21</java.version>
   <spring-ai.version>1.0.1</spring-ai.version>
</properties>
<dependencies>
   <dependency>
       <groupId>org.springframework.boot</groupId>
       <artifactId>spring-boot-starter-web</artifactId>
   </dependency>
   <dependency>
       <groupId>org.springframework.ai</groupId>
       <artifactId>spring-ai-starter-model-ollama</artifactId>
   </dependency>
   <dependency>
       <groupId>org.springframework.boot</groupId>
       <artifactId>spring-boot-devtools</artifactId>
       <scope>runtime</scope>
       <optional>true</optional>
   </dependency>
   <dependency>
       <groupId>org.projectlombok</groupId>
       <artifactId>lombok</artifactId>
       <optional>true</optional>
   </dependency>
   <dependency>
       <groupId>org.springframework.boot</groupId>
       <artifactId>spring-boot-starter-test</artifactId>
       <scope>test</scope>
   </dependency>
</dependencies>
<dependencyManagement>
   <dependencies>
       <dependency>
           <groupId>org.springframework.ai</groupId>
           <artifactId>spring-ai-bom</artifactId>
           <version>${spring-ai.version}</version>
           <type>pom</type>
           <scope>import</scope>
       </dependency>
   </dependencies>
</dependencyManagement>
Step 8: Configure Spring AI to Use Ollama
Spring Boot makes configuration simple. In your application.yml, set Ollama as the provider:
spring:
  application:
    name: spring-ollama
  ai:
    ollama:
      base-url: http://localhost:11434
      chat:
        model: llama2:latest
Here:
- base-url: Points to your running Ollama container.
- Model: Selects the model Ollama should use. Adjust it according to the models available.
This trim configuration seamlessly ties your Spring Boot app to Ollama.
Check the Ollama model name.
>curl http://localhost:11434/api/tags
{
    "models": [
        {
            "name": "llama2:latest",
            "model": "llama2:latest",
            "modified_at": "2025-08-27T08:14:50.2608108Z",
            "size": 3826793677,
            "digest": "78e26419b4469263f75331927a00a0284ef6544c1975b826b15abdaef17bb962",
            "details": {
                "parent_model": "",
                "format": "gguf",
                "family": "llama",
                "families": [
                    "llama"
                ],
                "parameter_size": "7B",
                "quantization_level": "Q4_0"
            }
        }
    ]
}
Step 9: Create a Simple Service in Spring AI
Next, write a service to interact with Ollama. Example in Java:
import lombok.RequiredArgsConstructor;
import org.springframework.ai.ollama.OllamaChatModel;
import org.springframework.stereotype.Service;

@Service
@RequiredArgsConstructor
public class OllamaService {

    private final OllamaChatModel ollama;

    public String askOllama(String prompt) {
        return ollama.call(prompt);
    }
}
This service wraps Ollama calls. Your application can now send prompts and receive AI-generated responses.
Step 10: Build a Controller for Testing
To make things interactive, expose a REST endpoint. Example:
import com.example.spring_ollama.service.OllamaService;
import org.springframework.web.bind.annotation.GetMapping;
import org.springframework.web.bind.annotation.RequestMapping;
import org.springframework.web.bind.annotation.RequestParam;
import org.springframework.web.bind.annotation.RestController;

@RestController
@RequestMapping("/api/ollama")
public class OllamaController {

    private final OllamaService service;

    public OllamaController(OllamaService service) {
        this.service = service;
    }

    @GetMapping("/ask")
    public String ask(@RequestParam String prompt) {
        return service.askOllama(prompt);
    }
}
Now you can hit your Spring Boot app and chat with Ollama.
Step 11: Test the Integration
Start your Spring Boot app. With Ollama running in Docker, visit:
http://localhost:8080/api/ollama/ask?prompt=Why is the sky blue?
If everything is correct, Ollama will respond. That means your integration works. You now have a Java app powered by Ollama inside Docker.
The sky appears blue to us because of a phenomenon called Rayleigh scattering. This is the scattering of sunlight by small particles in the atmosphere, such as nitrogen and oxygen molecules, and tiny dust particles. These particles absorb sunlight in all directions, but they scatter shorter (blue) wavelengths more than longer (red) wavelengths.

When sunlight enters Earth's atmosphere, it encounters these small particles and is scattered in all directions. The blue light is scattered more than the red light, so it reaches our eyes from all parts of the sky, giving the appearance of a blue sky. This effect is more pronounced when the sun is high in the sky, as there are more particles in the upper atmosphere to scatter the light.

The reason why we see the sky as blue and not, say, yellow or purple, is because our eyes are most sensitive to blue light. The human eye has cells in the retina that are most sensitive to light with a wavelength of around 450 nanometers (blue light), which is the same wavelength that is scattered most by the small particles in the atmosphere. So, when the sunlight enters our eyes, it appears blue because of the way the light is scattered and the sensitivity of our eyes.

It's worth noting that the color of the sky can appear different under different conditions. For example, during sunrise and sunset, the sky can take on hues of red, orange, and pink due to the scattering of light by larger particles in the atmosphere. Additionally, pollution and other atmospheric factors can also affect the color of the sky.
Step 12: Troubleshooting Tips
Things may break, and that’s fine. Common fixes:
- If Ollama doesn’t start, check the Docker logs.
- If Spring AI cannot connect, confirm the port mapping.
- Ensure that both Docker and Spring Boot applications run simultaneously.
- Update versions if APIs mismatch.
These checks usually solve most problems.
Next Steps: Expand Your Setup
You’ve built a strong base. From here, you can:
- Add a frontend for better interaction.
- Secure your API with authentication.
- Deploy the stack on a server.
- Train custom models locally.
The possibilities are endless. You’ve unlocked the first step toward building AI-enabled Java applications.
For GPU (NVIDIA)
This setup enables GPU acceleration, which is highly recommended for faster model inference.
If you want to pull a model when the container starts automatically, you can modify the docker-compose.yml:
services:
  ollama:
    image: ollama/ollama:latest
    container_name: ollama-gpu
    ports:
      - "11434:11434"
    volumes:
      - ollama_data:/root/.ollama
    environment:
      - NVIDIA_VISIBLE_DEVICES=all
      - NVIDIA_DRIVER_CAPABILITIES=compute,utility
    deploy:
      resources:
        reservations:
          devices:
            - driver: nvidia
              count: all
              capabilities: [gpu]
    restart: unless-stopped
    tty: true
    stdin_open: true
    depends_on:
      - model-puller

  model-puller:
    image: ollama/ollama:latest
    container_name: ollama-model-puller
    volumes:
      - ollama_data:/root/.ollama
    environment:
      - NVIDIA_VISIBLE_DEVICES=all
      - NVIDIA_DRIVER_CAPABILITIES=compute,utility
    deploy:
      resources:
        reservations:
          devices:
            - driver: nvidia
              count: all
              capabilities: [gpu]
    entrypoint: |
      sh -c "
      ollama serve &
      sleep 10
      echo 'Pulling ollama2 model...'
      ollama pull ollama2
      echo 'Model pulled successfully!'
      pkill ollama
      "
    restart: "no"

volumes:
  ollama_data:
    driver: local
Verify GPU Usage
# From inside container
docker exec -it ollama-gpu nvidia-smi
Troubleshooting
Check NVIDIA drivers:
nvidia-smi
Verify Docker can access the GPU:
docker run --rm --gpus all nvidia/cuda:11.0-base nvidia-smi
Check Docker daemon configuration (/etc/docker/daemon.json):
{
  "runtimes": {
    "nvidia": {
      "path": "nvidia-container-runtime",
      "runtimeArgs": []
    }
  },
  "default-runtime": "nvidia"
}
This setup will give you GPU-accelerated Ollama running in Docker, which will significantly improve inference speed compared to CPU-only execution.
Finally
You just created Ollama on Docker and connected it with Spring AI. That’s a powerful combo! Docker gave you consistency. Spring AI gave you simplicity. Together, they unlock creative projects without relying on the cloud.
Now it’s your turn. Experiment, break things, and improve them. Share your work with others. The community grows when we learn together.
You’ve got the tools, and you’ve got the steps. Time to build something amazing!
This article was originally published on Medium.