Ever wanted to build a beautiful, accessible, and fully validated contact form in Next.js? Let’s do it together using the awesome @heroui/react library.
You’ll learn how to use:
- Input
- Textarea
- Button
- Toast
…to create a clean and user-friendly experience.
Let’s get started.
Set Up Your Next.js Project

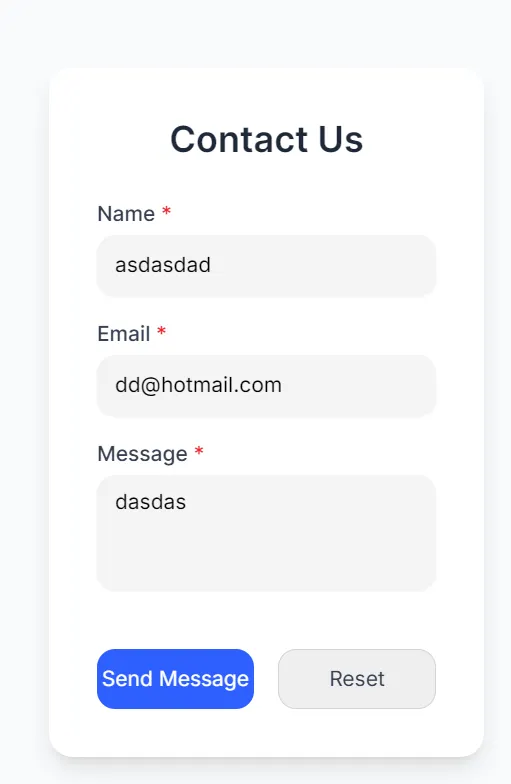
Design the Contact Form UI
Create a new component: components/ContactForm.tsx.
Inside it, add your import statements:
import { Input, Textarea, Button } from "@heroui/react";
import { useState } from "react";
import { addToast } from "@heroui/react";
Now, define your form structure using useForm:
const ContactForm = () => {
  const [isSubmitting, setIsSubmitting] = useState(false);

  const onSubmit = async (e: any) => {
    e.preventDefault();
    setIsSubmitting(true);
    const data = Object.fromEntries(new FormData(e.currentTarget));

    try {
      const response = await fetch("/api/contact", {
        method: "POST",
        headers: {
          "Content-Type": "application/json",
        },
        body: JSON.stringify(data),
      });

      console.log(response);

      if (response.ok) {
        //const data = await response.json();
        addToast({
          title: "Success",
          description: "Contact form submitted.",
          color: "success",
        });
      } else {
        //const errorData = await response.json();
        addToast({
          title: "Error",
          description: "Could not connect to the server. Please try again.",
          color: "danger",
        });
      }
    } catch (err) {
      console.error(err);
    }

    setTimeout(() => {
      setIsSubmitting(false);
    }, 3000);
  };
Then render the form:
return (
<div className="flex items-center justify-center min-h-screen bg-gray-50 px-4">
<form
onSubmit={onSubmit}
className="w-full max-w-md space-y-6 rounded-2xl bg-white p-8 shadow-lg"
>
<h2 className="text-2xl font-semibold text-gray-800 text-center">
Contact Us
</h2>
<div className="space-y-4">
<div>
<label className="block text-sm font-medium text-gray-700 mb-1">
Name <span className="text-red-500">*</span>
</label>
<Input
label=""
isRequired
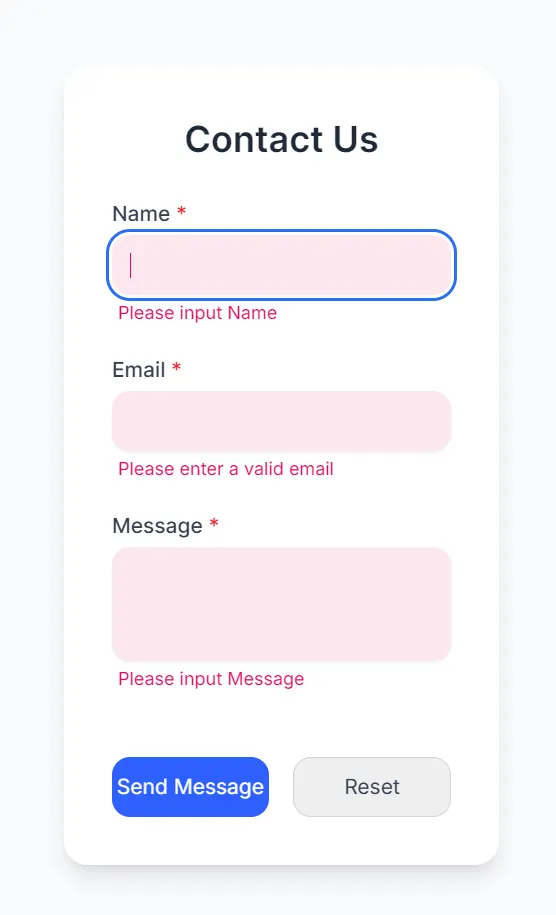
errorMessage="Please input Name"
className="w-full"
/>
</div>
<div>
<label className="block text-sm font-medium text-gray-700 mb-1">
Email <span className="text-red-500">*</span>
</label>
<Input
label=""
name="email"
type="email"
isRequired
errorMessage="Please enter a valid email"
className="w-full"
/>
</div>
<div>
<label className="block text-sm font-medium text-gray-700 mb-1">
Message <span className="text-red-500">*</span>
</label>
<Textarea
label=""
rows={5}
isRequired
errorMessage="Please input Message"
className="w-full"
/>
</div>
</div>
<div className="flex justify-between items-center gap-4 pt-4">
<Button
type="submit"
disabled={isSubmitting}
className="w-full bg-blue-600 text-white hover:bg-blue-700 transition-colors duration-200"
>
{isSubmitting ? "Sending..." : "Send Message"}
</Button>
<Button
type="reset"
variant="flat"
className="w-full border border-gray-300 text-gray-700 hover:bg-gray-100 transition-colors duration-200"
>
Reset
</Button>
</div>
</form>
</div>
);
};
export default ContactForm;Create the API Route
Now let’s handle form submissions.
Create a file: pages/api/contact/route.ts.
Here’s a simple handler:
// app/api/contact/route.ts (App Router)
import { NextResponse } from 'next/server';

export async function POST(request: Request) {
  const data = await request.json();
  // Handle POST request logic
  return NextResponse.json({ message: 'Success!', data });
}
Simple, right? Now, your form submits data to this API.
Add the Component to a Page
Go to app/contact/page.tsx and use the form:
"use client";

import ContactForm from '../../components/ContactForm';

export default function Home() {
  return (
    <main className="min-h-screen flex items-center justify-center bg-gray-50 p-4">
      <ContactForm />
    </main>
  );
}
That’s it. You’ve got a fully working contact form that:
- Has real-time validation
- Sends data via API
- Displays a toast notification on success
- It is accessible out of the box
Add ToastProvider to a Provider
Go to app/provider.tsx :
"use client";

import type { ThemeProviderProps } from "next-themes";

import * as React from "react";
import { HeroUIProvider } from "@heroui/system";
import { useRouter } from "next/navigation";
import { ThemeProvider as NextThemesProvider } from "next-themes";
import { ToastProvider } from "@heroui/react";

export interface ProvidersProps {
  children: React.ReactNode;
  themeProps?: ThemeProviderProps;
}

declare module "@react-types/shared" {
  interface RouterConfig {
    routerOptions: NonNullable<
      Parameters<ReturnType<typeof useRouter>["push"]>[1]
    >;
  }
}

export function Providers({ children, themeProps }: ProvidersProps) {
  const router = useRouter();

  return (
    <HeroUIProvider navigate={router.push}>
       <ToastProvider />
      <NextThemesProvider {...themeProps}>{children}</NextThemesProvider>
    </HeroUIProvider>
  );
}
A ToastProvider in Next.js is a component that typically wraps your application’s layout or root component to provide context and functionality for displaying “toast” notifications throughout your application.
Test application
Run application
>npm run dev
Access the contact page
http://localhost:3000/contact
Test requires fields.
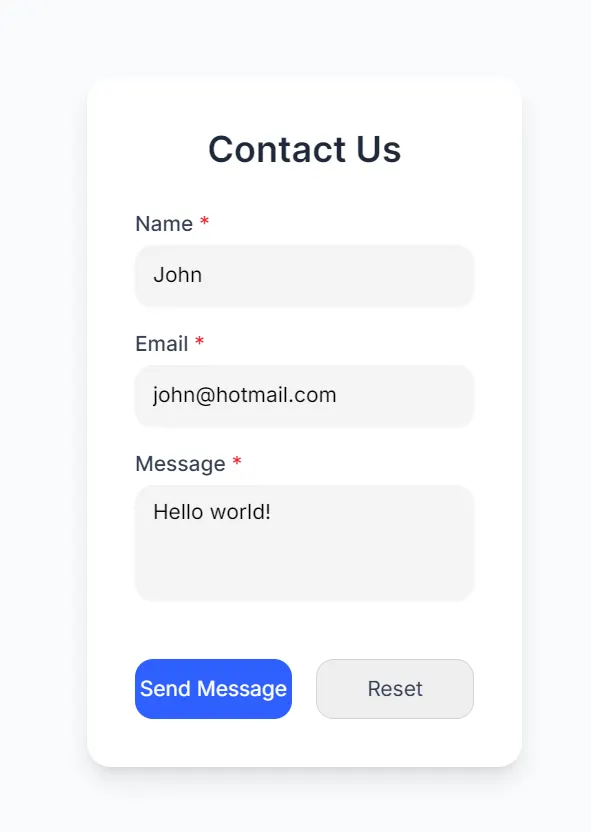
Test submit form.

Tips for Production Use
Before wrapping up, here are some quick tips:
- Add reCAPTCHA to prevent spam.
- Sanitize input on the server side.
- Set up an email service like Resend, SendGrid, or Mailgun.
- Use environment variables for API keys.
Security and accessibility matter. This setup gives you both a great dev experience and a good user experience.
Finally
You did it! 🎉
You’ve built a contact form in Next.js with TypeScript, complete with form validation and toast messages using @heroui/react.
This is an excellent foundation for any modern landing page, portfolio, or SaaS project.
5 Steps to an Accessible Next.js Contact Form
Build UI Component & Imports
File: components/ContactForm.tsx. Import HeroUI components (Input, Textarea, Button) and set up initial React state management (useState).
Implement Form Submission Handler
Define onSubmit to prevent default, collect data via FormData, and manage the isSubmitting state. Includes basic client-side validation.
Create Next.js API Route
File: /api/contact/route.ts. Define a POST handler to receive the JSON body and process the submission data server-side.
Configure Toast Notifications
Ensure ToastProvider is wrapped around the application’s root. Use addToast within the onSubmit handler to provide clear success or error feedback.
Security & Polish
For production, integrate security (e.g., reCAPTCHA), sanitize input on the server, and connect an email service (e.g., SendGrid) to fully process and send the message.
This article was originally published on Medium.