
A smooth booking system transforms how people experience your product. Hotels, clinics, and event organizers depend on it. Users expect convenience, speed, and clarity. If your booking flow fails, they leave.
You can change that. Imagine building a clean, elegant interface that works on any device. It inspires trust and drives conversions. HeroUI provides powerful components that make this possible. With its Calendar and Modal, you can create delightful booking experiences.
This tutorial will guide you step by step. You will build a booking system using Next.js, TypeScript, and HeroUI. By the end, you will have a working hotel or appointment booking interface. More importantly, you will gain skills to craft modern web applications with confidence.
Let’s dive in and start building something people will love to use.
Setting Up the Next.js Project

Understanding HeroUI Calendar and Modal
Before coding, understand why these components matter. The Calendar allows users to select dates quickly. It ensures accuracy and avoids confusion, eliminating the need for manual text input that leads to errors.
The Modal captures details in a focused way. It prevents distractions by dimming the background. Users can complete tasks without losing context. Together, they form the backbone of an intuitive booking flow.
Here’s a basic Calendar example:
import { Calendar } from "@heroui/calendar";

export default function CalendarExample() {
  return <Calendar aria-label="Booking date" />;
}
And a simple Modal example:
import { Modal, ModalContent, ModalHeader, ModalBody, ModalFooter, Button } from "@heroui/react";
import { useState } from "react";

export default function ModalExample() {
  const [isOpen, setIsOpen] = useState(false);

  return (
    <>
      <Button onPress={() => setIsOpen(true)}>Open Booking</Button>
      <Modal isOpen={isOpen} onOpenChange={setIsOpen}>
        <ModalContent>
          {(onClose) => (
            <>
              <ModalHeader>Booking Details</ModalHeader>
              <ModalBody>
                <p>Form goes here</p>
              </ModalBody>
              <ModalFooter>
                <Button onPress={onClose}>Close</Button>
              </ModalFooter>
            </>
          )}
        </ModalContent>
      </Modal>
    </>
  );
}
Individually, these components shine. But their true power emerges when combined. Let’s integrate them into a booking page.
Creating the Booking Page
We will create a dedicated page for booking. Next.js makes this simple. Create a file booking/page.tsx.
"use client";
import { useState } from "react";
import { Calendar } from "@heroui/calendar";
import {
Modal,
ModalContent,
ModalHeader,
ModalBody,
ModalFooter,
Button,
Input,
Form,
} from "@heroui/react";
import { today, getLocalTimeZone, CalendarDate } from "@internationalized/date";
export default function BookingPage() {
const [isOpen, setIsOpen] = useState(false);
const [selectedDate, setSelectedDate] = useState(today(getLocalTimeZone()));
const onSubmit = (e: any) => {
e.preventDefault();
alert("Booking confirmed!");
};
return (
<>
<div style={{ padding: "2rem", fontFamily: "sans-serif", color: "#333" }}>
<h1
style={{
textAlign: "center",
marginBottom: "1.5rem",
color: "#007bff",
}}
>
Book Your Stay
</h1>
<div
style={{
display: "flex",
justifyContent: "center",
marginBottom: "1rem",
}}
>
<Calendar
aria-label="Select booking date"
defaultValue={selectedDate}
onChange={(e) => setSelectedDate(e as CalendarDate)}
/>
</div>
<div style={{ display: "flex", justifyContent: "center" }}>
<Button
color="primary"
isDisabled={!selectedDate}
onPress={() => setIsOpen(true)}
>
Continue Booking
</Button>
</div>
</div>
</>
);
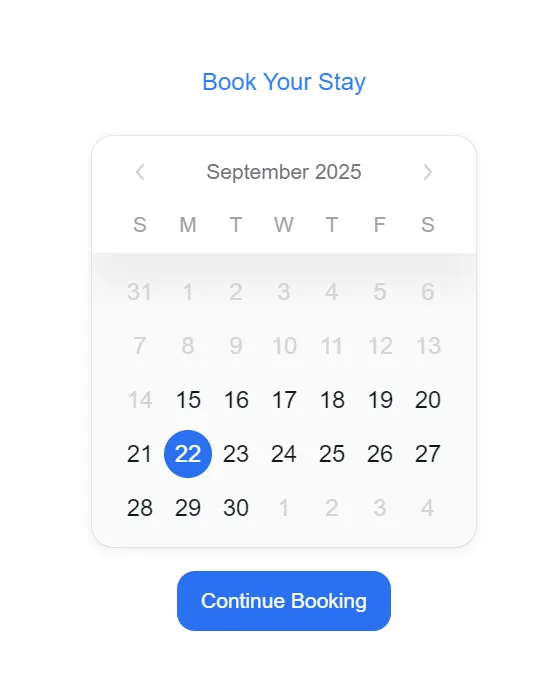
}This page allows users to select a date. Once selected, they can continue. The button remains disabled until a date is chosen. This design reduces errors and improves clarity.
Now let’s expand with the Modal to capture user details.
Integrating the Calendar into the Flow
The Calendar gives structure to the booking. It sets the stage for capturing details. But integration is key.
Add the Modal to the BookingPage:
<Modal isOpen={isOpen} onOpenChange={setIsOpen}>
<Form className="w-full max-w-xs" onSubmit={onSubmit}>
<ModalContent>
{(onClose) => (
<>
<ModalHeader>Confirm Your Booking</ModalHeader>
<ModalBody>
<p>Date Selected: {selectedDate?.toString()}</p>
<Input
isRequired
errorMessage="Please enter a Full Name"
label="Full Name"
name="full_name"
placeholder="Enter your name"
/>
<Input
isRequired
errorMessage="Please enter a valid email"
label="Email"
name="email"
placeholder="Enter your email"
type="email"
/>
</ModalBody>
<ModalFooter>
<Button onPress={onClose}>Cancel</Button>
<Button color="primary" type="submit" variant="bordered">
Confirm
</Button>
</ModalFooter>
</>
)}
</ModalContent>
</Form>
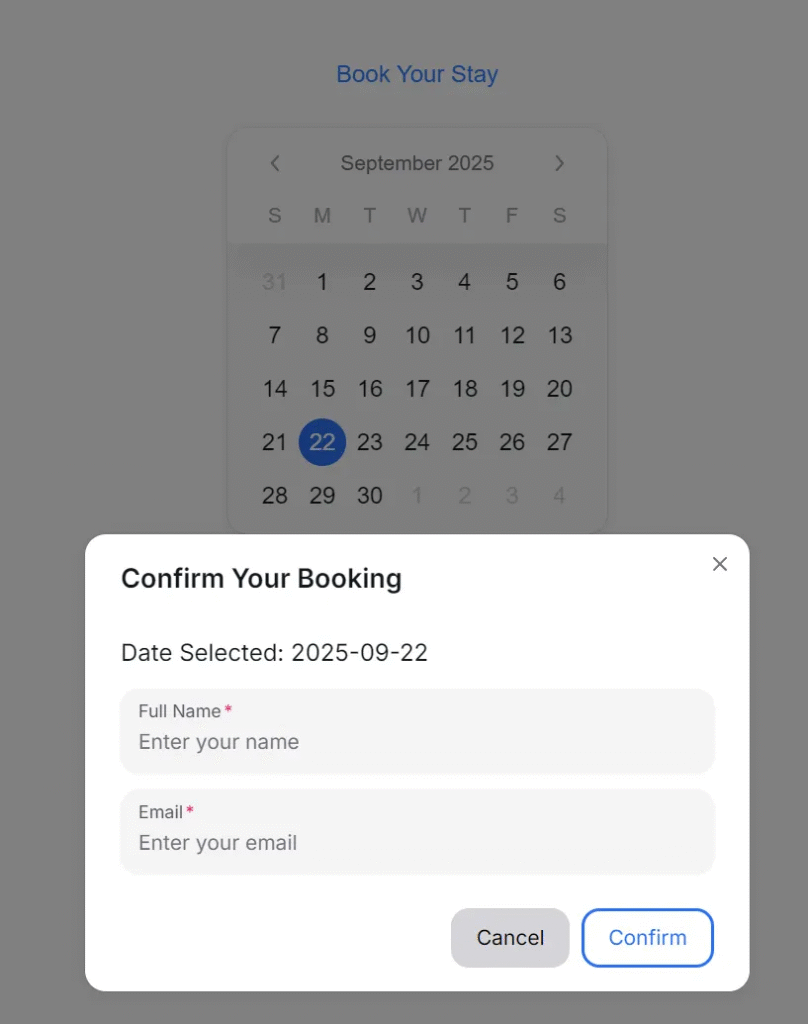
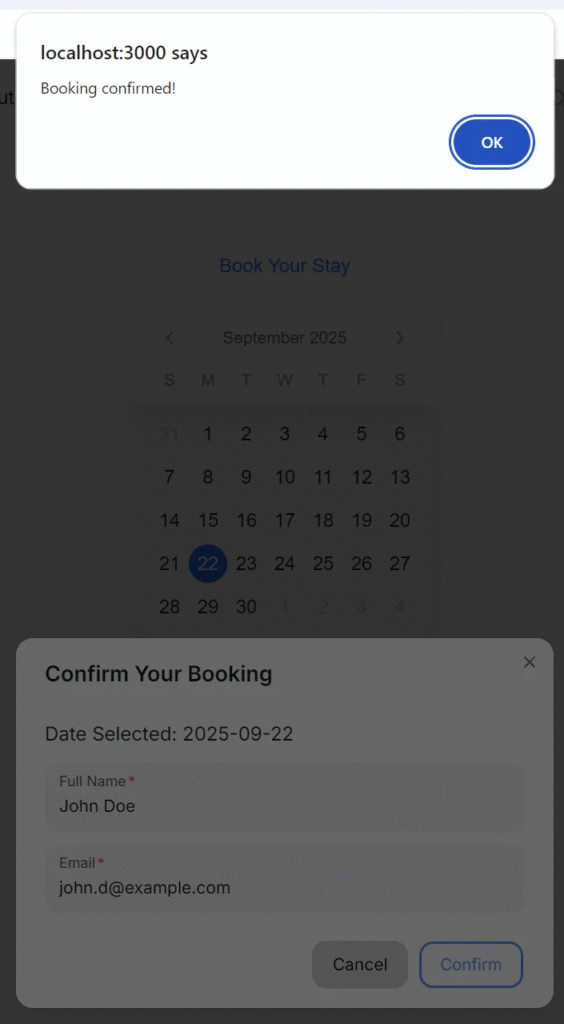
</Modal>Now the booking flow feels real. Users pick a date and enter their details. They confirm with a single click.
This interaction feels natural. People trust systems that guide them without friction. You now have the essentials of a booking interface.
Adding a Modal Dialog for User Details
The Modal serves as a personal space. It collects vital information without overwhelming users. Keeping the form short helps maintain engagement.
Best practices for booking forms:
- Ask only essential information.
- Keep inputs clear and labeled.
- Provide helpful defaults where possible.
HeroUI’s Input component makes forms accessible and elegant. Combine inputs with validations later for a stronger UX.
Imagine a hotel booking flow. The user selects dates, enters their name and email, and confirms. That’s simple. A minimal flow encourages more bookings.
This clarity reduces drop-offs and builds confidence. Modal dialogs shine in creating these experiences.
Combining Calendar and Modal into One Flow
You now have two powerful elements. Let’s make them work together seamlessly.
Final version of BookingPage:
"use client";

import { useState } from "react";
import { Calendar } from "@heroui/calendar";
import {
  Modal,
  ModalContent,
  ModalHeader,
  ModalBody,
  ModalFooter,
  Button,
  Input,
  Form,
} from "@heroui/react";
import { today, getLocalTimeZone, CalendarDate } from "@internationalized/date";

export default function BookingPage() {
  const [isOpen, setIsOpen] = useState(false);
  const [selectedDate, setSelectedDate] = useState(today(getLocalTimeZone()));

  const onSubmit = (e: any) => {
    e.preventDefault();
    alert("Booking confirmed!");
  };

  return (
    <>
      <div style={{ padding: "2rem", fontFamily: "sans-serif", color: "#333" }}>
        <h1
          style={{
            textAlign: "center",
            marginBottom: "1.5rem",
            color: "#007bff",
          }}
        >
          Book Your Stay
        </h1>
        <div
          style={{
            display: "flex",
            justifyContent: "center",
            marginBottom: "1rem",
          }}
        >
          <Calendar
            aria-label="Select booking date"
            defaultValue={selectedDate}
            onChange={(e) => setSelectedDate(e as CalendarDate)}
          />
        </div>
        <div style={{ display: "flex", justifyContent: "center" }}>
          <Button
            color="primary"
            isDisabled={!selectedDate}
            onPress={() => setIsOpen(true)}
          >
            Continue Booking
          </Button>
        </div>
      </div>

      <Modal isOpen={isOpen} onOpenChange={setIsOpen}>
        <Form className="w-full max-w-xs" onSubmit={onSubmit}>
          <ModalContent>
            {(onClose) => (
              <>
                <ModalHeader>Confirm Your Booking</ModalHeader>
                <ModalBody>
                  <p>Date Selected: {selectedDate?.toString()}</p>

                  <Input
                    isRequired
                    errorMessage="Please enter a Full Name"
                    label="Full Name"
                    name="full_name"
                    placeholder="Enter your name"
                  />
                  <Input
                    isRequired
                    errorMessage="Please enter a valid email"
                    label="Email"
                    name="email"
                    placeholder="Enter your email"
                    type="email"
                  />
                </ModalBody>
                <ModalFooter>
                  <Button onPress={onClose}>Cancel</Button>
                  <Button color="primary" type="submit" variant="bordered">
                    Confirm
                  </Button>
                </ModalFooter>
              </>
            )}
          </ModalContent>
        </Form>
      </Modal>
    </>
  );
}
This flow is simple yet powerful. Users move from calendar to form without friction. They end with confirmation, building trust.
Styling and Enhancing User Experience
A polished interface builds credibility. Styling plays a major role. HeroUI components support customization. Use props to change colors, sizes, and layouts.
Enhancements you can add:
- Highlight weekends or unavailable dates.
- Show price or availability info beside dates.
- Add animations to the modal.
For example, you can disable past dates:
import {
  today,
  getLocalTimeZone,
  CalendarDate,
  parseDate,
  isWeekend,
} from "@internationalized/date";
import { useLocale } from "@react-aria/i18n";

const [minValue] = useState(parseDate("2025-09-15"));
const [maxValue] = useState(parseDate("2025-09-30"));

let { locale } = useLocale();
let isInvalid = isWeekend(selectedDate, locale);

<Calendar
  aria-label="Select booking date"
  defaultValue={selectedDate}
  maxValue={maxValue}
  minValue={minValue}
  onChange={(e) => setSelectedDate(e as CalendarDate)}
  errorMessage={isInvalid ? "We are closed on weekends" : undefined}
  isInvalid={isInvalid}
/>
This avoids invalid inputs. Combine that with real data for availability checks.
Always prioritize clarity. Remove clutter. Use whitespace effectively. Make buttons bold and readable. These touches inspire confidence.
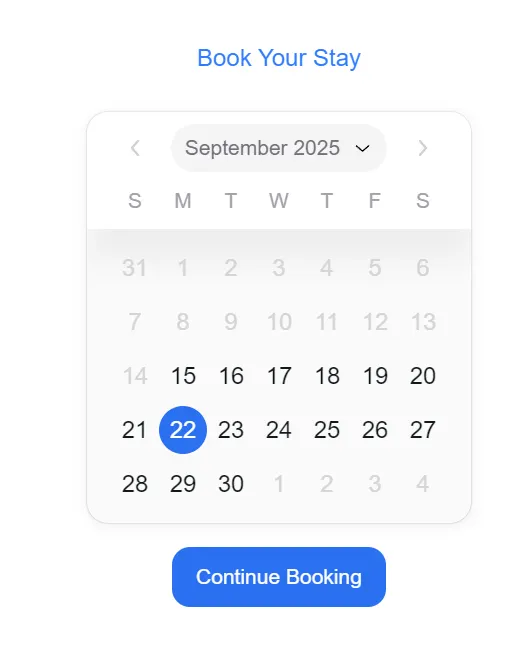
With Month And Year Picker
<Calendar
  showMonthAndYearPickers
  aria-label="Select booking date"
  defaultValue={selectedDate}
  maxValue={maxValue}
  minValue={minValue}
  onChange={(e) => setSelectedDate(e as CalendarDate)}
/>
Testing the Booking Flow
Testing ensures your booking system works for all users. Try different scenarios:
- Select today’s date.
- Select a future date.
- Submit without filling out the form.
- Cancel and retry.
Check mobile responsiveness too. HeroUI components adapt well, but test across devices.
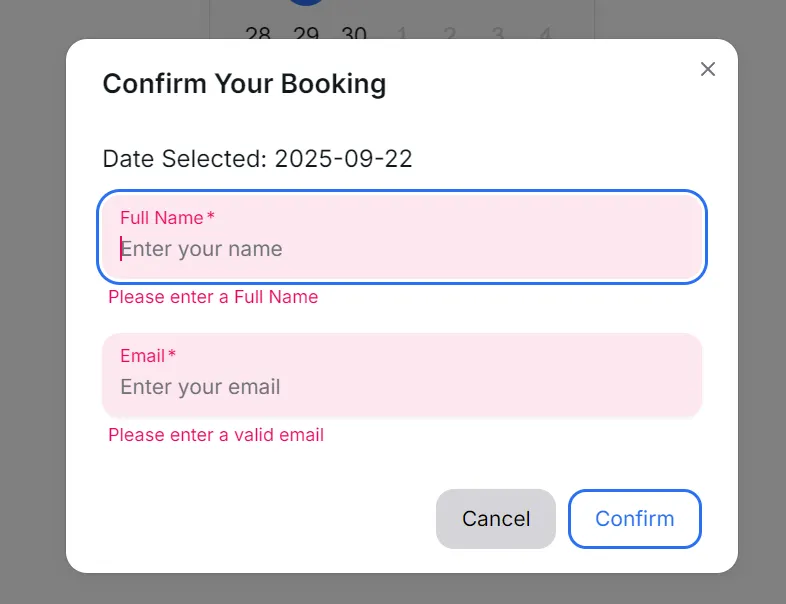
Consider adding validation. For example, ensure the email has a valid format. Prevent empty names from being submitted. Simple checks improve trust in your system.
Use tools like React Testing Library or Playwright for automated tests. They help you catch issues early. A reliable booking flow leads to satisfied users and higher conversions.
Launch application
http://localhost:3000/booking

Sending Booking Data to an API with Next.js App Route
A real booking system must save data somewhere. You can send form details to an API for storage or further processing. Next.js App Routes make this seamless.
First, create a new file in your project:
app/api/bookings/route.ts
import { NextResponse } from "next/server";

export async function POST(request: Request) {
  try {
    const data = await request.json();

    // Here you could save data to a database
    console.log("Booking received:", data);

    return NextResponse.json(
      { message: "Booking confirmed!", booking: data },
      { status: 200 }
    );
  } catch (error) {
    return NextResponse.json(
      { message: "Error processing booking." },
      { status: 500 },
    );
  }
}
This API listens for POST requests. It parses the booking data and responds with a confirmation message.
Next, update the booking confirmation handler in your BookingPage:
const onSubmit = async (e: any) => {
  e.preventDefault();
  const formData = new FormData(e.currentTarget);
  const formDataObject = Object.fromEntries(formData.entries());

  const response = await fetch("/api/bookings", {
    method: "POST",
    headers: { "Content-Type": "application/json" },
    body: JSON.stringify({
      date: selectedDate,
      ...formDataObject,
    }),
  });

  if (response.ok) {
    const result = await response.json();
    alert(result.message);
    setIsOpen(false);
  } else {
    alert("Booking failed. Please try again.");
  }
};
Now your booking system sends real data to the backend. You can later connect this to a database like PostgreSQL or MongoDB.
This addition transforms your app from a prototype into a working solution. Users feel more confident knowing their bookings are appropriately handled.
In console
Booking received: {
  date: {
    calendar: { identifier: 'gregory' },
    era: 'AD',
    year: 2025,
    month: 9,
    day: 22
  },
  full_name: 'John Doe',
  email: '[email protected]'
}
Considering an Alternative: Date Range Picker
Not every booking flow needs a single date. Hotels, vacation rentals, and coworking spaces often require start and end dates. In these cases, a Date Range Picker is a better choice than a single calendar.
HeroUI offers components that support range selection. They allow users to pick a check-in and check-out date in one step. This creates a more natural flow for multi-day bookings. It also reduces clicks, making the process faster and less prone to errors.
You should consider using a Date Range Picker if:
- Your booking involves stays longer than one day.
- Users often need to select consecutive days.
- You want to simplify the interface for multi-day reservations.
For appointments that last only a few hours, the single-date Calendar works best. For extended stays, the Date Range Picker shines.
Keep this in mind when designing your booking system. The right component aligns with your users’ needs and ensures a smoother experience.
Finally
You just built a booking system using HeroUI Calendar and Modal. The journey started with setting up Next.js. You explored HeroUI’s components. You combined them into a seamless flow.
The result is powerful. Users can select a date, confirm details, and feel secure. The interface feels modern, clean, and efficient.
But this is only the beginning. You can extend it further. Add time slots, payments, or integration with external APIs. Use HeroUI’s ecosystem to expand your vision.
Every great product starts with one step. You now hold the tools and knowledge to craft delightful booking experiences. Use them to inspire trust, grow your business, and create impact.
Keep building. Keep inspiring. The future of your booking system is in your hands.
This article was originally published on Medium.