
Every successful hotel or appointment-based business thrives on trust and convenience. Customers expect clarity, speed, and flexibility when booking online. A clunky interface can frustrate them, while a sleek design can inspire confidence and loyalty.
This is where a modern booking system makes all the difference. By combining Next.js, TypeScript, and HeroUI, you can deliver a seamless booking flow that feels polished and intuitive. HeroUI provides powerful components like RangeCalendar and modals, helping you design with speed and precision.
This tutorial will guide you through building a functional UI for a booking system. You will learn how to implement a date range picker for reservations, open modals for user details, and integrate everything with TypeScript for strong reliability.
By the end, you will not only have a working booking interface but also the confidence to expand it into a real-world product. Let’s begin the journey.
Setting Up Next.js with HeroUI

Creating the Calendar with RangeCalendar
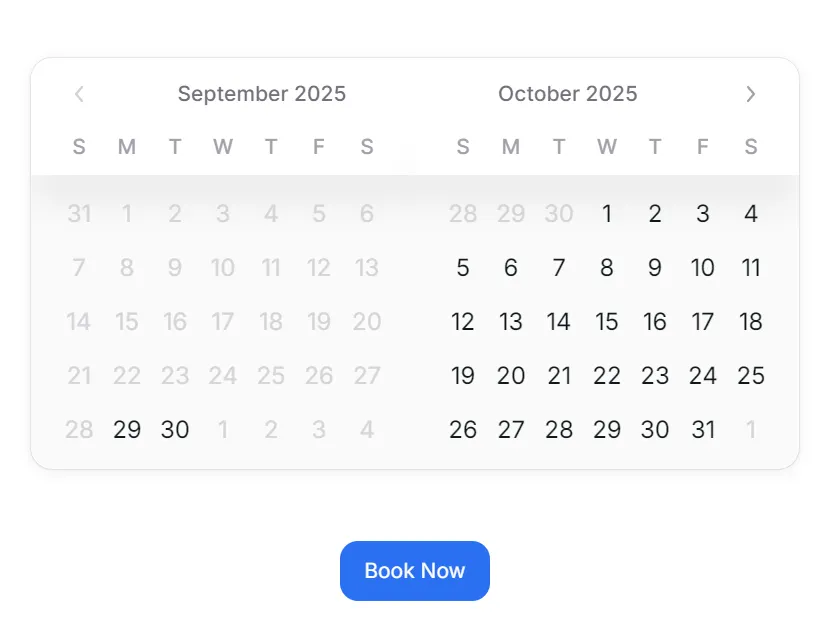
The heart of any booking system is the calendar. Guests want to quickly select their check-in and check-out dates. HeroUI provides the RangeCalendar component, which allows users to select date ranges intuitively.
Here’s how to add it:
// /components/calendar/BookingCalendar.tsx
"use client";
import { useState } from "react";
import { RangeCalendar } from "@heroui/calendar";
import { today, getLocalTimeZone, DateValue } from "@internationalized/date";
export default function BookingCalendar() {
const [value, setValue] = useState<{
start: DateValue;
end: DateValue;
} | null>(null);
return (
<div className="flex justify-center p-6">
<RangeCalendar
aria-label="Book your stay"
value={value}
onChange={setValue}
visibleMonths={2}
minValue={today(getLocalTimeZone())}
/>
</div>
);
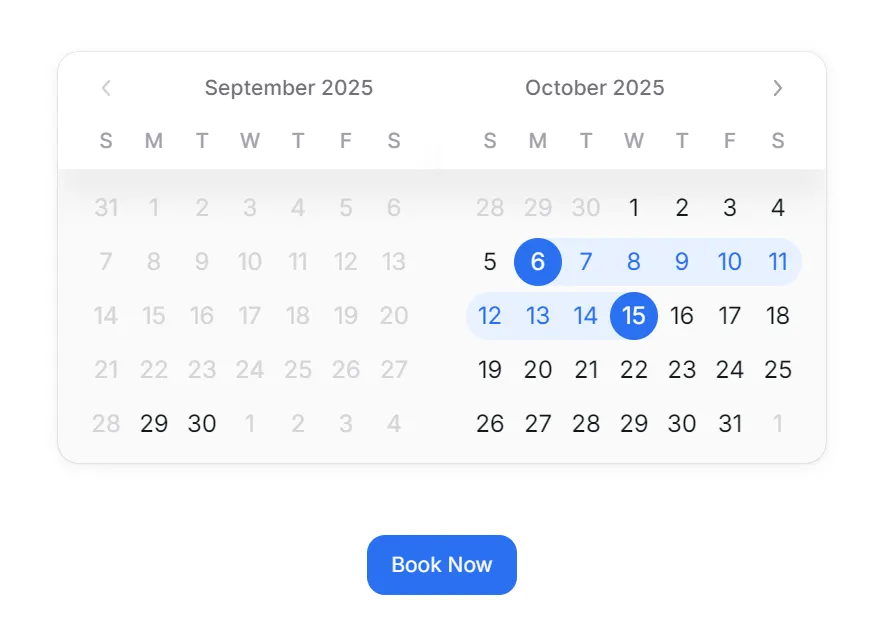
}This code sets up a two-month calendar that prevents users from selecting dates that are past the current month. Users can drag across days to select a range. The value state holds the chosen check-in and check-out dates.
With just a few lines, you already have a professional-looking date selector ready to inspire trust in customers. But booking isn’t complete until we collect details — and that’s where modals come in.
Adding the Modal for Booking Details
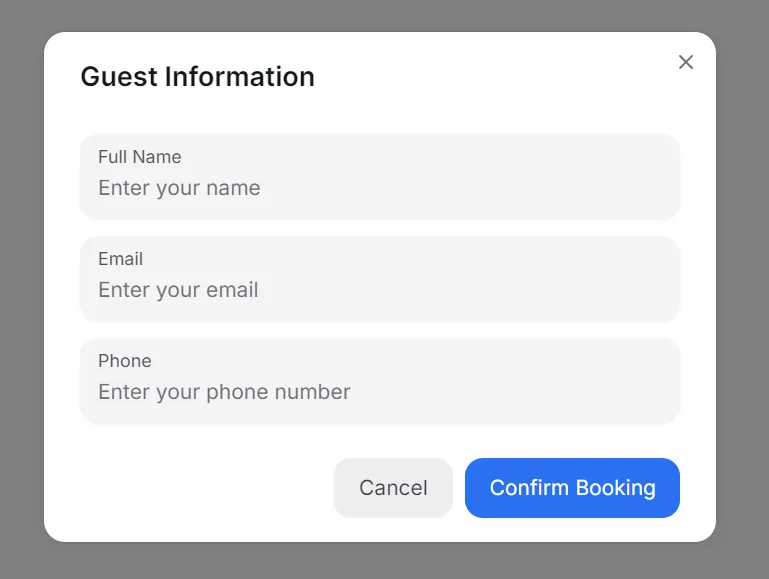
A booking flow must gather guest information. Instead of redirecting users to another page, use a modal dialog. Modals keep the process smooth and focused, reducing distractions.
HeroUI’s modal component is elegant and customizable. Here’s a setup:
// /components/calendar/BookingModal.tsx

import {
  Modal,
  ModalContent,
  ModalHeader,
  ModalBody,
  ModalFooter,
  Button,
  Input,
} from "@heroui/react";
import { useState } from "react";

export default function BookingModal() {
  const [isOpen, setIsOpen] = useState(false);

  return (
    <>
      <Button onPress={() => setIsOpen(true)}>Book Now</Button>
      <Modal isOpen={isOpen} onOpenChange={setIsOpen}>
        <ModalContent>
          {(onClose) => (
            <>
              <ModalHeader className="flex flex-col gap-1">
                Guest Information
              </ModalHeader>
              <ModalBody>
                <Input label="Full Name" placeholder="Enter your name" />
                <Input label="Email" placeholder="Enter your email" type="email" />
                <Input label="Phone" placeholder="Enter your phone number" />
              </ModalBody>
              <ModalFooter>
                <Button variant="flat" onPress={onClose}>Cancel</Button>
                <Button color="primary" onPress={onClose}>Confirm Booking</Button>
              </ModalFooter>
            </>
          )}
        </ModalContent>
      </Modal>
    </>
  );
}
This modal opens with a button click and provides input fields for essential details. Users can easily cancel or confirm their booking.
By using this approach, you maintain streamlined interactions while projecting a professional image.
Connecting Calendar and Modal
A powerful booking system connects date selection with guest details. When users choose dates, they should seamlessly move to the booking modal.
Here’s how to integrate them:
// /app/range_booking/page.tsx
"use client";

import { Button } from "@heroui/react";

import BookingCalendar from "../../components/calendar/BookingCalendar";
import BookingModal from "../../components/calendar/BookingModal";

export default function BookingSystem() {
  return (
    <div className="flex flex-col items-center gap-6 p-6">
      <BookingCalendar />
      <Button color="primary">Continue</Button>

      <BookingModal />
    </div>
  );
}
This integration ensures that the selected dates are displayed in the modal, giving users confidence that their input is accurate. The experience feels natural and professional.
Launch an application
npm run dev
http://localhost:3000/range_booking
Managing State with TypeScript
TypeScript brings reliability to your booking system. With strong typing, you avoid runtime errors and provide guidance for future developers.
For example, you can define a booking type:
type Booking = {
  start: DateValue;
  end: DateValue;
  guest: {
    name: string;
    email: string;
    phone?: string;
    optional? string;
  };
};
Then use it in your state management:
const [booking, setBooking] = useState<Booking | null>(null);
When a user confirms their booking, you can update the state safely:
setBooking({
  start: value!.start,
  end: value!.end,
  guest: { name, email, phone, optional},
});
By defining clear types, you reduce bugs and boost confidence. TypeScript ensures your UI remains scalable as you add features.
Practical Hotel Booking Example
Imagine you’re building a hotel booking system. Guests visit your site, choose their stay dates, and provide details in seconds.
Here’s how you can extend the modal:
<ModalBody>
  <p>
    Stay from {value?.start.toString()} to {value?.end.toString()}.
  </p>
  <Input label="Full Name" placeholder="Enter your name" />
  <Input label="Email" placeholder="Enter your email" type="email" />
  <Input label="Phone" placeholder="Enter your phone number" />
  <Input label="Special Requests" placeholder="Optional" />
</ModalBody>
Adding a special requests field makes the experience feel personal. Guests can share preferences, such as late check-in or dietary needs.
Hotels thrive on personalization, and this booking flow makes it easy to deliver personalized experiences. With minimal code, you create a system that delights both guests and staff.
Disabling Unavailable Dates with JSON Data
In real-world booking systems, certain dates are unavailable. Hotels may already be fully booked, or service providers may have days off. To handle this, HeroUI’s RangeCalendar provides the isDateUnavailable function.
You can easily connect this function with JSON data. Let’s say your backend provides unavailable dates as an array:
{
  "unavailableDates": [
    "2025-10-02",
    "2025-10-05",
    "2025-10-09"
  ]
}
You can load this JSON into your component and block those days in the calendar.
"use client";

import { useState } from "react";
import { RangeCalendar } from "@heroui/calendar";
import {
  today,
  getLocalTimeZone,
  DateValue,
  parseDate,
} from "@internationalized/date";

const unavailableData = {
  unavailableDates: ["2025-10-02", "2025-10-05", "2025-10-09"],
};

export default function BookingCalendar() {
  const [value, setValue] = useState<{
    start: DateValue;
    end: DateValue;
  } | null>(null);

  // Convert JSON into date objects
  const unavailableDates = unavailableData.unavailableDates.map((d) =>
    parseDate(d)
  );

  return (
    <div className="flex justify-center p-6">
      <RangeCalendar
        aria-label="Book your stay"
        isDateUnavailable={(date) =>
          unavailableDates.some((unavailableDateObject) => {
            return date.compare(unavailableDateObject) === 0;
          })
        }
        minValue={today(getLocalTimeZone())}
        value={value}
        visibleMonths={2}
        onChange={setValue}
      />
    </div>
  );
}
Here’s what happens step by step:
- You fetch or load unavailable dates from JSON.
- You convert them into
DateValueobjects withparseDate. - You pass a function to
isDateUnavailablethat checks if the current date matches one in the list.
The result? Blocked dates appear disabled on the calendar, and users cannot select them.
This approach keeps your UI in sync with backend availability, ensuring a professional and trustworthy booking flow.
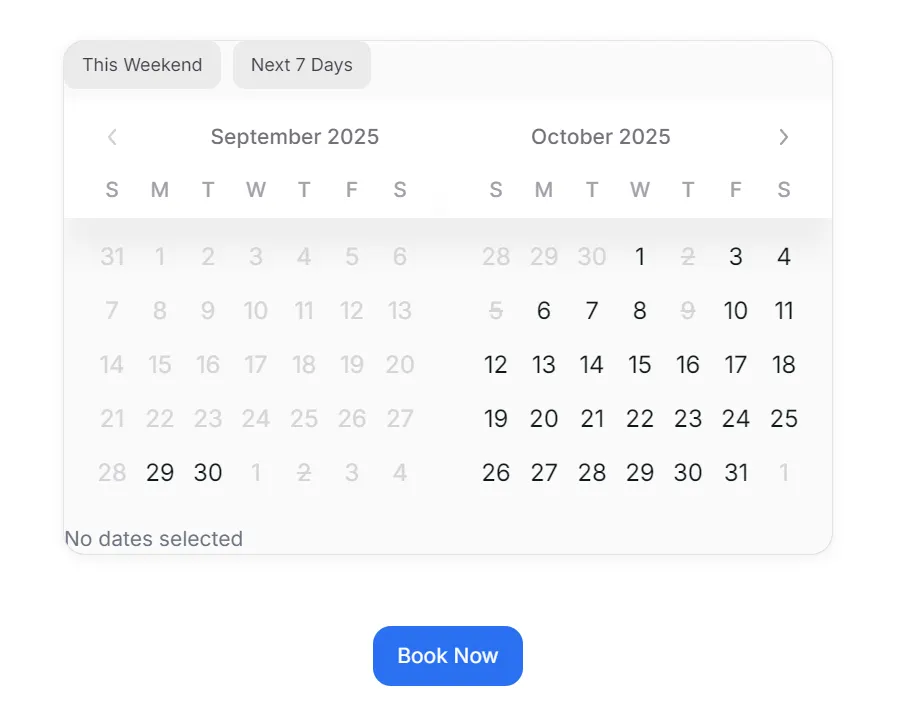
Adding Presets with topContent and bottomContent
Sometimes, users want quick options without having to click through the calendar. That’s where presets shine. You can place preset buttons above or below the calendar using topContent and bottomContent.
Imagine you want to let guests quickly pick This Weekend or Next 7 Days. Here’s how:
"use client";

import { useState } from "react";
import { RangeCalendar } from "@heroui/calendar";
import {
  today,
  getLocalTimeZone,
  DateValue,
  parseDate,
  startOfWeek,
  endOfWeek,
} from "@internationalized/date";
import { Button } from "@heroui/button";

const unavailableData = {
  unavailableDates: ["2025-10-02", "2025-10-05", "2025-10-09"],
};

export default function BookingCalendar() {
  const [value, setValue] = useState<{
    start: DateValue;
    end: DateValue;
  } | null>(null);

  const now = today(getLocalTimeZone());

  // Preset helpers
  const setWeekend = () => {
    const start = startOfWeek(now.add({ weeks: 0 }), "en-US");
    const end = endOfWeek(now.add({ weeks: 0 }), "en-US");

    setValue({ start, end });
  };

  const setNext7Days = () => {
    const start = now;
    const end = now.add({ days: 7 });

    setValue({ start, end });
  };

  // Convert JSON into date objects
  const unavailableDates = unavailableData.unavailableDates.map((d) =>
    parseDate(d)
  );

  const isRangeInvalid = (range: {
    start: DateValue;
    end: DateValue;
  }): boolean => {
    if (!range.start || !range.end) {
      return false;
    }

    const unavailableDatesSet = new Set(
      unavailableData.unavailableDates.map((dateStr) =>
        parseDate(dateStr).toString()
      )
    );

    let currentDate = range.start;

    while (currentDate.compare(range.end) <= 0) {
      if (unavailableDatesSet.has(currentDate.toString())) {
        return true; // Found an unavailable date!
      }

      currentDate = currentDate.add({ days: 1 });
    }

    return false;
  };

  const invalidRangeSelected = value ? isRangeInvalid(value) : false;

  return (
    <div className="flex justify-center p-6">
      <RangeCalendar
        aria-label="Book your stay"
        bottomContent={
          <div className="mt-2 text-sm text-gray-500">
            {value
              ? `Selected: ${value.start.toString()} → ${value.end.toString()}`
              : "No dates selected"}
          </div>
        }
        isDateUnavailable={(date) =>
          unavailableDates.some((unavailableDateObject) => {
            return date.compare(unavailableDateObject) === 0;
          })
        }
        isInvalid={invalidRangeSelected}
        minValue={today(getLocalTimeZone())}
        topContent={
          <div className="flex gap-2 mb-2">
            <Button size="sm" variant="flat" onPress={setWeekend}>
              This Weekend
            </Button>
            <Button size="sm" variant="flat" onPress={setNext7Days}>
              Next 7 Days
            </Button>
          </div>
        }
        value={value}
        visibleMonths={2}
        onChange={setValue}
      />
    </div>
  );
}
What happens here:
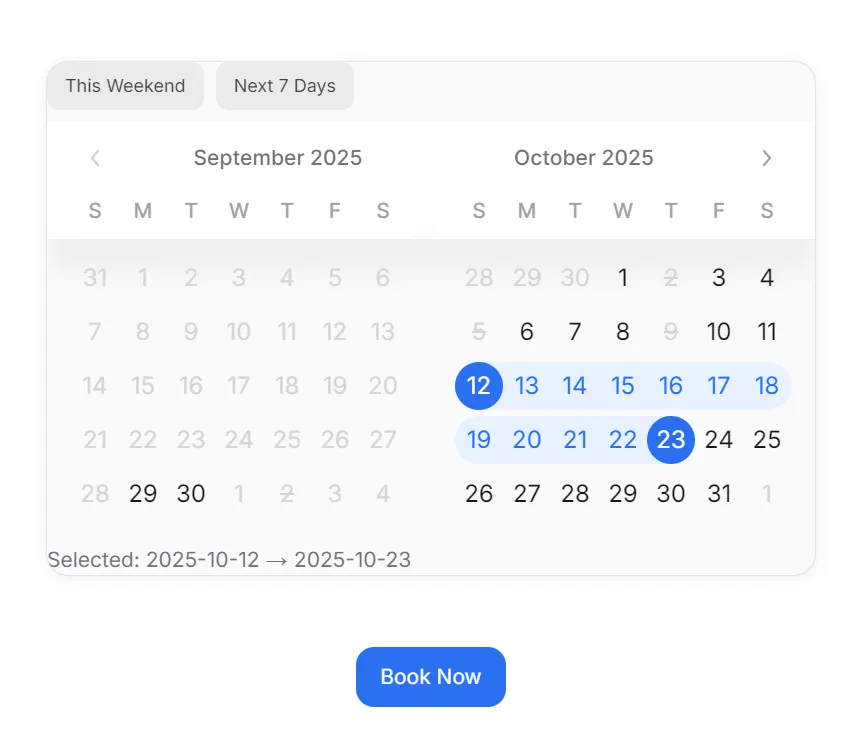
topContent: Adds preset buttons above the calendar. Clicking them updates the date range automatically.bottomContent: Displays a live summary of the selected dates, reinforcing user confidence.
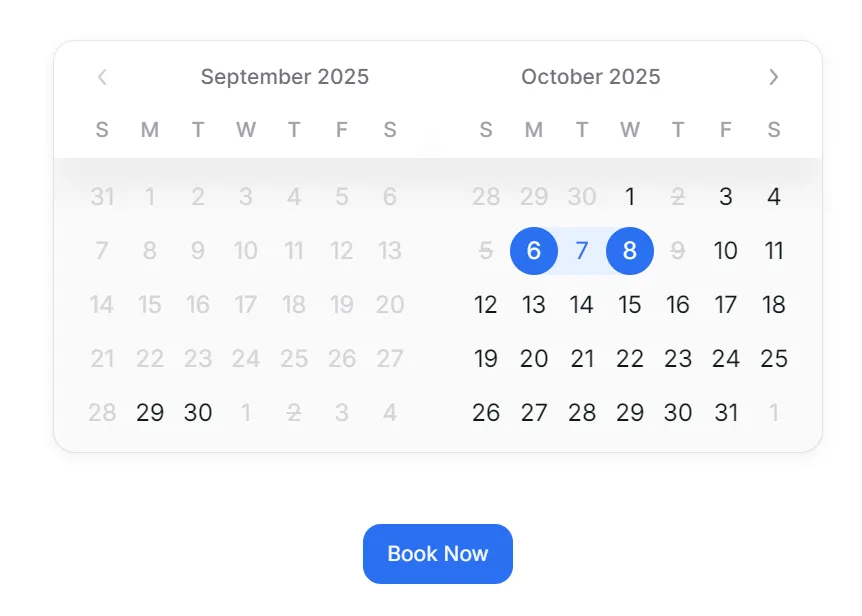
This combination improves usability. Instead of clicking multiple times, users can book faster with a single click. It also adds clarity, showing exactly what’s been selected.
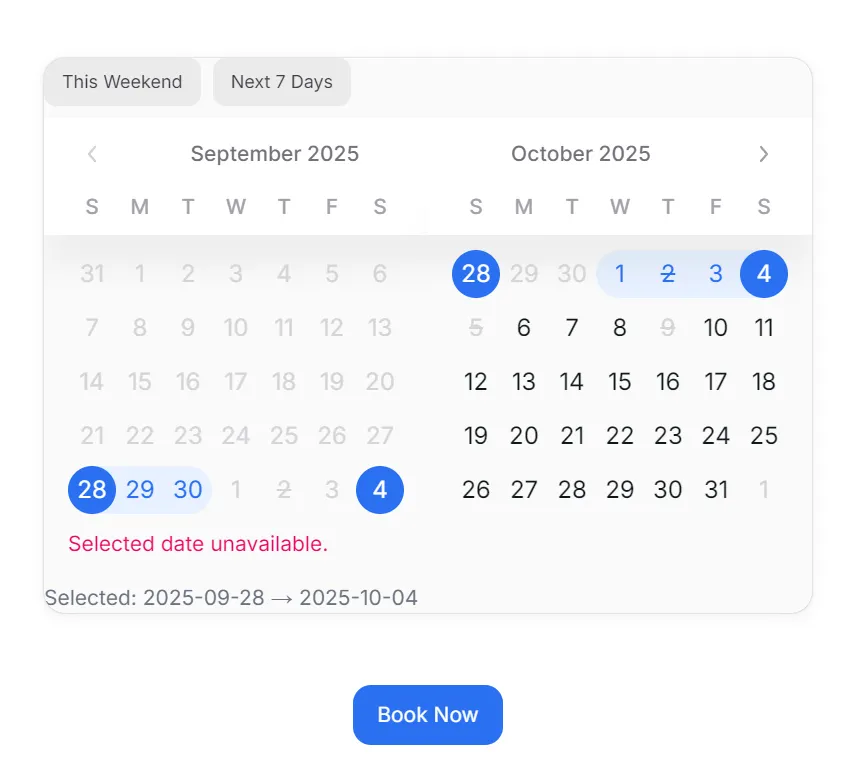
The user clicked on the weekend button, but the day overlaps with an unavailable date. The calendar component shows an error message.
Finally
You’ve now seen how to build a modern booking system with HeroUI, Next.js, and TypeScript. From setting up the calendar to connecting a modal, each step created a smoother, more persuasive experience for users.
The beauty of this approach lies in its adaptability. With minor tweaks, the same system can be applied to hotels, clinics, salons, or event planners. You inspire trust by offering clarity, efficiency, and a stylish approach.
Remember: every booking is a decision. When users feel confident, they choose you. By using HeroUI’s polished components, you reduce friction and elevate your brand.
Now it’s your turn. Open your editor, install HeroUI, and craft the booking experience your customers deserve. Let this tutorial be the first step toward a product that not only works but also inspires.
This article was originally published on Medium.